DIY PV Installation Starts With Safe Planning
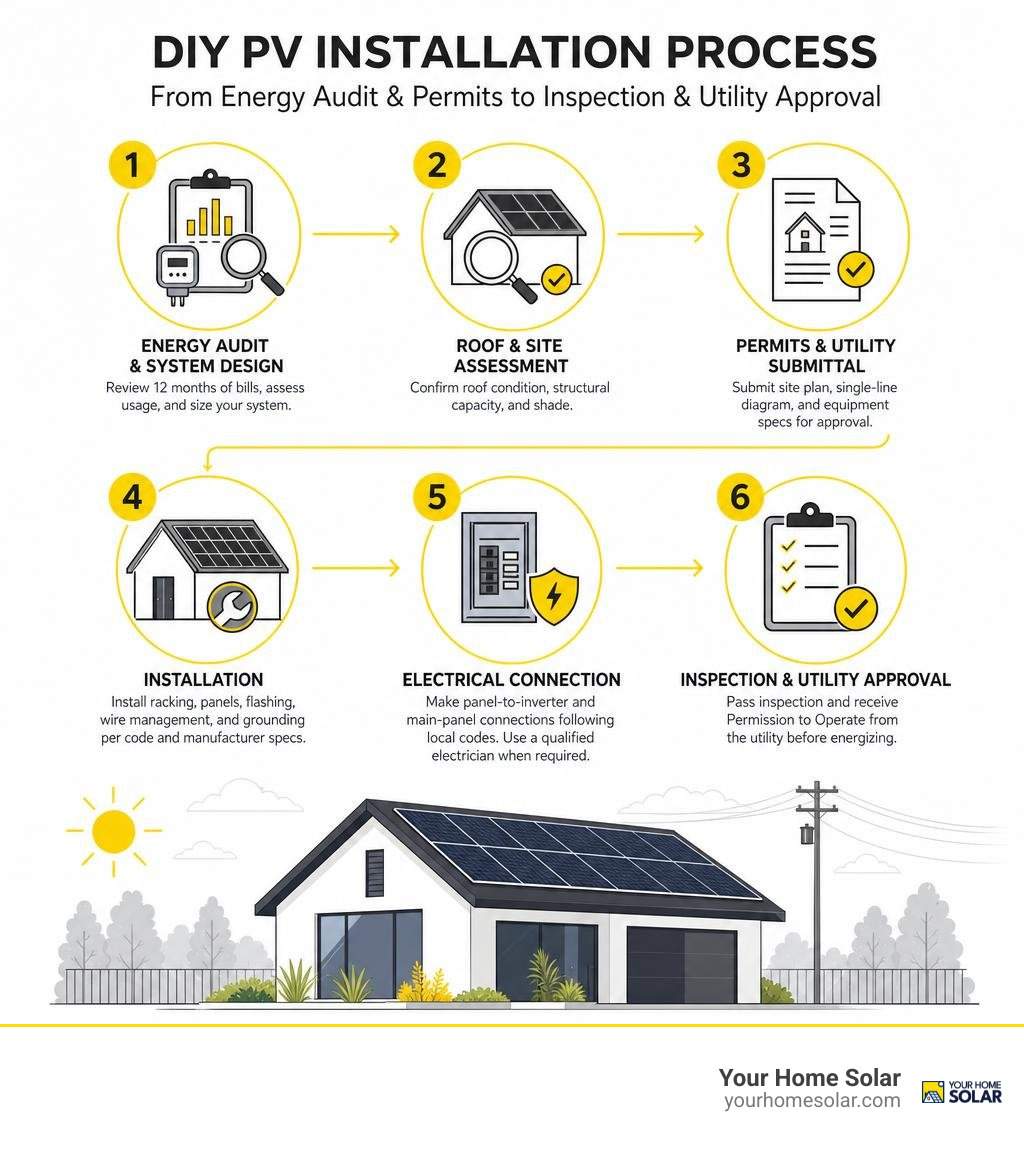
A DIY PV installation can lower your solar cost, but only if you plan the system before buying equipment or stepping onto the roof. Start by checking your annual electricity use, roof condition and shade; choose code-listed panels, inverter, and racking that work together; then get permits and utility approval before installation.
For most homeowners, the safest path is:
- Size the system with 12 months of utility bills and local solar-production data.
- Confirm the roof can handle the added load and has years of life left.
- Submit a site plan, single-line electrical diagram, and equipment specifications to the local building department and utility.
- Install racking with proper flashing, grounding, and manufacturer-specified torque.
- Have a qualified electrician handle the main-panel connection when local rules, system voltage, or your experience level calls for it.
- Pass inspection and receive utility Permission to Operate before energizing a grid-connected system.
DIY can reduce total project costs substantially by removing some labor and contractor overhead. But the hidden costs can include permits, engineering, tool rentals, roof repairs, electrical upgrades, shipping, and the time required to correct an inspection failure. A roof fall, damaged shingles, or a DC wiring error can erase savings quickly.
This guide focuses on a practical middle ground: do the planning and mechanical work only when you can do it safely, and bring in licensed help for high-risk electrical or structural work. That approach can still support lower bills and more outage resilience without treating a rooftop electrical system like a weekend experiment.
I am Ernie Bussell, founder and CEO of Your Home Solar, with solar operations experience and a career shaped by strict quality-control and safety processes. I will walk you through DIY PV installation decisions with the same focus on clear planning, code compliance, and doing the job right the first time.
Diy pv installation word list:
Preparing for a DIY PV Installation: Costs, Codes, and Equipment
Taking on a solar installation yourself can cut total installation costs by 40% to 60%. In professional builds, labor accounts for roughly 7% of total costs, while operational overhead, administrative permitting staff, marketing, and company margins make up around 20%. By taking on these roles, you eliminate third-party labor and soft expenses.
At the 1–5 kW scale, self-installers often complete projects for $0.80 to $1.50 per watt installed, compared to $2.50 to $3.30 per watt for turnkey contractor solutions. For an 8 kW system, a DIY project generally ranges from $6,500 to $10,700 before local incentives, whereas a turnkey installation typically runs between $13,500 and $24,700.
Because the federal Residential Clean Energy Credit (Section 25D) expired on December 31, 2025, maximizing baseline installation efficiency is more important than ever in 2026.
| Expense Category | Turnkey Professional (8 kW) | DIY Self-Installed (8 kW) |
|---|---|---|
| Tier-1 Monocrystalline Modules | $4,500 – $6,000 | $3,600 – $4,800 (Pallet pricing) |
| Inverters (Micro or Hybrid String) | $2,200 – $3,500 | $1,800 – $2,800 |
| Racking Hardware & Flashing | $1,200 – $1,800 | $900 – $1,400 |
| Balance of Systems (BOS Wire/Conduit) | $800 – $1,400 | $600 – $1,000 |
| Engineering & Permitting Fees | Included in contract | $400 – $1,000 |
| Installation Labor & Overhead | $7,000 – $12,000 | $0 (Homeowner sweat equity) |
| Estimated Total Outlay | $15,700 – $24,700 | $7,300 – $11,000 |
Cost calculations must account for hidden project expenses:
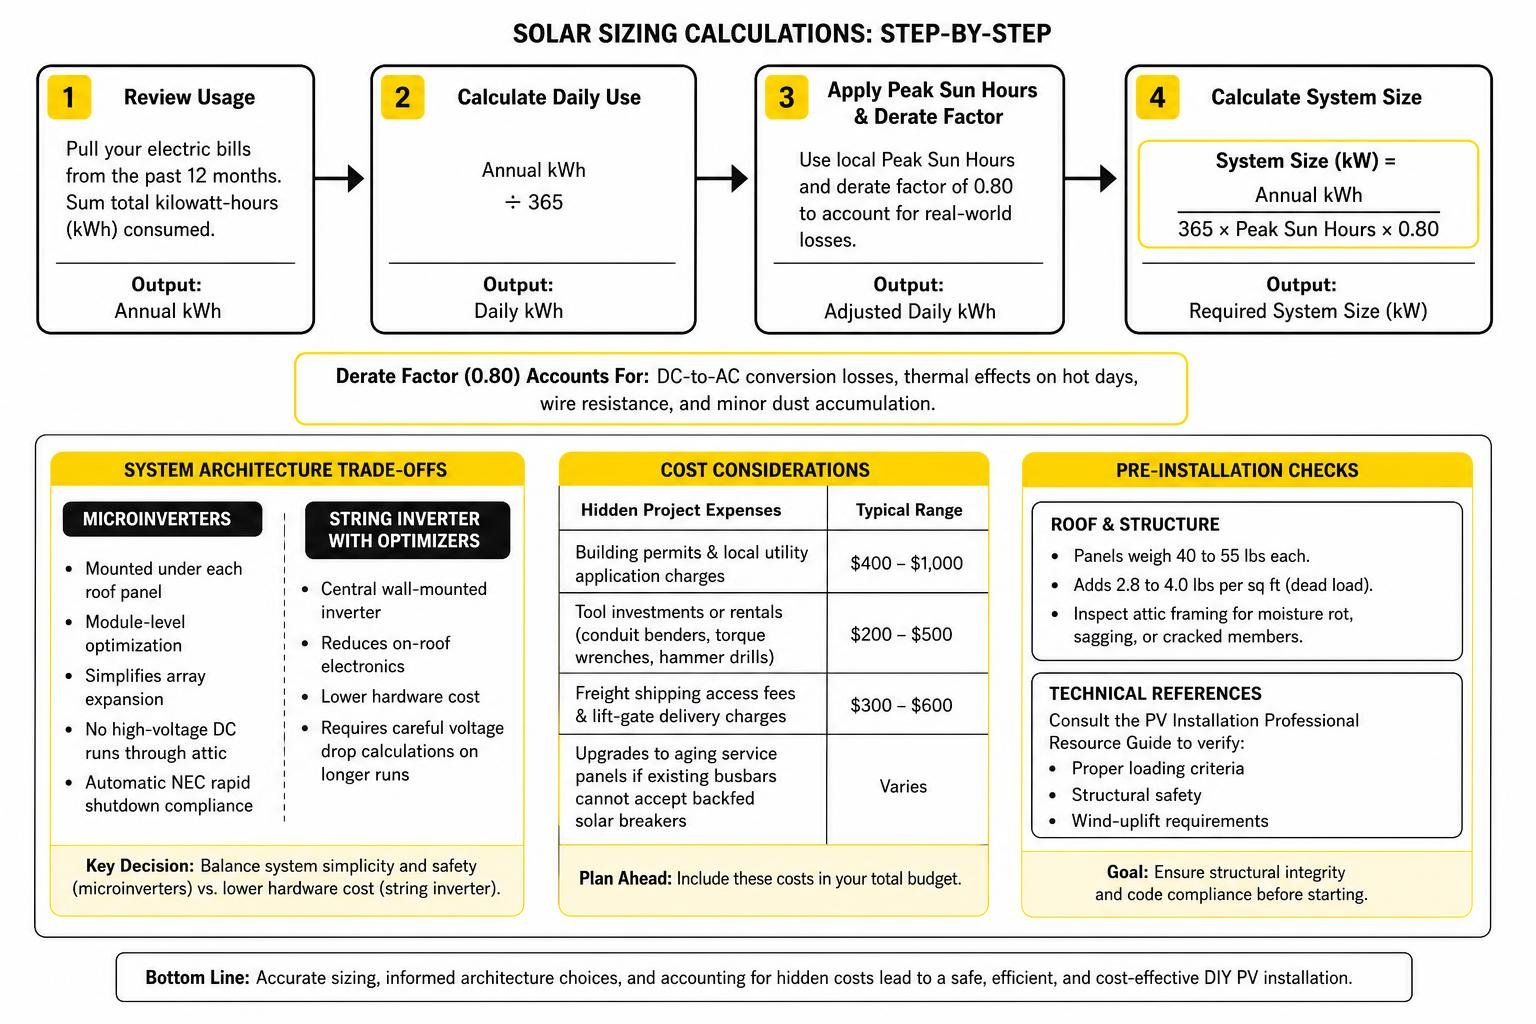
- Building permit fees and local utility application charges ($400–$1,000).
- Tool investments or rental fees for conduit benders, torque wrenches, and hammer drills ($200–$500).
- Freight shipping access fees and lift-gate delivery charges for heavy residential equipment pallets ($300–$600).
- Upgrades to aging service panels if existing busbars cannot accept backfed solar breakers.
Before ordering hardware, evaluate your roof structure. Standard solar panels weigh 40 to 55 pounds each, contributing an added dead load of 2.8 to 4.0 pounds per square foot. Inspect your attic framing to ensure rafters and trusses show no signs of past moisture rot, sagging, or cracked structural members.
Consult the technical references in the PV Installation Professional Resource Guide to verify proper loading criteria, structural safety, and wind-uplift requirements before starting your build.
Sizing the Array and Choosing System Architecture
Accurate sizing prevents costly overbuilding or disappointing energy shortages. To determine your capacity target, pull your electric bills from the past 12 months, sum the total kilowatt-hours (kWh) consumed, and calculate your daily consumption.
$$\text{System Size (kW)} = \frac{\text{Annual kWh}}{365 \times \text{Peak Sun Hours} \times 0.80}$$
The 0.80 derate factor accounts for real-world environmental elements: DC-to-AC conversion losses, thermal coefficients on hot summer days, wire resistance, and minor dust accumulation.
When selecting components, careful work during designing your own solar panel system helps prevent electrical mismatches.
Choosing an inverter architecture comes down to balancing system simplicity against hardware cost:
- Microinverters: Mounted directly under each roof panel, microinverters convert DC to AC at the module level. They offer module-level optimization, simplify array expansion, avoid high-voltage DC runs through your attic, and automatically comply with NEC rapid shutdown requirements.
- String Inverters with Optimizers: A central wall-mounted inverter handles power conversion for the entire string. This reduces on-roof electronics, though careful voltage drop calculations are required for longer runs.
- Hybrid Inverters: These manage solar inputs and direct DC energy storage simultaneously, streamlining future battery additions without requiring separate AC-coupled storage units.
For a deeper dive into conversion efficiencies and inverter topologies, read our detailed breakdown on selecting residential solar inverters.
Essential Safety Gear and Tools for DIY PV Installation
Working on rooftops with live electrical hardware requires proper tools and personal protective equipment.

Required Safety Gear (Non-Negotiable):
- OSHA-compliant full-body fall-arrest harness, lanyard, roof ridge anchor, and 50-foot vertical lifeline.
- 1,000V-rated insulated screwdrivers and lineman pliers.
- CAT-III/CAT-IV 600V digital multimeter with calibrated leads.
- UV-blocking safety glasses, heavy-duty mechanical work gloves, and steel-toe work boots with non-slip soles.
Specialized Mechanical and Electrical Tools:
- Calibrated inch-pound torque wrench (50–250 in-lb range) and foot-pound torque wrench.
- Dedicated MC4 wire crimpers and pin-release disconnect tools.
- Deep-socket sets, impact driver, high-torque cordless drill, and carbide-tipped bits.
- Chalk reel line, stud finder, and roofers pry bar.
- EMT conduit bender, fish tape, and step drill bits (Uni-bits).
Review our safety protocols in the step-by-step DIY solar power guide to prepare your staging area before bringing equipment on-site.
Step-by-Step Mechanical and Rooftop Setup
A durable installation requires clean mechanical alignment. Structural mounts must land securely into the center of the underlying framing, not just the roof sheathing.
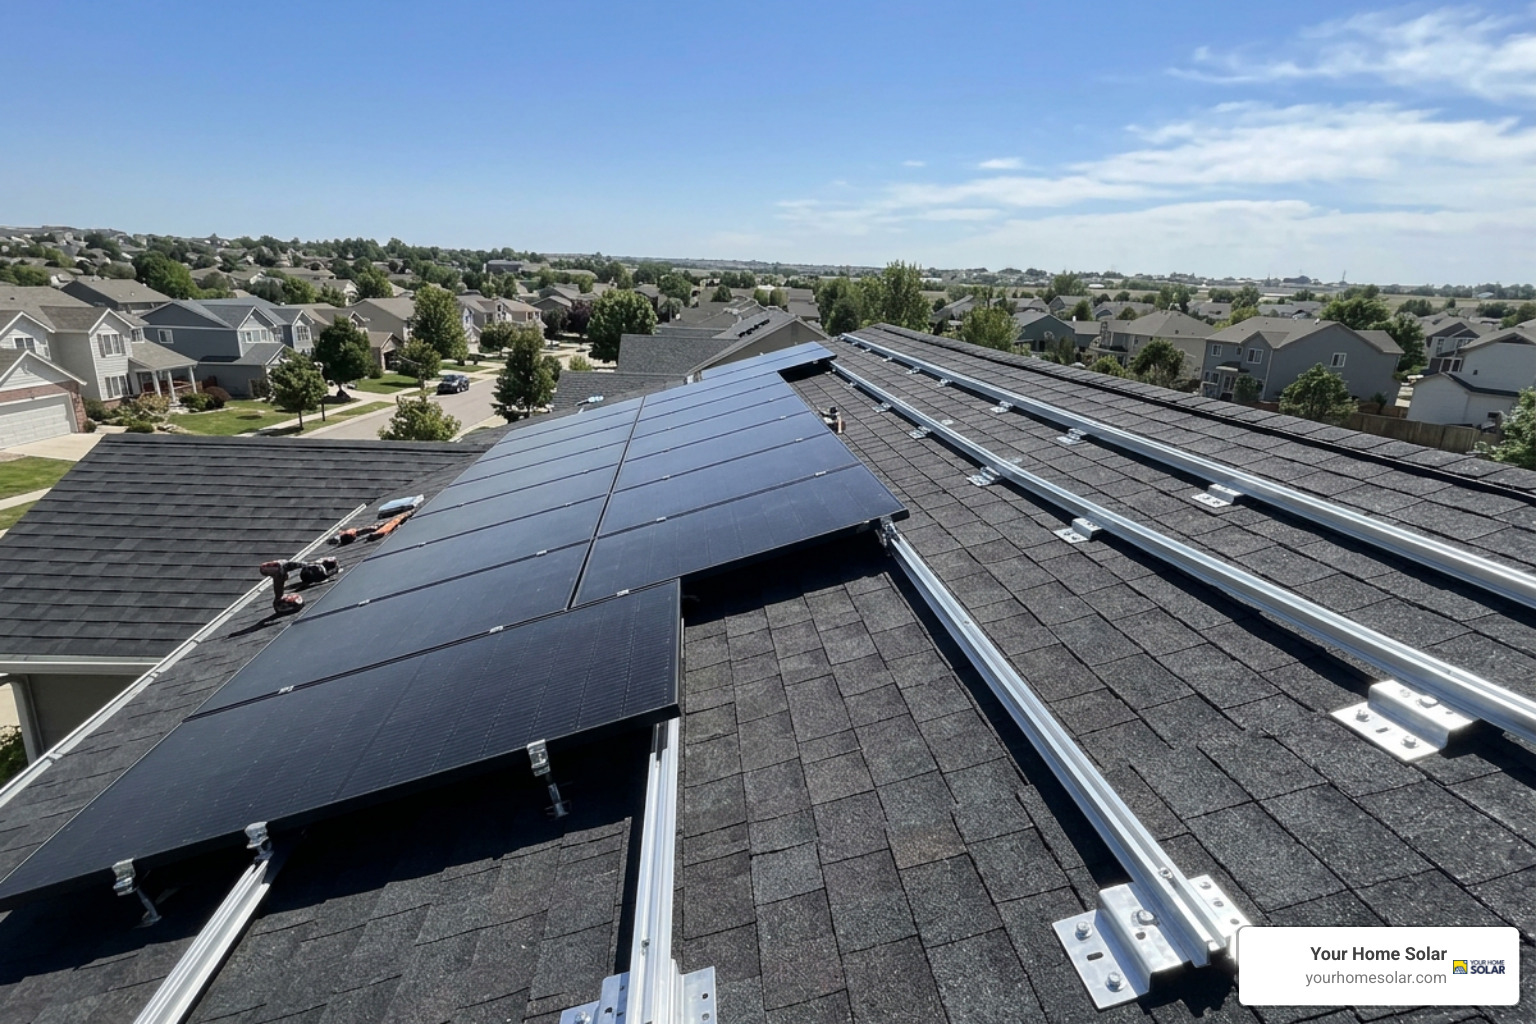
Begin by measuring roof setbacks from the ridges, valleys, and eaves (typically 36 inches under local fire codes for walking pathways). Snap bold chalk lines across your roof face to establish straight mounting planes. Use an electronic stud finder from the roof, or measure rafter spacing from inside the attic, to locate and mark rafter centers along your chalk lines.
Drill pilot holes into the marked rafters to verify solid lumber contact. Fill pilot penetrations with structural polyurethane roofing sealant before securing your mounts.
Mechanical Racking and Mounting: The DIY PV Installation Foundation
Install metal flashing plates underneath the upper shingle course so water flows off smoothly. Modern flashing assemblies feature raised waterproofing collars or integrated EPDM rubber grommets that compress when driven down.
Fasten heavy-duty structural lag screws through the L-foot bracket and flashing plate into the rafter core, torquing to manufacturer specifications (typically 120–160 in-lb). Mount your aluminum support rails to the L-feet using stainless hardware. Splice rail sections using manufacturer-supplied internal bonding expansion splices, leaving a 0.5-inch expansion gap every 40 feet of continuous run to accommodate thermal contraction and expansion across seasonal temperature shifts.
Before hoisting modules, review our component guide on understanding solar panels and module hardware to familiarize yourself with frame structures and clamping channels.
Panel Placement and Clamp Installation Protocol
Lifting 45-pound, 6-foot glass-and-aluminum modules onto a roof requires a controlled two-person protocol. Use a ladder-mounted hoist or staging scaffold, and never attempt to carry panels up a ladder by hand in windy conditions.
- Lay the initial module in the bottom corner of the racking grid, squaring the frame against your rails.
- Fasten end-clamps into the outer rail channels, securing the outer frame edge.
- Slide integrated bonding mid-clamps between adjacent panels. These clamps have sharp teeth that pierce the anodized aluminum coating to establish equipment grounding across modules.
- Route module leads underneath the array, securing cables directly to the inner rail channels with UV-resistant stainless-steel wire clips. Cables should never hang loosely or touch abrasive roofing shingles.
- Torque all mid-clamps and end-clamps using a calibrated torque wrench (typically 85–120 in-lb, depending on the manufacturer).
Electrical Wiring, Safety Codes, and Inverter Connection
Array wiring must be designed for both electrical efficiency and long-term safety under National Electrical Code (NEC) standards.
When configuring series strings for central or hybrid inverters, calculate cold-temperature open-circuit voltage ($V_{oc}$) to avoid exceeding the inverter’s maximum input voltage on freezing winter mornings:
$$V_{oc(\text{cold})} = N \times V_{oc(\text{STC})} \times [1 + \beta_{Voc} \times (T_{\text{min}} – 25^\circ\text{C})]$$
Where:
- $N$ = Number of series-connected panels
- $V_{oc(\text{STC})}$ = Module open-circuit voltage at standard test conditions
- $\beta_{Voc}$ = Temperature coefficient of $V_{oc}$ (negative percentage value, e.g., $-0.28\%/^\circ\text{C}$)
- $T_{\text{min}}$ = Record low ambient temperature for your local climate
Always verify polarity with a multimeter before making final connections. For foundational wiring methods, consult our guide on safe DIY solar setup techniques.
Compliance with NEC 690: Rapid Shutdown and Grounding
Article 690 of the National Electrical Code establishes strict rules for residential rooftop photovoltaic safety:
- Equipment Grounding (NEC 690.43): All exposed non-current-carrying metal parts—including panel frames, aluminum rails, junction boxes, and metal conduit—must be bonded together using minimum 6 AWG copper grounding conductors routed directly to the main service grounding electrode.
- Rapid Shutdown (NEC 690.12): Rooftop PV circuits must drop below 80 volts within 30 seconds outside the array boundary (and below 30 volts within the array) when the rapid shutdown initiator is pulled. Microinverter systems meet this rule natively; string inverter systems require module-level rapid shutdown devices (RSDs) installed behind every module.
- Overcurrent Protection (NEC 690.8): Array conductor ampacity and overcurrent devices must be rated for at least 125% of maximum short-circuit current ($I_{sc}$) multiplied by an additional 125% continuous-duty factor ($1.56 \times I_{sc}$).
If you are pairing your array with energy storage, read our guide on building a hybrid solar system to learn about battery disconnects and high-interrupt Class-T fusing.
Main Panel Tie-In, Battery Storage, and Plug-In Regulations
Connecting the solar AC output to your home’s main service panel requires adherence to the 120% Rule (NEC 705.12). The total rating of all overcurrent devices supplying power to a busbar cannot exceed 120% of the busbar’s rated ampacity:
$$(\text{Main Service Breaker} + \text{Solar Backfeed Breaker}) \le \text{Busbar Rating} \times 1.20$$
For example, a 200A-rated panel with a 200A main breaker allows a maximum solar backfeed breaker of 40A:
$$(200\text{A} \times 1.20) – 200\text{A} = 40\text{A}$$
Install the solar backfeed breaker at the opposite end of the busbar from the utility main lug to avoid concentrated current points.
For off-grid setups or critical backup panels, review the wiring steps in connecting off-grid solar systems to a home.
Permitting, Inspection, and Utility Commissioning
Before you turn on a grid-tied system, you must secure approvals from both your local Authority Having Jurisdiction (AHJ) and your utility company.
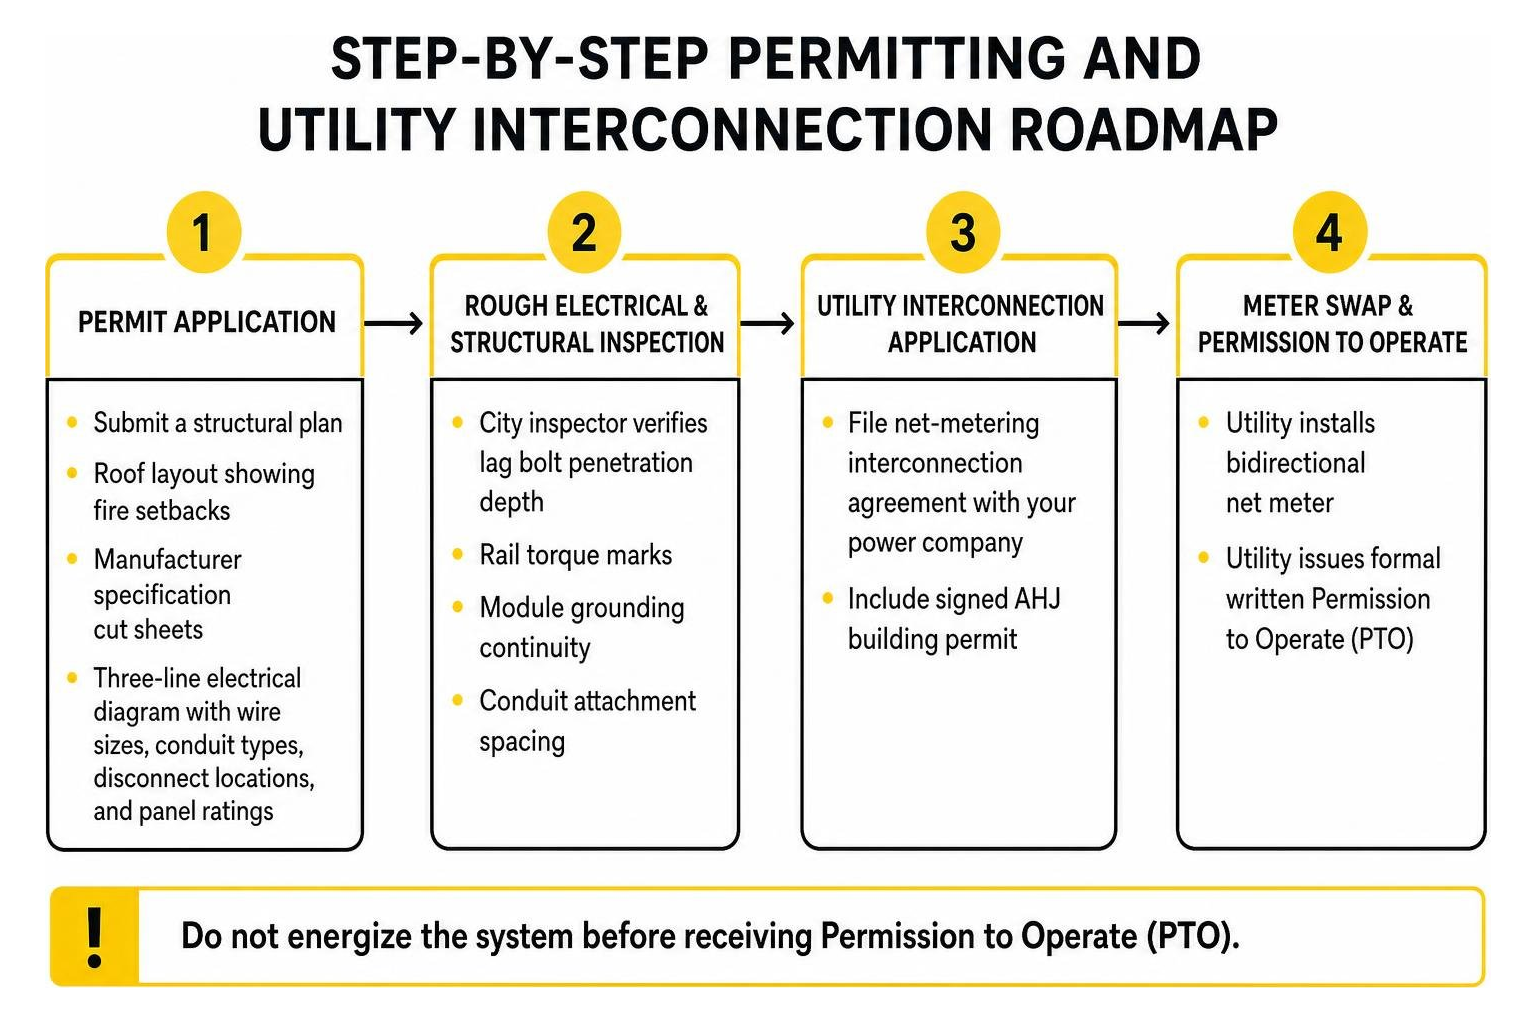
- Permit Application: Submit a structural plan, roof layout showing fire setbacks, manufacturer specification cut sheets, and a three-line electrical diagram illustrating wire sizes, conduit types, disconnect locations, and panel ratings.
- Rough Electrical & Structural Inspection: The city building inspector verifies lag bolt penetration depth, rail torque marks, module grounding continuity, and conduit attachment spacing.
- Utility Interconnection Application: File the net-metering interconnection agreement with your power company along with your signed AHJ building permit.
- Meter Swap & Permission to Operate (PTO): The utility installs a bidirectional net meter and issues formal written Permission to Operate. Do not energize the system before receiving this document.
Critical DIY Solar Pitfalls and How to Avoid Them
- Undersized Wire Gauges: Running small gauge wire over long distances leads to high voltage drops (>3%), causing inverters to trip off-line during peak production hours.
- Rushed Flashing Seals: Failing to locate rafter centers or driving lag bolts at angles creates leak paths that can damage drywall and framing over time.
- Ignoring Winter Voltage Surges: Sizing string lengths based purely on standard room-temperature ratings without accounting for cold-weather voltage spikes can damage string inverter circuitry.
- Cable Friction & Pinch Points: Leaving solar cables resting on roof surfaces or clamped under module frames leads to insulation wear, ground faults, and potential DC arc risks.
Hybrid DIY: Knowing When to Call a Licensed Electrician
A hybrid DIY approach offers a practical middle ground: you handle the planning, mechanical racking assembly, panel mounting, and conduit runs, then bring in a licensed electrician for high-voltage terminations.
Hire an electrician if your project involves:
- Main electrical panel de-energization or whole-home service upgrades (e.g., 100A to 200A panel swaps).
- Line-side (supply-side) utility service taps.
- Subpanel installations and battery backup transfer switches.
- Complex three-phase grid interconnections.
For help deciding where to draw the line between DIY tasks and professional help, see our guide on evaluating DIY vs professional electrical work.
Frequently Asked Questions About DIY Solar
How much money can I realistically save with DIY solar?
Most homeowners save between 40% and 60% on their overall system cost by handling the procurement and installation labor themselves. On a typical 8 kW system, this keeps $7,000 to $12,000 in your pocket compared to a standard turnkey installation contract.
Can I legally install grid-tied solar panels myself?
Yes, most jurisdictions allow owner-builders to pull residential electrical and building permits for their primary residence. However, you must follow all local building codes and pass formal inspections. Some utilities also require a licensed electrician’s signature on the final grid interconnection filing.
What are the main risks of installing solar panels on my own roof?
The three primary hazards are personal falls from the roof edge, high-voltage DC electrical arcs or shocks, and structural roof leaks caused by improper flashing. Using certified fall-arrest systems, working with de-energized circuits, and torquing all components to manufacturer specifications keeps these risks low.
Conclusion
Completing a DIY solar installation requires careful planning, mechanical skill, and strict adherence to electrical safety standards. When approached systematically, designing and mounting your own photovoltaic system delivers reliable clean energy, lower power bills, and the satisfaction of building your own home energy system.
If you run into complex electrical tie-ins, challenging roof layouts, or simply want professional assistance to ensure lifetime reliability, our team is here to help. Explore our tailored residential solar solutions to see how we help homeowners design, build, and optimize dependable solar energy systems.