
What You Need to Know About Hooking Solar Panels to Your House
Hooking solar panels to your house involves five core steps:
- Mount the panels on your roof or ground with a racking system
- Wire the array using DC-rated cables and connectors
- Connect through a charge controller (if using batteries) to regulate power flow
- Install an inverter to convert DC electricity to AC for home use
- Connect to your electrical panel via a dedicated breaker or transfer switch
That’s the short version. The full process involves permits, inspections, utility agreements, and safety gear — all covered below.
Every month, East Tennessee homeowners pay more than they should for electricity — and many are one ice storm away from days without power. Solar can change both of those realities. Since 2008, hundreds of thousands of solar systems have been installed across the U.S., and the technology has never been more reliable or affordable.
But “just put panels on the roof” is not how this works. The connection between your solar panels and your home’s electrical system is where the real complexity lives — and where mistakes can be costly or dangerous.
This guide walks you through the entire process clearly, from components to connection, so you can make confident decisions.
I’m Ernie Bussell, founder and CEO of Your Home Solar, and my background spans nuclear weapons quality assurance in the U.S. Navy, a decade in education, and several years leading operations for a $40 million solar installation company before building East Tennessee’s most trusted solar contractor around the mission of helping homeowners understand hooking solar panels to their house the right way. Let’s get into it.

Basic hooking solar panels to house terms:
Essential Components for Hooking Solar Panels to House Systems
To understand how solar panels connect to your home, we must first look at the team of components working behind the scenes. It takes more than just the panels on your roof to power your television, refrigerator, and HVAC system.
Here is the essential equipment you need:
- Solar Photovoltaic (PV) Panels: The stars of the show. These panels contain photovoltaic cells that capture sunlight and convert it into direct current (DC) electricity. To get the most out of your roof space in East Tennessee, we highly recommend monocrystalline panels, which boast efficiencies of 20% to 24%, compared to older, less efficient polycrystalline panels. To learn more about the science, check out our guide on How Solar Panels Work: A Comprehensive Guide.
- Solar Inverter: Your home’s appliances run on alternating current (AC) electricity, but your panels produce DC. The inverter is the “brain” of the system that converts that DC power into usable AC power. You can choose between a single string inverter, power optimizers, or microinverters mounted under each panel. For a deep dive into choosing the right one, read The Heart of Your Solar System: Understanding Home Inverters.
- Charge Controller: If you are storing power in a battery bank, you need a charge controller. This device regulates the voltage and current coming from your solar panels to prevent overcharging and extend battery life. Maximum Power Point Tracking (MPPT) controllers are the modern standard, capturing up to 30% more energy than older Pulse Width Modulation (PWM) controllers.
- Battery Bank: An optional but increasingly popular component in places like Knoxville and Sevierville, where summer storms and winter freezes can knock out the grid. Modern lithium iron phosphate (LiFePO4) batteries are the gold standard, offering 2,000 to 5,000 charge cycles and allowing a deep depth of discharge compared to traditional lead-acid or AGM batteries.
- Wiring and Conduit: Outdoor solar wiring must withstand extreme heat, cold, and UV exposure. We use specialized, sunlight-resistant PV wire or USE-2 cabling run through protective conduit to satisfy the National Electrical Code (NEC).
- Safety Disconnects: Both AC and DC manual disconnect switches are required by law. They allow you or emergency personnel to instantly cut power from the solar array or the inverter during maintenance or emergencies.
For a detailed breakdown of how these pieces fit together, check out this How To Connect Solar Panels To A Battery: Step-by-Step Wiring Guide (+ Diagrams).
Grid-Tied, Off-Grid, and Hybrid Interconnections
How you hook solar panels to your house depends heavily on your energy goals. There are three primary system configurations, each with its own wiring pathway to your home’s electrical panel.

| System Type | Grid Connection | Battery Storage | Pros | Cons |
|---|---|---|---|---|
| Grid-Tied | Connected | No | Lowest upfront cost, simple setup, utilizes net metering | No power during grid outages (due to safety shutdown) |
| Off-Grid | Completely Isolated | Required | Total energy independence, no utility bills | High battery costs, must manage loads carefully |
| Hybrid | Connected | Yes | Backup power during outages, optimizes time-of-use rates | More complex wiring, higher initial investment |
Grid-Tied Systems
This is the most common and cost-effective residential setup in areas like Maryville and Johnson City. Your solar inverter connects directly to your home’s main electrical panel. When your panels produce more electricity than your home needs, the excess flows backward through your utility meter and onto the electrical grid.
Through a policy called net metering, your utility provider grants you credits for this excess power, which you can use to offset your bills at night. However, standard grid-tied systems feature anti-islanding protection. If the power grid goes down, your solar system automatically shuts off to prevent sending live electricity down the lines, which could injure utility workers trying to restore power.
Off-Grid Systems
Off-grid systems are entirely isolated from the utility company. The solar panels feed power into a charge controller, which charges a large battery bank. An off-grid inverter then draws DC power from the batteries and converts it to AC power for your home. These systems are common for remote cabins in the mountains of East Tennessee where running utility lines is prohibitively expensive.
Hybrid Systems
A hybrid system gives you the best of both worlds. It remains connected to the utility grid to take advantage of net metering, but it also includes a battery bank. When a power outage occurs, a specialized hybrid inverter automatically disconnects your home from the grid and switches to battery power in milliseconds, keeping your lights, refrigerators, and medical equipment running smoothly.
To explore which system fits your household budget and energy security goals, read through our Residential Solar Solutions Guide.
Assessing Your Home Suitability Before Hooking Solar Panels to House Electrical Systems
Before buying any racking or wiring, we must determine if your property is physically ready for solar.
First, consider your roof orientation and pitch. In the Northern Hemisphere, solar panels perform best when facing directly south at a tilt angle matching your local latitude (usually between 30 and 40 degrees in East Tennessee). East and west-facing roofs are also viable, typically producing about 80% to 90% of the energy of a south-facing roof.
Second, perform a thorough shading analysis. Trees, chimneys, and neighboring buildings can severely impact system performance. Even a small amount of shade on a single panel in a traditional string inverter setup can drop the power output of the entire array. Using tools like a Solar Pathfinder helps map out seasonal sun paths.
Third, check your roof age. Solar panels are designed to last 25 to 30 years. Because removing and reinstalling a solar array to replace a roof can cost thousands of dollars, we strongly recommend that your roof be less than 5 years old before installation. If your roof is nearing the end of its life, it is best to replace it first.
Finally, review your Homeowners Association (HOA) rules and historical zoning restrictions. While Tennessee law protects a homeowner’s right to install solar in many cases, some HOAs have specific aesthetic guidelines regarding panel placement and conduit routing.
For a comprehensive checklist to prepare your property, read Preparing Your Home for Solar Installation: What You Need to Know and explore our guide on From Roof to Reality: A Guide to Residential Solar Panel Design.
Permits, Regulations, and Utility Interconnection
You cannot simply bolt solar panels to your roof and plug them into your wall. Doing so violates building codes, compromises your home insurance, and can lead to immediate utility disconnection.
Before any physical work begins, you must obtain:
- Electrical and Building Permits from your local Authority Having Jurisdiction (AHJ), such as the city of Knoxville or the county building department.
- Zoning Approval to ensure your system complies with local setback requirements.
- An Interconnection Agreement with your local utility provider (such as Knoxville Utilities Board, BrightRidge, or Lenoir City Utilities Board).
Your system design must comply strictly with the National Electrical Code (NEC), specifically Article 690, which governs solar photovoltaic systems. This includes requirements for rapid shutdown capability, which allows firefighters to easily de-energize the solar array on your roof with the flip of a single exterior switch.
Once the physical installation is complete, a local electrical inspector must sign off on the work. Fortunately, about 90% of residential solar projects do not require an on-site utility inspector visit; most local utilities will accept the building department’s official inspection record. Once approved, the utility will issue you a formal Permission to Operate (PTO) and install a bidirectional utility meter.
For state-specific solar guidelines, incentives, and policy updates, consult the Residential Solar – TN.gov portal.
Step-by-Step Guide to Wiring and Connecting Your Solar System
If you are planning to handle the physical installation yourself or simply want to understand the process our professional crews follow, here is the chronological sequence for hooking solar panels to house electrical systems.

Always wear proper safety gear, including a fall-protection harness when working on the roof, safety glasses, and insulated electrical gloves. Never work on electrical wiring in wet or high-wind conditions.
To familiarize yourself with the full project scope, read A Step-by-Step Guide to Solar PV System Installation and From Planning to Powering Up: The Ultimate Solar Panel Installation Procedure.
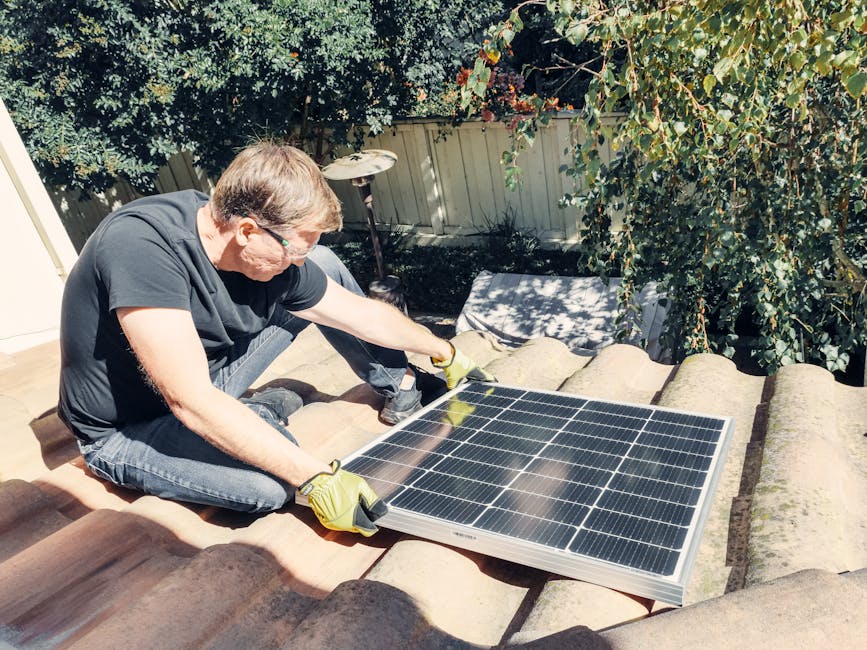
Step 1: Mounting and Racking
Before touching a single wire, the physical structural support must be built.
- Locate the Rafters: Use a high-quality stud finder or inspect the attic to locate your roof rafters. Your racking system must be anchored directly into these structural rafters, not just the thin roof decking.
- Install Roof Attachments and Flashing: Drill pilot holes into the rafters and secure the mounting brackets using heavy-duty lag bolts. Every roof penetration must be sealed with metal flashing and high-grade outdoor silicone to guarantee a lifetime of leak-free performance.
- Mount the Rails: Secure the aluminum racking rails to the roof brackets. Use a level and string line to ensure the rails are perfectly aligned and flat.
- Set the Angle: If you are using a ground mount or a flat roof rack, adjust the tilt legs to match your target angle for optimal year-round solar capture in East Tennessee.
For a deeper dive into structural engineering and layout design, read The Ultimate Guide to Designing Your Own Solar Panel System.
Step 2: Wiring the Solar Array
Once the racking is secure, it is time to connect the panels.
- Series vs. Parallel Decisions:
- Series Wiring connects the positive terminal of one panel to the negative terminal of the next. This increases the total voltage of your array while keeping the current (amperage) the same. High voltage is ideal for efficient, long-distance wire runs to a string inverter.
- Parallel Wiring connects all positive terminals together and all negative terminals together. This increases the amperage while keeping the voltage the same. Parallel wiring is common in smaller off-grid systems.
- Make Safe Connections: Use standard, weatherproof MC4 connectors to click the panels together. Secure all loose wiring to the racking rails using outdoor-rated metal wire clips. Never let solar cables dangle or touch the abrasive roof surface.
- Run the Trunk Cable: Route the positive and negative ends of your solar array through a protective, outdoor-rated EMT conduit down to your ground-level equipment.
For a comprehensive technical breakdown of wire gauges and DC voltage drop calculations, refer to the DIY Off-Grid Solar System Wiring Guide (2026) | WattSizing.
Step 3: Inverter and Charge Controller Installation
Your electrical conversion equipment must be installed in a cool, well-ventilated space away from direct sunlight, such as a garage, utility room, or shaded exterior wall.
- Mount the Equipment: Secure the inverter and charge controller to the wall using heavy-duty anchors.
- The Golden Rule of Battery Connection: If your system includes a battery bank, always connect the battery to the charge controller FIRST before connecting the solar panels. Most charge controllers need to detect the battery’s nominal voltage (12V, 24V, or 48V) to initialize their internal programming. Connecting the high-voltage solar array first can instantly fry the controller’s delicate circuitry.
- Wire the DC Disconnect: Install a manual DC disconnect switch between the solar array conduit and the inverter or charge controller. This allows you to safely isolate the roof panels during maintenance.
For a beginner-friendly overview of how these components communicate, check out Solar Energy Made Simple: Understanding the Basics of Solar Panel Installation.
Step 4: Hooking Solar Panels to House Electrical Panels Safely
This is the final, most critical step where the solar system integrates with your home’s main electrical panel. There are two primary ways to make this connection:
1. Load-Side Interconnection (Breaker Connection)
This is the simplest and most common method. The AC output from your inverter is wired directly to a dedicated double-pole circuit breaker at the opposite end of your main electrical panel from the main utility breaker.
However, you must follow the 120% Rule defined by the National Electrical Code. This rule states that the sum of the main utility breaker and the solar backfeed breaker cannot exceed 120% of your electrical panel’s busbar rating. For example, if you have a standard 200-amp panel with a 200-amp main breaker:
$$\text{Total Allowable Amperage} = 200\text{ A} \times 120\% = 240\text{ A}$$
This leaves you with a maximum of 40 amps ($240 – 200$) of allowable solar backfeed capacity. If your solar system produces more current than this rule allows, you will either need to upgrade your main panel or use a supply-side connection.
2. Supply-Side Interconnection (Line-Side Tap)
If your electrical panel is full or your solar system is too large for the 120% rule, a supply-side connection is used. This involves tapping into the main service wires before they reach your main electrical panel’s main breaker. This method bypasses the limitations of your panel’s busbar but requires a specialized external fused disconnect switch and close coordination with your utility provider.
To understand the step-by-step wiring details and safety checks for this final integration, read How to Wire Solar Panels to House: Step-by-Step Instructions.
DIY vs. Professional Solar Installation
With a wealth of DIY solar kits available online in June 2026, many handy homeowners wonder if they should tackle this project themselves or hire a professional team.
DIY Installation Pros and Cons
- Pros:
- Upfront Cost Savings: Eliminating professional labor can save you around $10,500 on a typical 6 kW residential solar system.
- Personal Satisfaction: There is an undeniable pride in building your own self-sustaining power station.
- Cons:
- Massive Time Investment: A typical 16-panel system requires about 32 hours of physical labor (following the rule of thumb of 2 hours per panel) — and that does not include the dozens of hours spent researching permits, drawing wiring schematics, and filing paperwork.
- Extreme Safety Risks: Working on steep roofs carries high fall risks, and handling high-voltage DC current can be lethal if a mistake is made.
- Warranty Issues: Many premium solar panel and inverter manufacturers will only honor their 25-year warranties if the equipment is installed by a licensed professional.
- Utility Rejection: Some local utilities in East Tennessee will refuse to interconnect systems that were not designed and stamped by a licensed electrical engineer.
Professional Installation Pros and Cons
- Pros:
- NABCEP Certified Expertise: Certified professionals design systems that are mechanically secure against high winds and electrically safe from fire hazards.
- Turnkey Permitting: Your installer handles all the paperwork, HOA approvals, engineering stamps, and utility interconnection agreements.
- Comprehensive Warranties: Professional installations come with both equipment and workmanship warranties, giving you peace of mind for decades.
- Cons:
- Higher Initial Cost: Professional labor and engineering overhead increase the upfront system price.
To weigh your options carefully, read A Practical Guide to the Solar Installation Process and The Ultimate Guide to Residential Solar Installation: From Panels to Power.
Frequently Asked Questions about Hooking Solar Panels to House Power
Can I connect solar panels directly to a battery?
No, you should never connect a solar panel directly to a battery. Solar panels produce highly variable voltage depending on the intensity of the sun. Without a charge controller to regulate this power, the panel will continue to push high voltage into the battery even after it is fully charged.
For lithium batteries, this overcharging can cause thermal runaway, which can lead to fires or explosions. For lead-acid batteries, it can cause boiling, gassing, and permanent plate damage. Always install a certified MPPT or PWM charge controller between your panels and your battery bank.
What happens to my solar system during a power outage?
If you have a standard grid-tied system, your solar panels will automatically shut down during a utility power outage. This is a mandatory safety feature called anti-islanding protection, designed to keep utility linemen safe while they work on downed power lines.
If you want your home to have power during a blackout, you must install a hybrid system with battery storage and an automatic transfer switch. When the grid fails, the switch isolates your home from the utility lines, allowing your hybrid inverter to safely power your critical appliances using your battery bank.
To understand exactly how this transition works, read our guide on What to Expect During a Solar Installation for Your East Tennessee Home.
How do I connect solar panels without feeding power back into the grid?
If you want to use solar power but avoid the hassle of utility interconnection agreements, net metering fees, or local regulations, you have two safe options:
- Use a Transfer Switch: You can wire your solar inverter to a manual or automatic transfer switch (ATS). This switch allows you to toggle specific household circuits between grid power and solar/battery power. Because the switch is mechanically interlocked, the two power sources can never connect, preventing any power from feeding back into the grid.
- Install a Zero-Export Inverter: Modern grid-tied inverters can be paired with smart current sensors installed at your main service entrance. If the inverter detects that your home is about to export power to the grid, it instantly throttles down its energy production to match your exact household consumption.
Conclusion
Hooking solar panels to your house is one of the most rewarding home improvement projects you can undertake. Whether your goal is to slash your monthly utility bills, secure your family against unexpected power grid failures, or reduce your carbon footprint, understanding the technical connection process is the first step toward energy independence.
While the physical mounting and simple wiring can be tempting DIY projects, the high-voltage electrical connections, complex utility regulations, and strict building codes make professional installation the safest and most reliable path for most families.
At Your Home Solar, we provide comprehensive home energy solutions tailored specifically to the unique climate and utility landscapes of East Tennessee. From Knoxville and Oak Ridge to Johnson City and Maryville, our expert team is dedicated to delivering reliable, safe, and rewarding solar installations. Beyond solar, we specialize in backup generators and EV chargers to ensure your home is fully prepared for the future.
Ready to take control of your power? Contact us today to explore our Residential Solar Solutions and schedule your custom home solar assessment.