
What You Need to Know Before Designing a Home Solar System
Getting solar system design for home right is the difference between a system that pays for itself in 6 years and one that underperforms for 25.
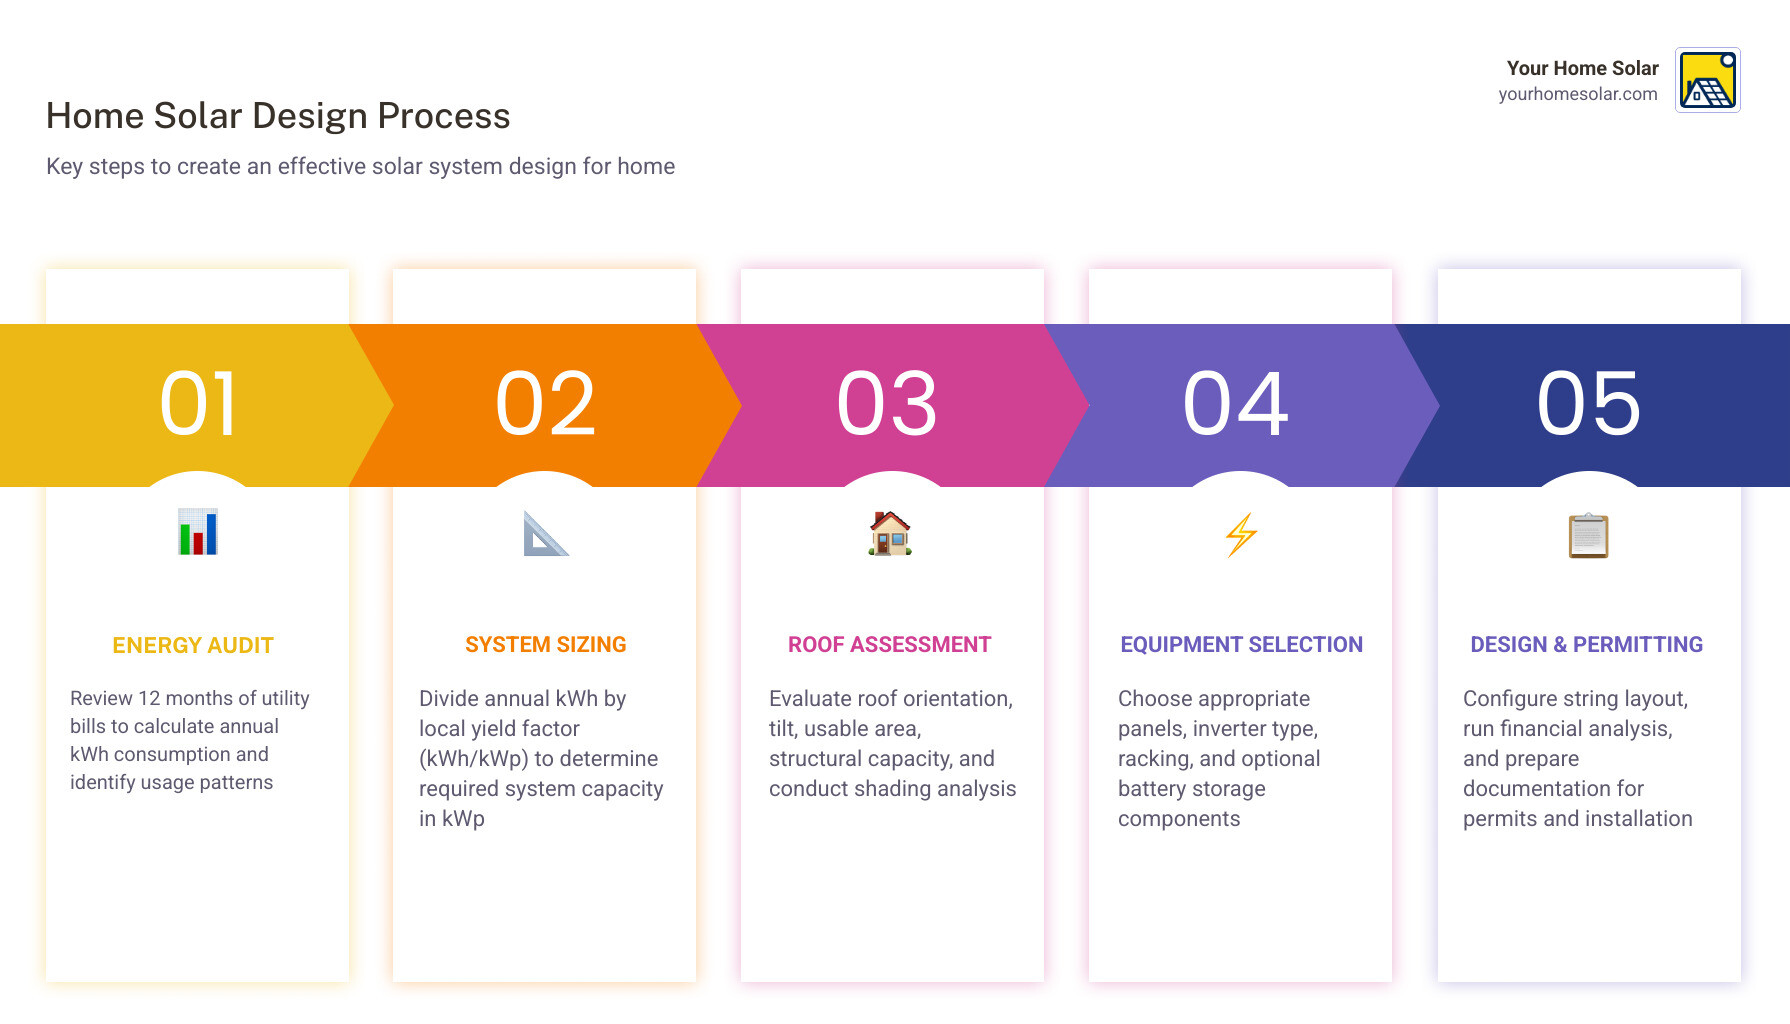
Here’s a quick overview of the core steps:
- Calculate your energy use — Pull 12 months of utility bills and find your annual kWh total
- Size your system — Divide annual kWh by your local yield factor (kWh/kWp/year) to get your target kWp
- Assess your roof — Check orientation, tilt, usable area, structural capacity, and shading
- Choose your equipment — Select panels, inverter type, racking, and optional battery storage
- Design strings and layout — Configure series/parallel strings within your inverter’s MPPT range
- Run the financial numbers — Factor in incentives, net metering, and payback period
- Get permitted — Prepare a single-line diagram, site plan, and product data sheets before installation
Most homes in the US fall between 5 and 8 kWp, using 12 to 20 panels, with a simple payback of 5 to 10 years. A well-designed system achieves a performance ratio of 75–85% and costs roughly $2.00–$3.50 per watt installed.
This guide walks you through every step in plain language — no engineering degree required.
I’m Ernie Bussell, founder and CEO of Your Home Solar, and after leading operations for a $40 million per year solar company and building East Tennessee’s top-rated solar contractor from the ground up, I’ve seen how a solid solar system design for home saves homeowners thousands — and how a poor one costs them just as much. Let’s make sure yours is done right.
Step 1: Start Your solar system design for home With Energy Use and Goals
Before we place a single panel, we need to know what the system is supposed to do.
That sounds obvious, but this is where many homeowners go wrong. They start with roof space or panel count instead of starting with energy use. In East Tennessee, the right design depends on how much electricity you use across all four seasons, whether you want backup power, and whether you want to offset all or only part of your bill.
A few questions help define the goal:
- How many kWh does your home use in a full year?
- Do you want to offset 50%, 80%, or 100% of that use?
- Are you planning to add an EV charger, hot tub, or heat pump soon?
- Do you want the lowest cost system, or a battery-ready system with future flexibility?
- Is outage backup important, or is bill reduction the main goal?
How to calculate your home’s annual electricity consumption
The best method is simple: gather 12 months of utility bills and add up the kWh used each month.
Why 12 months? Because one month can lie to you. A mild April bill does not represent an August air-conditioning sprint or a January heating spike.
Use this process:
- Pull the last 12 electric bills.
- Write down monthly kWh usage.
- Add them together for annual kWh.
- Divide by 365 for your daily average.
- Note seasonal highs and lows.
- Add expected future loads.
For example, if your total annual use is 10,500 kWh, your average daily use is about 28.8 kWh per day.
Future loads matter too. If you expect to add an EV charger, electric water heater, or heat pump, include that now. Retrofitting later often costs more than designing properly the first time.

A few practical tips:
- Use actual billed kWh, not dollar amounts
- Ignore one-time billing anomalies
- Separate electric heat and cooling patterns if possible
- If you work from home, account for daytime consumption
- If you want batteries, identify your critical loads separately
If you want a deeper look at Tennessee-specific sizing logic, our guide on properly sizing a solar system for your East Tennessee home is a great next step.
How to size solar system design for home in kWp
Once we know annual usage, we estimate the array size in kilowatts peak, or kWp.
A common sizing formula is:
System size (kWp) = Annual consumption (kWh) / Yield factor (kWh/kWp/year)
The yield factor depends on your solar resource, roof conditions, and system losses. A well-designed residential system usually lands in a performance ratio range of about 75% to 85%.
Using the research example:
- Annual use: 10,500 kWh
- Yield factor: 1,400 kWh/kWp/year
- Required size: 10,500 / 1,400 = 7.5 kWp
If you use 440 W panels, that comes out to about 17 panels.
In real design work, we usually add a margin of roughly 10% for losses, future growth, or conservative production assumptions. That does not mean oversizing wildly. It means designing with the real world in mind, because the real world contains heat, dirt, wiring losses, and the occasional leaf that thinks it pays property tax.
A few sizing reminders:
- Higher efficiency panels reduce roof space needed, not energy demand
- Better orientation improves production but does not replace proper sizing
- A smaller unshaded system often beats a larger shaded one
- East Tennessee homes commonly land in the 5 to 8 kWp range
Decide between grid-tied, hybrid, or off-grid
Now decide what kind of system you are building.
Grid-tied
This is the most common option. The panels feed your home first, and excess power can be exported depending on your utility arrangement. It is usually the most cost-effective design for bill reduction.
Best for:
- Lowest upfront cost
- Homes with reliable utility service
- Homeowners focused on ROI
Hybrid
A hybrid system combines solar with battery storage. It can reduce grid use, improve self-consumption, and provide backup power to selected circuits during outages.
Best for:
- Homes with outage concerns
- People who want battery backup now or later
- Homeowners interested in more control over energy use
Off-grid
Off-grid systems operate independently of the utility and require much more careful battery, inverter, and backup generator planning.
Best for:
- Remote properties
- Homes where grid connection is unavailable or impractical
For most homes in East Tennessee, grid-tied or hybrid makes the most sense. If you want help comparing the options, read our guides on different types of residential solar energy systems and off-grid solar panel systems.
Step 2: Check Roof Suitability Before You Place a Single Panel
Your roof is not just a place to put panels. It is part of the energy equation.
A good roof for solar has enough usable space, favorable orientation, manageable shading, sound structure, and enough remaining life to justify installation.
How orientation, tilt, and roof area affect production
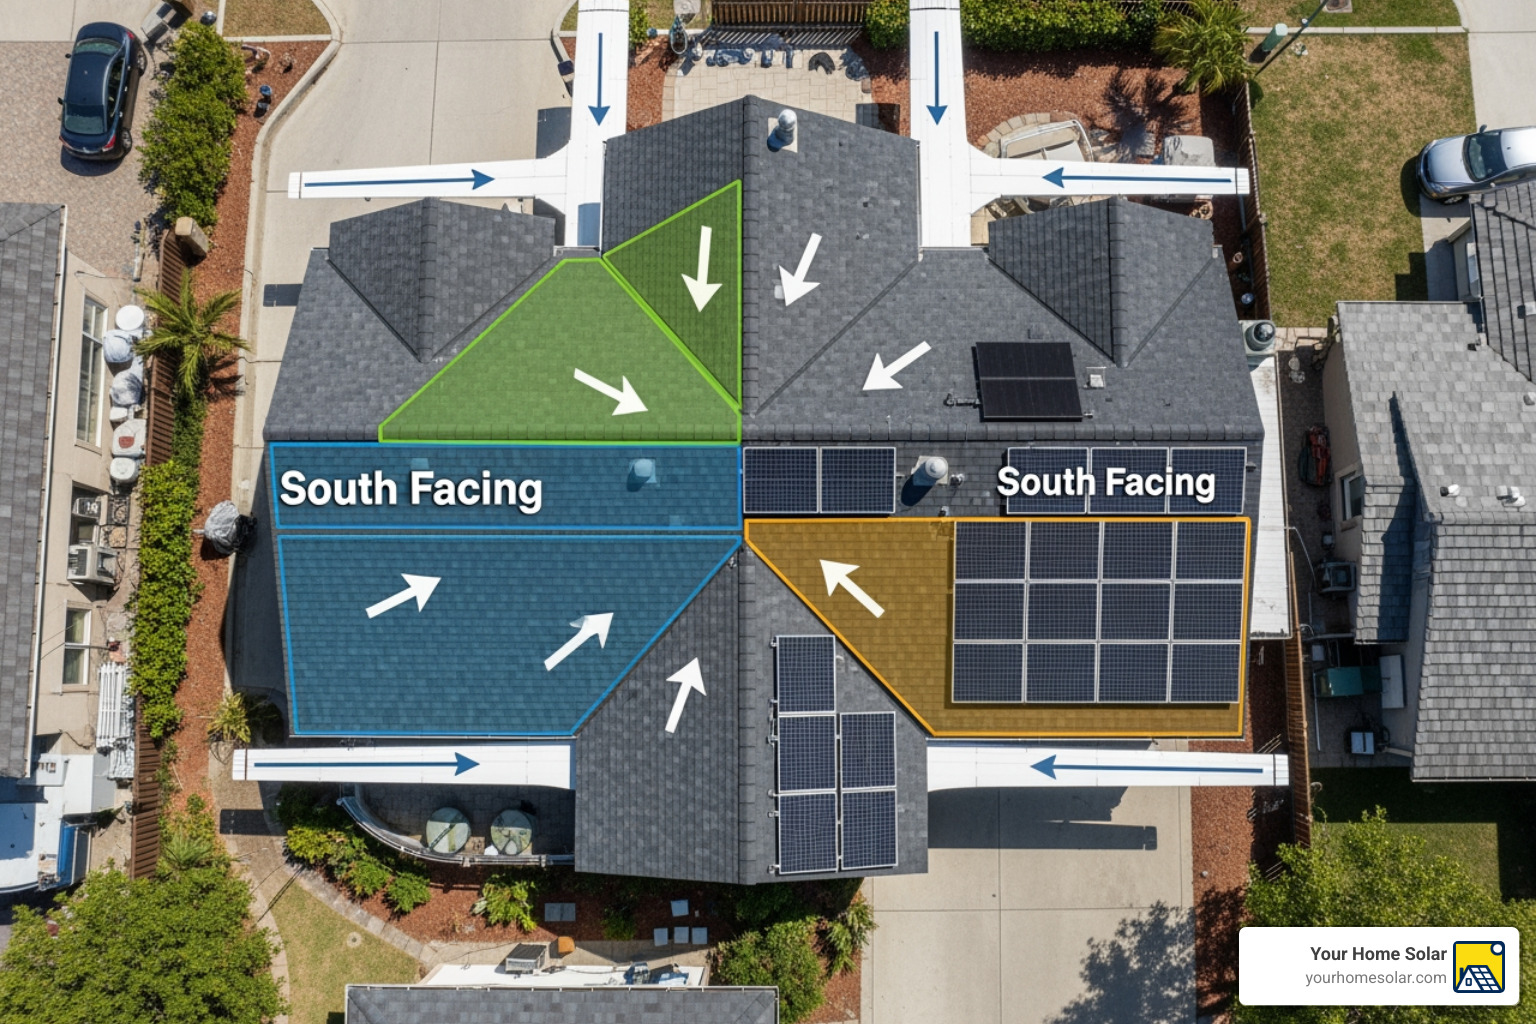
In the northern hemisphere, south-facing roof planes generally produce the most annual energy. Southeast and southwest roofs can still perform very well, often around 92% to 95% of a due-south layout. East- and west-facing roofs usually produce less, but can still be worthwhile. North-facing roofs are usually much less productive and often not ideal.
Here is the practical ranking:
- South-facing: best annual production
- Southeast or southwest: strong alternative
- East or west: acceptable in many cases
- North-facing: usually weakest option
Tilt matters too. A tilt near local latitude is often close to optimal for annual production, though roof pitch is usually fixed by the home. In most residential projects, we work with the roof we have rather than the roof we wish we had.
Space matters quickly. A typical modern residential panel may occupy about 2.2 square meters, and a 5 to 8 kWp system commonly uses 12 to 20 panels. You also need room for setbacks, obstructions, and installation spacing.
Structural capacity, roof condition, and code setbacks
Solar is durable, but it is not weightless.
Research shows residential arrays can add roughly 12 to 15 kg/m2 of dead load, and solar-ready guidance often recommends planning for up to 6 pounds per square foot of additional roof load. Some sources put modern panel systems closer to around 3 pounds per square foot depending on hardware. The exact number depends on the module, racking, and roof type, so structural verification matters.
Check these items early:
- Roof age and expected remaining life
- Rafter or truss condition
- Sheathing condition
- Roof type and attachment method
- Structural load capacity
- Wind exposure and local code requirements
If your roof may need replacement within a few years, it is usually smarter to re-roof first. Removing and reinstalling panels later is rarely anyone’s favorite hobby.
You also need to respect code setbacks and fire access paths. Layouts often require clearances near ridges, eaves, and pathways for firefighter access. Local requirements can vary by jurisdiction, so always confirm before finalizing the design.
For background on solar-ready construction and structural planning, see the Renewable Energy Ready Home guide.
Perform a shading analysis before finalizing layout
Shading analysis is one of the most important parts of solar system design for home.
Small shade can cause big losses. Because cells are wired in series, shading a small portion of a panel can knock out a larger section of output. In string systems, one weak module can drag down others in the same string.
That is why we say this often: fewer unshaded panels are usually better than more partially shaded ones.
Look for shade from:
- Trees
- Chimneys
- Dormers
- Plumbing vents
- Neighboring houses
- Power poles
- Satellite dishes
- Seasonal leaf growth
Shading must be checked across seasons, not just at noon on a sunny afternoon. Winter sun angles are lower, and morning or late-day shade can change the economics of a roof plane.
As a rule of thumb, panel positions with shading losses above about 15% to 20% deserve a hard second look. Tools and software can model this much more accurately than eyeballing it from the driveway.
Step 3: Choose the Right Equipment for Performance, Safety, and Budget
A home PV system is more than panels. The full package usually includes modules, inverter(s), racking, wiring, disconnects, rapid shutdown components, monitoring, and sometimes batteries or charge controllers.
Panel selection for residential rooftops
For most homes in 2026, monocrystalline panels remain the standard choice. Many premium residential systems now use high-efficiency N-type designs because they offer strong performance, good temperature behavior, and lower long-term degradation.
What to compare:
- Wattage
- Efficiency
- Temperature coefficient
- Product warranty
- Performance warranty
- Degradation rate
- Physical dimensions
- Appearance
Current degradation rates are often around 0.4% to 0.55% per year over the first 25 years. That long-term performance matters, especially when roof space is limited.
If you want to learn more about panel types and tradeoffs, visit our solar panels guide.
Inverter options and what fits your roof best
The inverter turns panel DC power into usable AC power for your home. It is the traffic cop of the system, and yes, it gets blamed for a lot.
Your main choices are:
String inverter
Best for simpler roofs with minimal shading. Lower equipment cost, fewer rooftop electronics, and efficient operation.
Microinverters
Best for roofs with multiple orientations or uneven shading. Each panel works more independently, which can reduce mismatch losses and improve panel-level monitoring.
Hybrid inverter
Best when battery storage is part of the plan now or soon. These systems simplify future battery integration and backup design.
Most residential inverters operate around 96% to 98% efficiency. Over a 25-year solar array life, it is also normal to expect at least one inverter replacement.
For a full breakdown, read our guide to home inverters.
Racking, mounting, wiring, and monitoring essentials
Racking is not glamorous, but it matters. It keeps the array attached through wind, rain, heat, and decades of weather. It also represents a meaningful share of project cost, often around 10% to 25% of the total.
Look for:
- Roof-compatible mounting hardware
- Proper flashing to protect roof integrity
- Corrosion-resistant materials
- Manufacturer-approved attachments
- Code-compliant bonding and grounding
- Clean wire management
- Monitoring capability
Poor wiring design can create voltage drop and reduce performance. Oversized wire is not exciting dinner conversation, but undersized wire can waste power and create headaches.
Here is a simple comparison of common inverter approaches:
| Feature | String Inverter | Microinverters |
|---|---|---|
| Best for | Simple, unshaded roofs | Complex or shaded roofs |
| Monitoring | System-level, sometimes string-level | Panel-level |
| Rooftop electronics | Lower | Higher |
| Shade tolerance | Lower | Better |
| Expansion flexibility | Moderate | High |
| Upfront cost | Lower | Higher |
Step 4: Design the Array, Strings, and Battery Storage Correctly
This is where solar design stops being a shopping list and becomes an actual system.
Array layout and string design fundamentals
Array layout includes panel placement, portrait vs landscape orientation, setbacks, and electrical grouping.
Panels can be wired:
- In series to increase voltage
- In parallel to increase current
String design must stay within the inverter’s MPPT operating window and maximum voltage limit at all expected temperatures. Cold weather matters because panel open-circuit voltage rises as temperature drops. A string that looks safe on paper at standard test conditions can exceed voltage limits on a cold East Tennessee morning.
A few best practices:
- Group similar roof planes together
- Avoid mixing different azimuths in the same string unless the equipment allows it
- Confirm maximum Voc at cold temperature
- Confirm operating voltage stays inside the MPPT range
- Keep conductor losses low
Residential DC/AC ratio usually falls between 0.8 and 1.2, with 1.1 to 1.2 often being the sweet spot. That means a slightly larger DC array can feed a smaller AC inverter efficiently, accepting a bit of midday clipping in exchange for stronger morning and late-afternoon harvest.
How to size the inverter for your array and local conditions
Inverter sizing is not just matching nameplate numbers. We need to account for:
- Total array wattage
- DC/AC ratio
- MPPT voltage range
- Max DC input voltage
- Max input current
- Roof orientation mix
- Temperature derating
- Utility export limits
- Main service panel connection
For off-grid or battery-based systems, inverter surge handling also matters. Motors, pumps, and compressors can demand much higher startup power than their running wattage.
If your utility imposes export caps, that may affect inverter choice or require export-limiting settings. Service panel bus ratings and interconnection rules matter too.
When battery storage makes sense for a home system
Batteries are not mandatory for most grid-tied homes, but they are increasingly useful.
A battery can make sense when:
- You want backup power during outages
- You want to power critical loads overnight
- You face time-of-use rates
- You want to increase self-consumption of solar energy
- You are planning for future resilience
Most modern residential storage uses lithium iron phosphate, often called LiFePO4 or LFP. It is popular because of its long cycle life, high usable depth of discharge, and low maintenance.
Battery sizing usually starts with critical load planning:
Battery capacity (kWh) = Critical load (kW) x Backup hours / Depth of discharge
You also need to decide between:
- AC-coupled battery systems
- DC-coupled battery systems
- Whole-home backup
- Essential-load backup only
If you are not ready for storage now, a battery-ready design can still be smart. Learn more in our guide to solar energy and the grid.
Step 5: Run the Numbers on Cost, Incentives, Permits, and Software
Good design is technical, but it is also financial. A system that looks great on paper still needs to make sense in real life.
How utility rates, incentives, and net metering change your payback
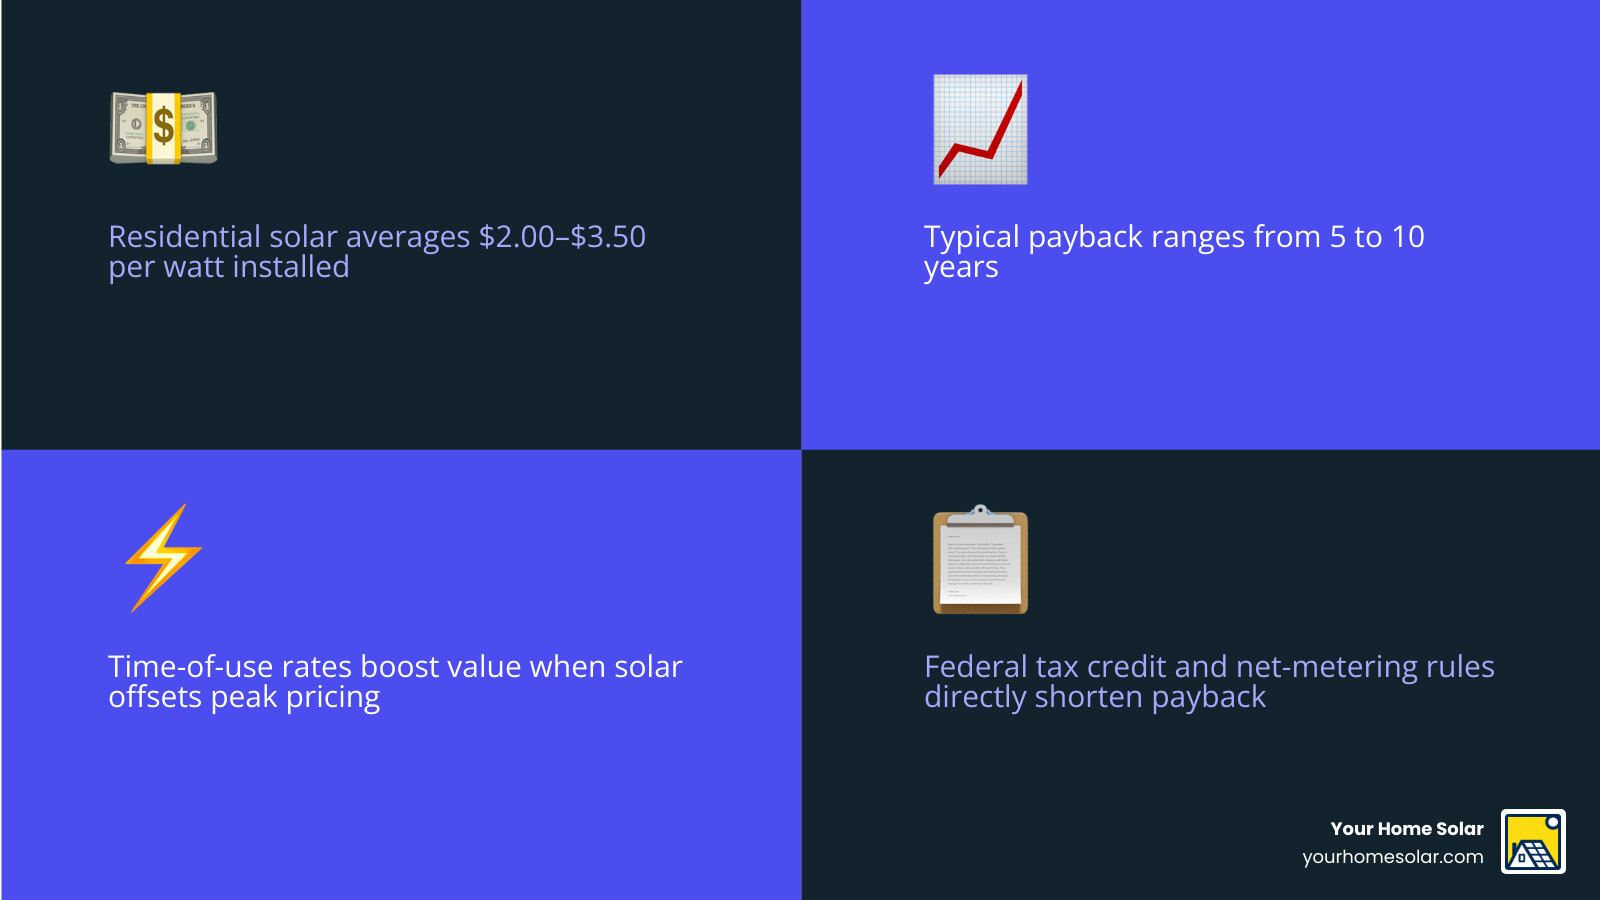
Installed residential solar in the US commonly falls around $2.00 to $3.50 per watt. Simple payback often lands in the 5 to 10 year range, depending on system cost, utility rates, export compensation, and incentives.
Your payback depends on:
- Installed cost
- Annual production
- Utility rate structure
- Available tax credits
- Net metering or export compensation
- Battery cost, if included
- How much solar you use directly in the home
Tiered or time-of-use billing can improve the value of solar if your production offsets higher-priced electricity. Export rules matter too, because not every kWh sent to the grid is valued the same way.
For foundational solar-ready planning and permitting background, see the system planning and permitting guide.
What permits and documents you need before installation
Before installation starts, most residential projects need a permit package and utility interconnection paperwork.
Common requirements include:
- Site plan
- Roof layout
- Single-line electrical diagram
- Equipment specification sheets
- Structural documentation
- Attachment details
- Placards and labels
- Utility application
- Inspection checklist
- Engineering stamp if required by local jurisdiction
Single-line diagrams are especially important because utilities and building departments often require them for interconnection approval.
If you are designing your own system, permit requirements vary by local authority. In East Tennessee, it is smart to verify expectations early rather than redesigning later.
Why design software beats manual planning for most homeowners
Manual design is possible, but software is usually faster, more accurate, and far better for permit readiness.
An experienced designer might complete a basic residential design manually in 1 to 3 hours. With software, the same process can often be done in under an hour.
Modern tools help with:
- 3D roof modeling
- Irradiance mapping
- Shade analysis
- Panel layout
- Auto stringing
- Production simulation
- Voltage checks
- Permit-ready plan generation
If you want to see how layout and production planning come together, our article on residential solar panel design walks through it.
Frequently Asked Questions about solar system design for home
How many panels does the average home need?
Most homes fall between 5 and 8 kWp, which usually means around 12 to 20 panels depending on panel wattage and roof conditions. A 7.5 kWp system using 440 W modules needs about 17 panels. Roof space, shading, and offset goals all affect the final count.
What happens to solar during a power outage?
A standard grid-tied solar system shuts down during a blackout because of anti-islanding safety rules. This protects utility workers and the grid. If you want solar to keep powering selected loads during an outage, you need battery storage and backup-capable equipment.
Can I design now and add batteries later?
Yes, often. A battery-ready design can make future expansion easier, especially if you choose compatible equipment and plan your electrical layout accordingly. It is smart to think ahead about critical loads, inverter type, and space for battery installation.
Conclusion: Build a Smarter Plan Before You Buy
The best solar system design for home starts with clear goals, accurate energy data, and a realistic understanding of your roof, equipment, and local permitting path.
Before you buy anything, make sure you have covered this checklist:
- 12 months of energy use
- A target offset percentage
- Future load planning
- Roof orientation and usable area
- Structural and roof condition review
- Shading analysis
- Equipment selection
- String and inverter compatibility
- Battery decision or upgrade path
- Cost, incentive, and payback review
- Permit-ready documentation
A well-designed home solar system can deliver decades of savings, better resilience, and much less guesswork. And once it is installed, monitoring and maintenance help protect that investment over the long haul.
If you want to keep learning, start with our Residential Solar Solutions Guide and our practical guide to solar system maintenance.
At Your Home Solar, we help homeowners across East Tennessee build systems that are tailored, reliable, and worth it for the long run. That is how solar should feel: less confusing, more rewarding, and a lot closer to done right the first time.