What You Actually Need to Know Before Setting Up a Solar System
A proper solar system setup can cut your power bill dramatically — or eliminate it entirely. But wire one thing wrong, and you could damage thousands of dollars in equipment, or worse.
Here’s a quick overview of what a home solar setup involves:
- Calculate your energy needs — add up your daily watt-hours from appliances and lights
- Choose your system type — grid-tied, hybrid, or off-grid
- Select your components — solar panels, batteries, charge controller, inverter, and mounting hardware
- Size your system — match panel wattage and battery capacity to your daily load
- Wire in the right order — battery to charge controller first, then panels, then inverter
- Mount your panels — roof mount or ground mount, angled toward the south
- Test and monitor — verify voltage, check connections, and set up monitoring
This guide walks you through each step in plain language — no engineering degree required.
Going solar sounds simple on the surface. Buy some panels, hook them up, and watch the meter spin backward. But anyone who has actually attempted a solar system setup knows the reality is a little more involved.
The good news? It’s absolutely learnable. The components are straightforward once you understand what each one does. The wiring follows a logical sequence. And the payoff — lower bills, backup power during outages, and real energy independence — is very much worth the effort.
The tricky part is knowing what you don’t know. A reversed polarity connection can fry a charge controller. Skipping the battery connection step before wiring in panels can send a damaging voltage surge through your system. And choosing the wrong inverter type can leave half your appliances running poorly.
This article breaks it all down into clear, safe, actionable steps — whether you’re planning a DIY project or just want to understand what a professional installer should be doing.
I’m Ernie Bussell, founder and CEO of Your Home Solar, and I’ve guided hundreds of East Tennessee homeowners through every stage of the solar system setup process — from sizing and permitting to wiring and long-term maintenance. Before starting Your Home Solar, I spent years in solar operations management, overseeing installation crews for a $40 million per year operation, which means I’ve seen what goes right — and what goes dangerously wrong.
Quick solar system setup terms:
Essential Components for a Reliable Solar System Setup
To build a solar system setup that runs reliably for decades, you need to understand the individual jobs of each core component. Think of your solar setup as an electrical team: each member must be sized correctly and perform its role flawlessly to keep your lights on.

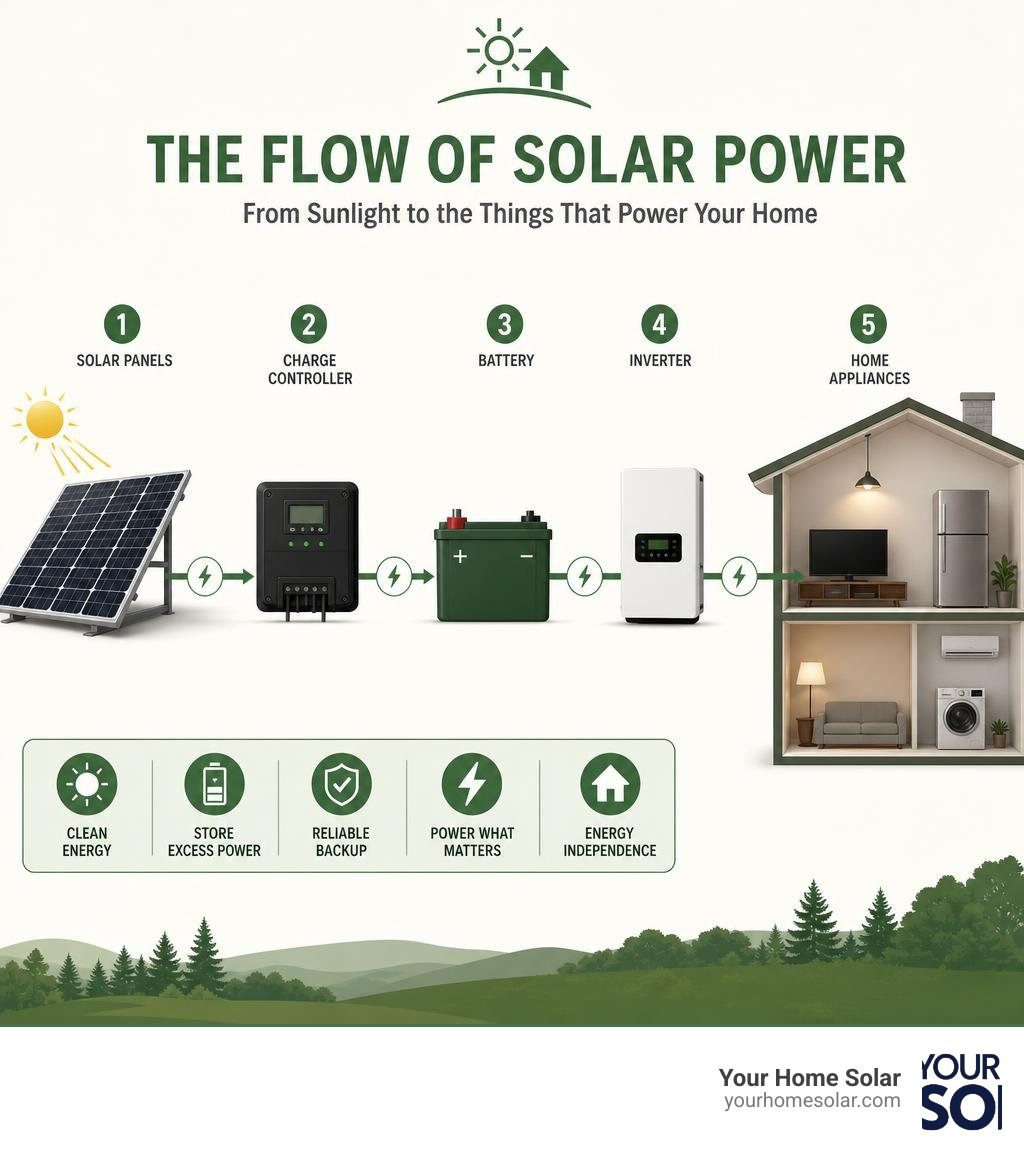
The basic anatomy of a solar system includes five main parts:
- Solar Panels (Photovoltaic Modules): These are your primary power generators. They collect sunlight and convert it into Direct Current (DC) electricity. Modern monocrystalline panels are the industry standard for residential setups due to their high efficiency and sleek black appearance.
- Solar Batteries (Energy Storage): Batteries store the DC electricity produced during the day so you can use it at night, during cloudy periods, or during grid outages.
- Inverters: Your home appliances run on Alternating Current (AC) electricity, but your panels and batteries use DC. The inverter is the translator that converts DC power into usable AC power.
- Charge Controllers: This component acts as a safety gatekeeper between your solar panels and your batteries. It regulates the incoming voltage and current to prevent your batteries from overcharging and suffering permanent damage.
- Mounting Hardware: The racking, brackets, and rails that secure your panels to your roof or ground mount. This hardware is engineered to withstand heavy winds, snow loads, and local weather conditions.
When you are planning your solar powered home, selecting quality parts that are fully compatible with one another is the key to preventing system failures.
Selecting the Right Inverter and Battery Technology
Choosing your inverter and battery tech is where many custom installations succeed or fail. It is not just about choosing the cheapest option; it is about choosing the right tool for the job.
First, let’s talk about inverters. You will generally choose between three main configurations:
- Pure Sine Wave Inverters: These generate a clean, smooth wave of electricity identical to (or better than) the utility grid. They are absolutely required for sensitive electronics, modern refrigerators, and variable-speed motors. Avoid modified sine wave or square wave inverters—they run hot and can damage your appliances.
- Microinverters: Instead of one large “string” inverter for the whole system, microinverters are mounted under each individual panel. This means if one panel is shaded by a tree, the rest of the array continues producing power at 100% capacity.
- Hybrid Inverters: These are smart, all-in-one units that manage power from your panels, your battery storage, and the utility grid simultaneously. They are the gold standard for modern grid-tied systems with battery backup.
Next, you must select your battery chemistry. The two main contenders are traditional Lead-Acid and modern Lithium (specifically Lithium Iron Phosphate, or LiFePO4).
- Lead-Acid Batteries: While cheaper upfront, they are heavy, require regular maintenance, and have a short lifespan (3 to 5 years). More importantly, you can only safely discharge them to 50% of their capacity without damaging them.
- Lithium Batteries (LiFePO4): These are the modern standard. They can be safely discharged up to 80% to 90% of their capacity, require zero maintenance, and last 10 to 15 years.
- High-Voltage Batteries: Increasingly popular in 2026, high-voltage battery systems (operating above 100V, often up to 400V) allow for much higher efficiency. They require thinner, less expensive wiring and lose less energy during power conversion.
For a deeper dive into these technologies, check out our comprehensive residential solar installation guide.
Designing Your System: Grid-Tie, Hybrid, or Off-Grid
Before buying a single panel, you must decide how your system will interact with the local power grid. This decision impacts your budget, your backup power options, and your utility connection requirements.
| Feature | Grid-Tied System | Hybrid System | Off-Grid System |
|---|---|---|---|
| Grid Connection | Yes | Yes | No |
| Battery Storage | No | Yes (Optional/Recommended) | Yes (Required) |
| Provides Power During Outages | No (Shut down for safety) | Yes | Yes |
| TVA Net Metering Eligible | Yes | Yes | No |
| Initial System Cost | Lowest | Moderate to High | Highest |
- Grid-Tied Systems: These are the simplest and most common setups. Your panels feed electricity directly into your home, and any excess goes back to the utility grid. However, for safety reasons, if the grid goes down, your system automatically shuts off to prevent sending power down the lines where utility crews might be working.
- Hybrid Systems: The best of both worlds. You are connected to the grid and can take advantage of net metering, but you also have a battery bank. If the power grid goes down, your system instantly switches to battery backup to keep your critical loads running.
- Off-Grid Systems: These are entirely independent of the utility grid. You must generate 100% of your own power and store it in a large battery bank. This requires careful sizing and often a backup generator to get you through consecutive cloudy days.
If you are considering getting solar power for your house, we highly recommend hybrid systems for East Tennessee. They offer the security of backup power during storms while keeping you connected to the grid for seamless daily operation.
Sizing Your Solar Array and Battery Storage
Sizing your solar system setup incorrectly is a recipe for frustration. Under-size it, and your batteries will constantly run dry. Over-size it unnecessarily, and you will spend thousands of dollars on capacity you will never use.
To size your system, follow this three-step formula:
1. Calculate Your Daily Energy Load
Look at your utility bills over the past year to find your average daily kilowatt-hour (kWh) usage. If you want to build an off-grid or critical-loads backup system, list the appliances you need to run, their wattage, and how many hours they will run each day.
$$\text{Watt-Hours (Wh)} = \text{Appliance Watts} \times \text{Run Time (Hours)}$$
Add these up to find your total daily watt-hour demand. For example, if your critical loads require 10,000 Wh (or 10 kWh) per day, that is your target.
2. Factor in Your Daily Sun Hours
“Sun hours” do not mean the total hours of daylight, but rather the equivalent hours of peak, high-intensity sunlight. In East Tennessee—including Knoxville, Maryville, and Sevierville—we average about 4 to 4.5 peak sun hours per day depending on the season.
3. Determine Panel and Battery Sizing
To generate 10 kWh of power per day with 4 peak sun hours, you need a solar array that can produce at least 2.5 kW under ideal conditions:
$$\frac{10,000 \text{ Wh}}{4 \text{ Sun Hours}} = 2,500 \text{ Watts (2.5 kW) of Solar Panels}$$
Accounting for real-world system inefficiencies (usually around 20%), you would want to install approximately 3.1 kW of solar panels (e.g., eight 400-watt panels).
For battery storage, if you want 24 hours of backup power for that same 10 kWh load, you will need a 10 kWh lithium battery bank. If using lead-acid, you would need a 20 kWh bank because you can only discharge them halfway.
For a localized look at sizing, consult our guide on properly sizing a solar system.
Determining the Right Solar System Setup for Your Needs
Local conditions play a massive role in your financial return on investment. For example, Knoxville solar cost data shows that while upfront installation costs exist, the combination of federal tax credits and long-term utility savings makes solar highly predictable and rewarding.
Similarly, looking at the Solar Panel Cost Guide in Oak Ridge, TN (2025 Update) or pricing data for Farragut, TN reveals that a custom-sized system tailored to your roof’s specific orientation will always outperform a generic, unoptimized system.
Wiring and Connecting Your Components Safely
Wiring is where a solar system setup goes from a fun weekend planning project to a serious electrical installation. Standard residential solar arrays can produce hundreds of volts of DC electricity—more than enough to cause severe injury or start an electrical fire if handled incorrectly.

When wiring your solar panels, you have two primary options:
- Series Wiring: Connecting the positive terminal of one panel to the negative terminal of the next. This increases the total voltage while keeping the amperage the same. High voltage is excellent for long wire runs because it reduces power loss, but it requires an inverter or charge controller that can handle the higher voltage.
- Parallel Wiring: Connecting all positive terminals together and all negative terminals together. This increases the amperage while keeping the voltage the same. Parallel wiring is safer from a high-voltage standpoint but requires thicker, heavier-gauge copper wires to handle the high current.
Always use industry-standard MC4 connectors for your outdoor panel connections. They are weatherproof, locking, and ensure a tight, low-resistance connection that prevents electrical arcing.
Before starting, cover your solar panels with a dark blanket or cardboard. Panels produce voltage the moment light hits them; keeping them covered keeps the wires cold and safe to handle during the solar panel installation procedure.
The Correct Sequence for a Safe Solar System Setup
If you remember only one safety rule from this guide, make it this one: Always connect your battery to your charge controller before connecting your solar panels.
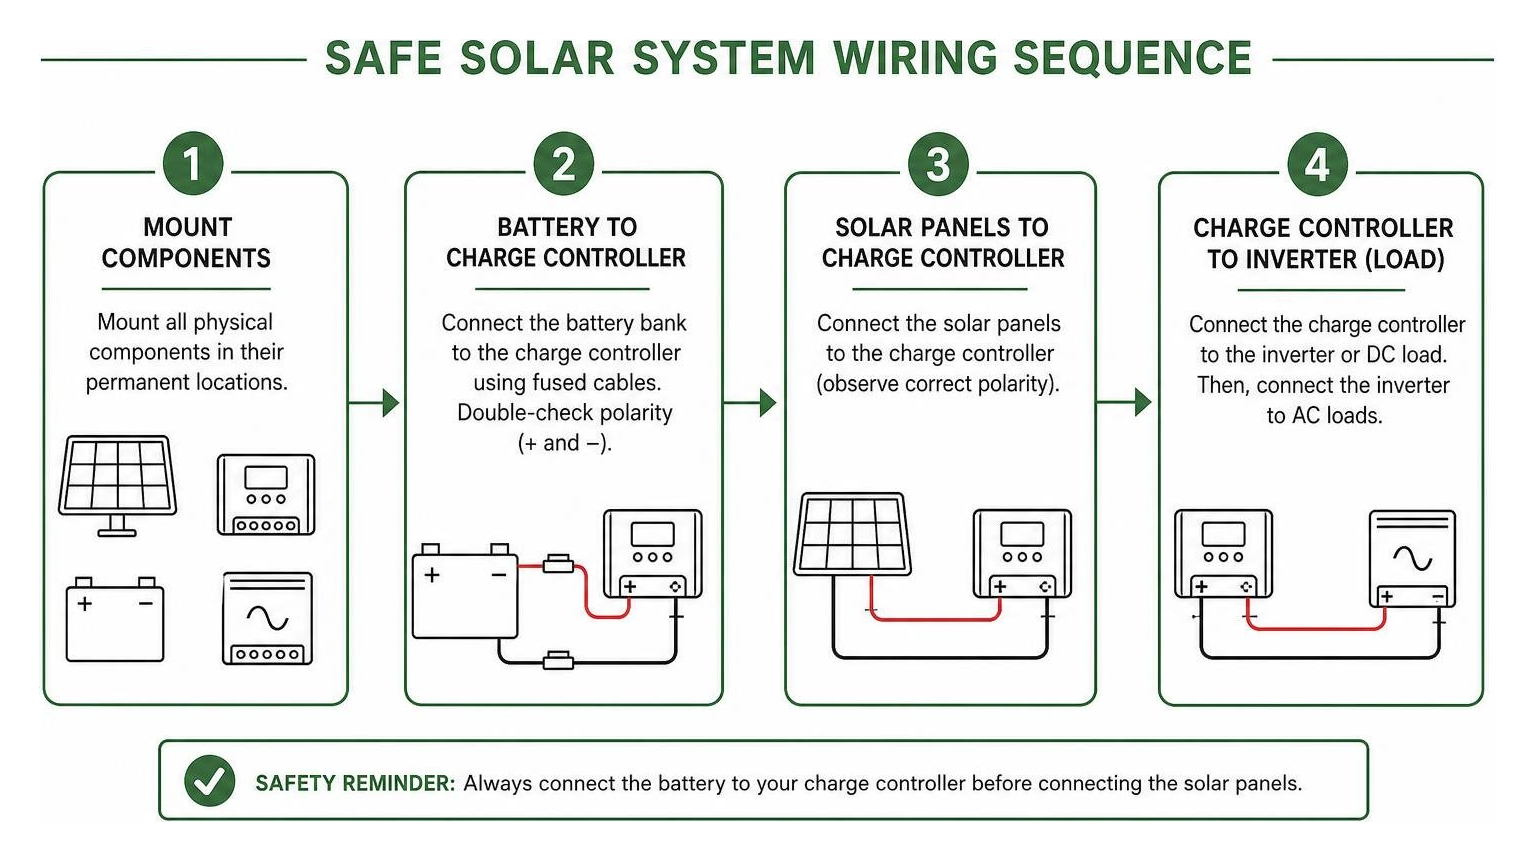
Many modern charge controllers need to detect the battery’s voltage (whether it is a 12V, 24V, or 48V system) to calibrate themselves and regulate power correctly. If you connect the high-voltage solar panels first, the charge controller will not know how to regulate the incoming power and can instantly overheat or fry its internal circuits.
Here is the exact step-by-step sequence for a safe installation:
- Mount all physical components (panels, charge controller, inverter, battery bank) in their permanent locations.
- Connect the battery bank to the charge controller using properly sized, fused copper cables. Double-check your positive (+) and negative (-) polarities.
- Allow the charge controller to boot up and recognize the battery bank voltage.
- Connect the solar panels to the charge controller (ensuring the panels are covered or facing away from the sun during connection).
- Connect the inverter directly to the battery bank (never connect the inverter to the load terminals of a charge controller, as the inverter draws more current than the controller can handle).
- Uncover your panels, check the controller screen to verify that charging current is flowing, and turn on your inverter.
For a detailed walkthrough of this physical installation process, read our step-by-step solar PV installation guide.
Mounting, Maintenance, and Storm-Proofing Your System
Your solar panels will live outdoors in the elements for 25 to 30 years. They need a rock-solid foundation and proper maintenance to perform their best.
- Roof Mounts: The most common residential choice. Panels are mounted parallel to your roof surface using lag bolts secured directly into your roof rafters. For flat roofs, ballasted systems (which use heavy concrete blocks to hold the racking in place without penetrating the roof membrane) are often preferred.
- Ground Mounts: If your roof has too much shade or faces the wrong direction, ground mounts are an incredible alternative. They allow you to orient and tilt your panels perfectly toward the south for maximum efficiency. However, they require digging trenches for electrical conduit and pouring concrete footers.
Once installed, maintenance is surprisingly minimal because solar systems have no moving parts. However, you should plan on:
- Panel Cleaning: Dust, pollen, and bird droppings can decrease your system’s output by 5% to 15%. A gentle spray with a garden hose and a soft squeegee once or twice a year is usually all it takes. Never use abrasive chemicals or pressure washers.
- Seasonal Inspections: Check your mounting hardware to ensure everything remains tight, and look for any signs of animal damage (like squirrels chewing on exposed wires).
- Storm-Proofing: In East Tennessee, we get our fair share of high winds and severe weather. Ensure your racking is rated for local wind loads (typically 90 to 110 mph). Installing whole-house surge protection is also highly recommended to protect your sensitive inverter and battery electronics from lightning strikes.
If you want to see how these factors translate into real-world financial performance, look at the Johnson City solar payback data or the cost trends in Sevierville, TN. Properly mounted and maintained systems consistently pay for themselves years ahead of schedule.
Frequently Asked Questions about Solar Installation
Should I buy a complete solar kit or build a custom system?
Complete solar kits are pre-packaged systems that include compatible panels, inverters, and charge controllers. They are fantastic for small off-grid cabins, RVs, or simple DIY projects because they eliminate the guesswork of component compatibility.
However, for a full-sized residential home, a custom-designed system is almost always superior. Every home has a unique roof shape, shading profile, and electrical load. A custom system ensures you do not overpay for components you do not need, and it allows for professional engineering to meet strict local utility grid-interconnection rules.
Why are high-voltage batteries preferred for modern solar setups?
Traditional battery backups run on low-voltage DC (usually 48V). While safe and reliable, moving large amounts of power at low voltage requires incredibly thick, expensive copper wiring to prevent power loss and overheating.
High-voltage battery systems (operating at 300V to 400V+) match the operating voltage of modern solar arrays and utility grids much more closely. This means the hybrid inverter does not have to work as hard to step the voltage up or down, resulting in higher system efficiency, cooler operating temperatures, and much thinner, easier-to-install wiring.
How do I protect my solar system from severe weather and storms?
First, ensure your racking system is professionally engineered and bolted securely to your home’s structural framing. Second, incorporate high-quality surge protection devices (SPDs) on both the DC side (from the panels) and the AC side (at your main electrical panel) to guard against lightning.
For true storm resilience, we recommend pairing your hybrid solar setup with a whole-home backup generator. If a severe storm knocks out power and brings consecutive days of heavy cloud cover, a backup generator can step in to charge your batteries and power your home until the sun comes back out.
Conclusion
Setting up a solar system is one of the most rewarding home improvement projects you can undertake. It provides clean, reliable power, slashes your utility bills, and gives your family peace of mind during unexpected grid outages.
While a small DIY project can be a fun way to learn the basics, designing and installing a full-scale residential system that safely integrates with your home’s electrical panel and the local utility grid is a highly complex job. One minor mistake can void manufacturer warranties, violate local building codes, or create serious safety hazards.
At Your Home Solar, we provide comprehensive home energy solutions tailored specifically to East Tennessee. Whether you are in Knoxville, Oak Ridge, Maryville, or Johnson City, our team of local experts handles everything—from custom engineering and permitting to flawless, certified installation and long-term support.
Ready to take control of your energy future? Schedule a consultation with the top solar installer in Knoxville today, and let us build a safe, efficient, and reliable solar solution for your home.