Wall Mounted Solar Panels Can Capture More Winter Sun
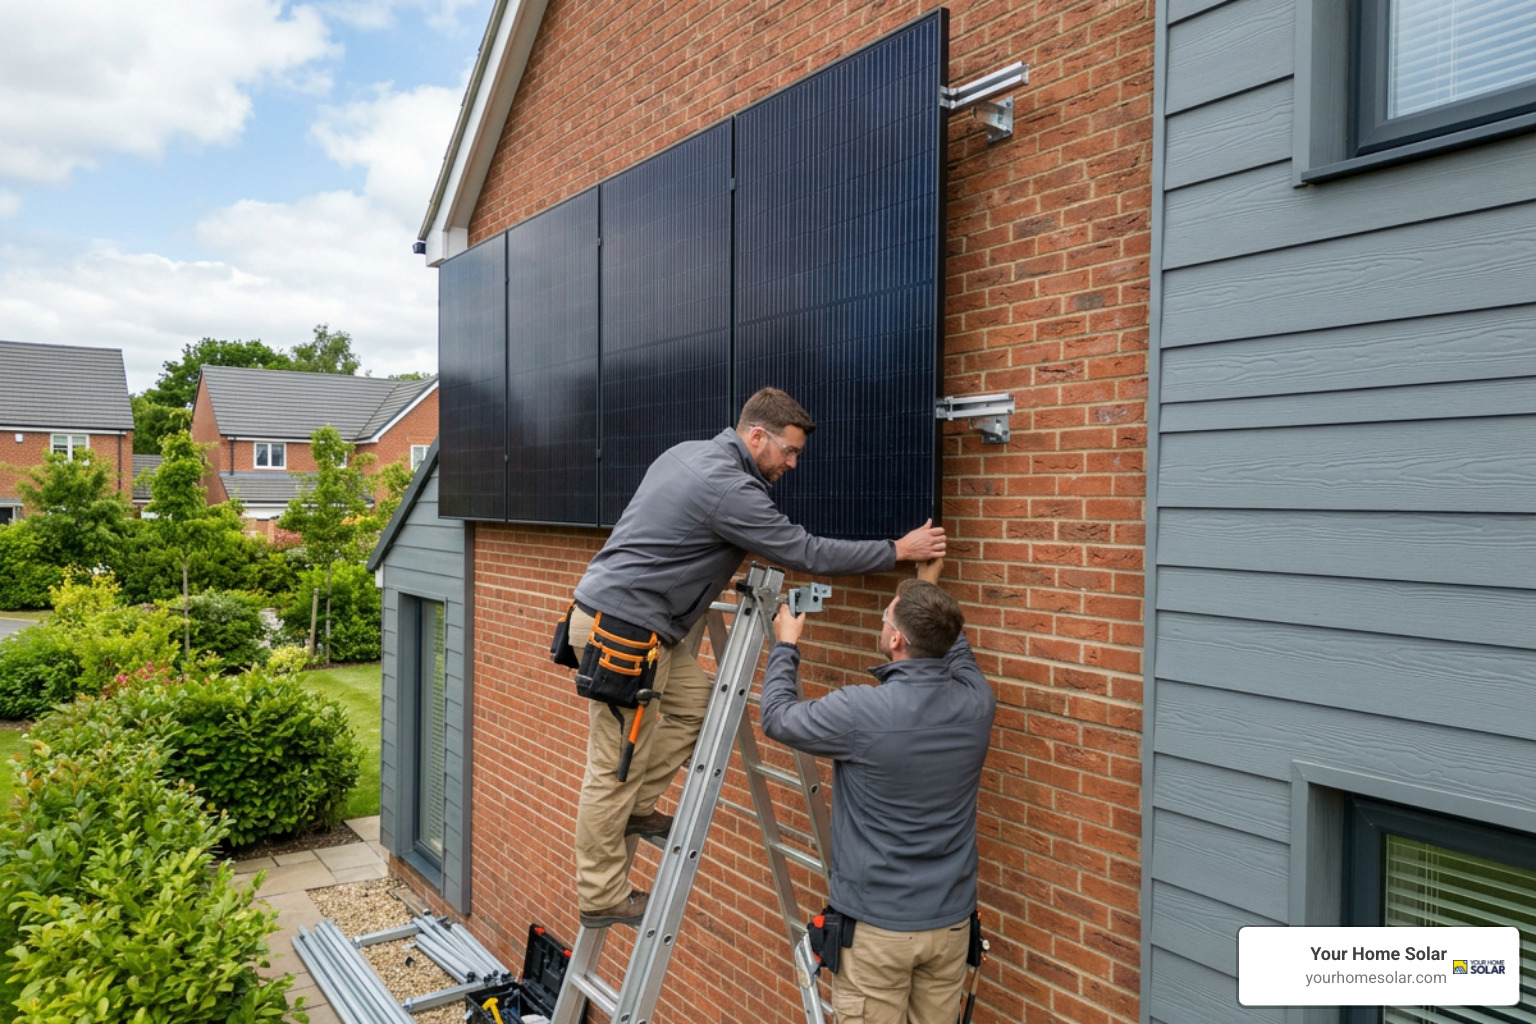
Wall mounted solar panels are a practical option when roof space is limited, a roof is shaded, or you want to capture more of East Tennessee’s low winter sun. A south-facing wall can hold panels vertically or on adjustable brackets with a slight tilt, while leaving an air gap behind the modules for cooling and safe drainage.
Before installing, make sure the wall structure, anchors, mounting hardware, and electrical route are engineered for the panel weight plus local wind and snow loads. Wall systems usually produce less energy over a full year than a well-aimed roof array, but they can perform well in winter mornings and afternoons, shed snow more easily, and turn unused exterior space into a source of backup-ready solar power.
I am Ernie Bussell, Founder and CEO of Your Home Solar, with years of solar operations and installation leadership in East Tennessee. My work with wall mounted solar panels and complete home energy systems is guided by a simple standard: assess the structure, explain the tradeoffs clearly, and install every component for long-term safety and performance.
Simple guide to wall mounted solar panels:
Why Choose Wall Mounted Solar Panels for Seasonal Energy?
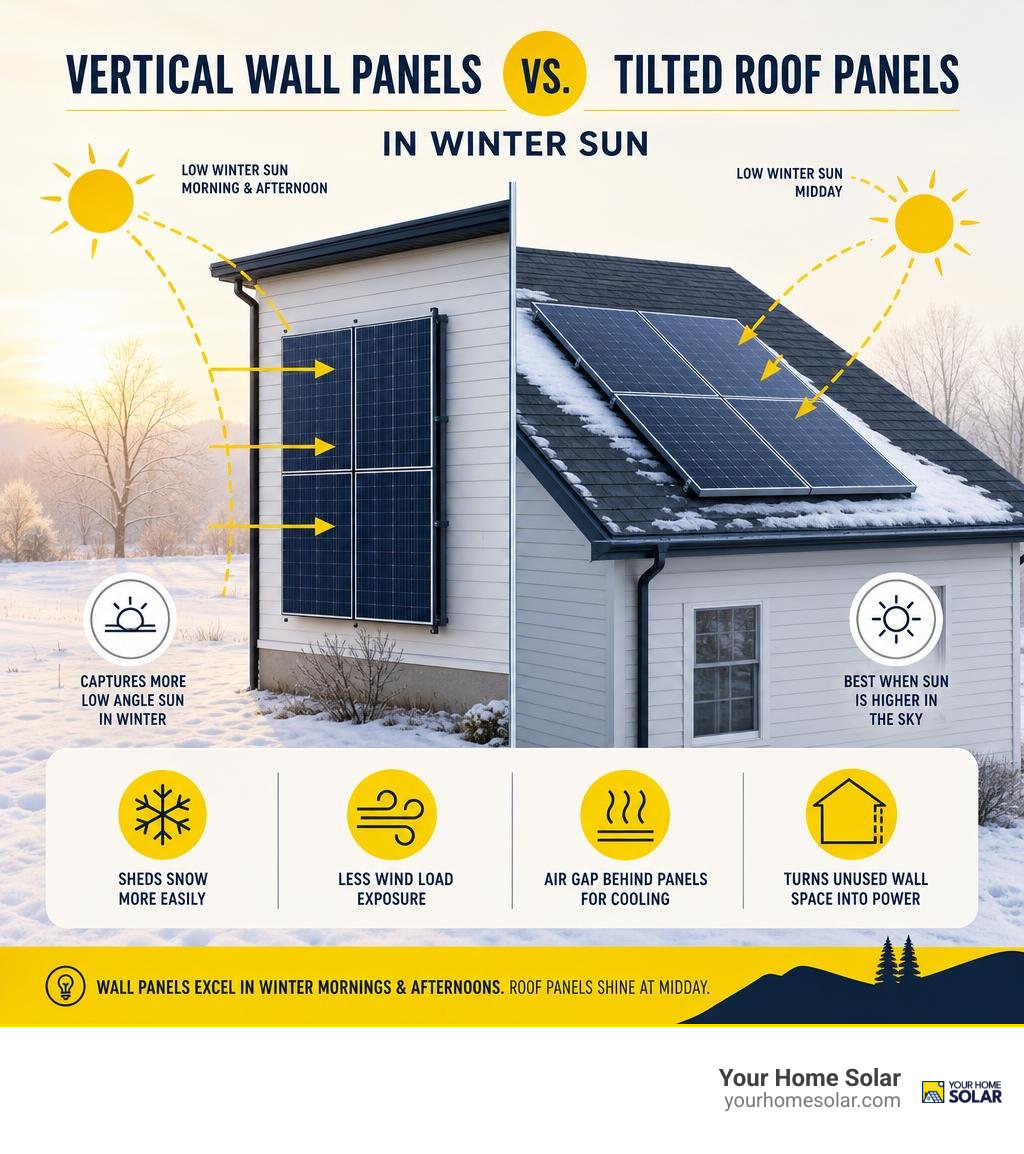
When most homeowners consider renewable power, they imagine arrays placed squarely on shingles. However, vertical facades and wall surfaces present unique mechanical and seasonal benefits. During the winter months across East Tennessee—from Knoxville and Maryville up to Johnson City and Kingsport—the sun travels across the sky at a significantly lower arc. While standard pitched roofs may receive sunlight at steep, inefficient angles from November through February, a vertical wall sits much closer to perpendicular to these low winter rays.
By understanding how light strikes vertical surfaces, homeowners can achieve steady seasonal yields while maximizing solar energy production when heating demands spike. Wall-mounted photovoltaic modules offer several distinct seasonal advantages:
- Enhanced Low-Angle Capture: In midwinter, the noon sun angle drops below 35 degrees. Vertical panels absorb this direct solar radiation far more effectively than low-slope roofs.
- Immediate Snow Shedding: Snow cannot settle on a 90-degree vertical plane. When a winter storm covers rooftop systems across Sevierville or Oak Ridge, wall-mounted panels clear instantly, generating electricity immediately after the clouds break.
- Diffuse and Albedo Light Absorption: Snow-covered ground reflects sunlight upward. Vertical installations efficiently capture this ground-reflected albedo light, turning surrounding snow into natural solar mirrors.
- Architectural Shading and Thermal Buffering: In the summer, when the sun is overhead, vertical panels receive less direct intensity, which naturally limits heat transfer through the building envelope and acts as an exterior thermal barrier.
Optimizing Tilt Angles for Winter Sun Capture
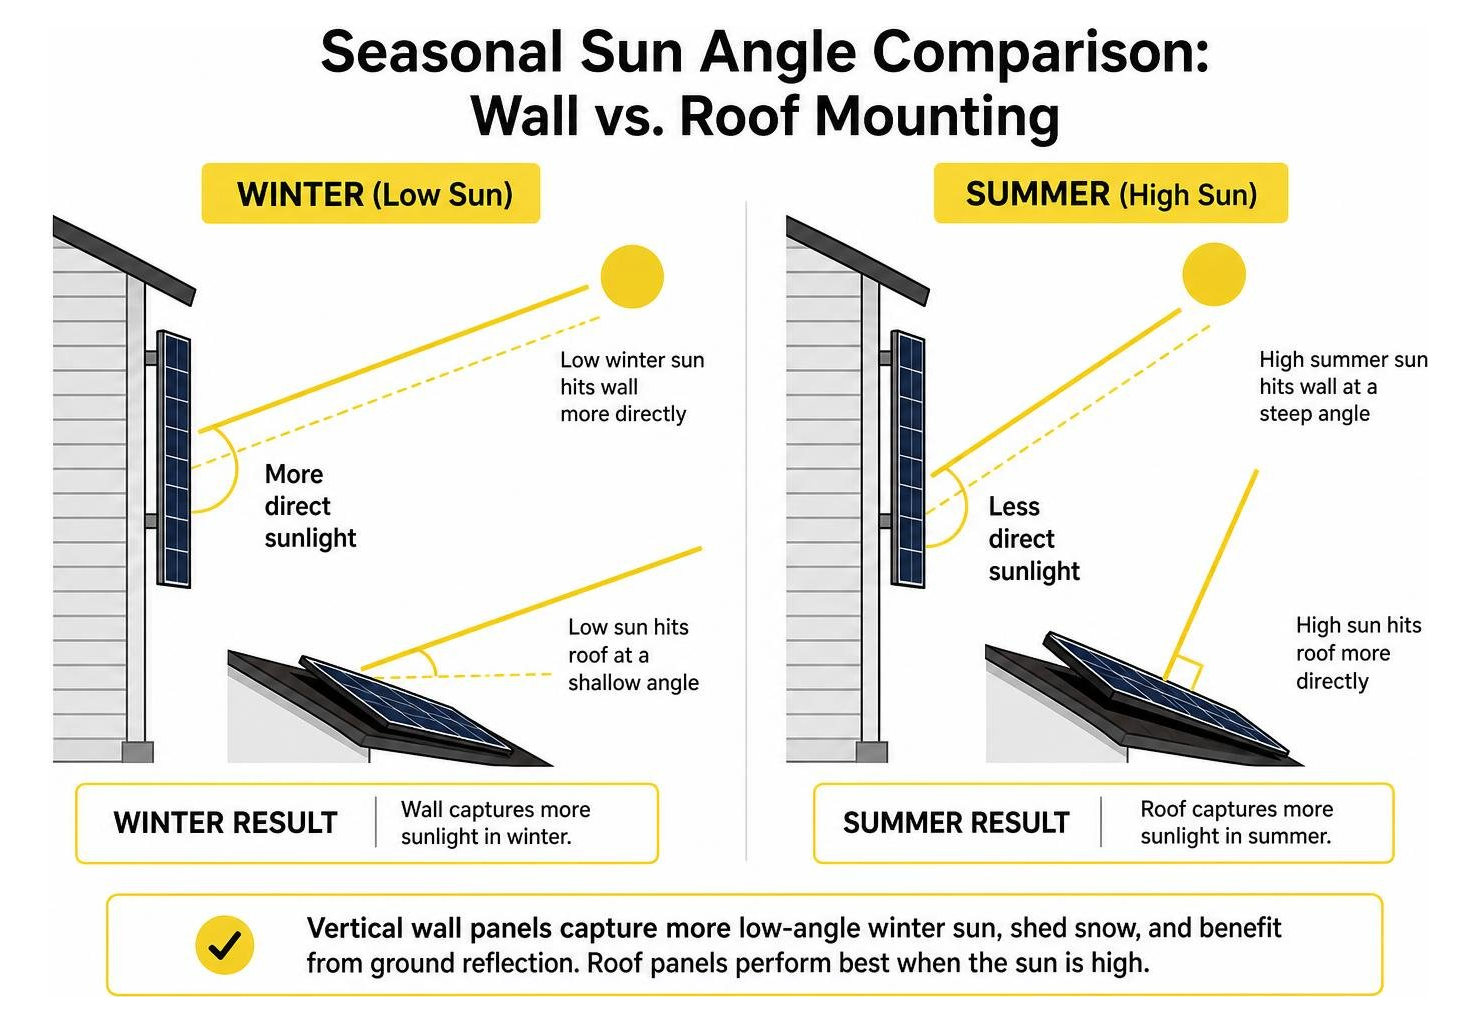
To understand why wall-mounted systems excel in cold weather, it helps to review basic geometry and how solar panels work. Solar cells generate maximum current when incoming photons strike the silicon wafer at a direct 90-degree angle.
During the summer solstice in Tennessee, the sun reaches an altitude above 75 degrees. In contrast, during the winter solstice, that peak altitude drops to approximately 31 degrees. A panel mounted completely flat on a vertical wall (90-degree tilt) captures this winter light at roughly a 59-degree incidence angle—far superior to a shallow 15-degree roof pitch.
When structural space allows, mounting modules on adjustable wall brackets tilted between 60 and 75 degrees achieves the absolute mathematical sweet spot for cold-weather solar harvesting. Aligning these systems within 15 degrees of true south ensures maximum irradiance throughout peak morning and afternoon hours.
Comparing Wall Mounts, Roof Mounts, and Ground Racking
Choosing the right structural foundation for your solar array depends on property boundaries, roof structure, and budget considerations. For homeowners asking, “will putting a solar system on my roof damage it,” wall mounts provide an appealing alternative that avoids shingle penetrations entirely.
| Feature / Metric | Wall Mounted Systems | Standard Roof Mounts | Ground Mounted Arrays |
|---|---|---|---|
| Typical Tilt Angle | 60° to 90° (Vertical) | 15° to 35° (Matches Roof) | 25° to 45° (Customizable) |
| Winter Generation | High (Optimal low sun angle) | Moderate (Suboptimal incidence) | High (If tilted for winter) |
| Snow Accumulation | None (Sheds via gravity) | Moderate to High (Can block sun) | Moderate (Requires manual clearing) |
| Structural Footprint | Zero ground/yard space used | Uses existing roof area | Requires substantial open land |
| Roof Penetration Risk | Zero shingle penetrations | Requires rafters & flashing | None |
| Shading Vulnerability | Prone to fences, trees & eaves | Low (High elevation) | Low (Site selectable) |
| Installation Complexity | High (Masonry/cladding anchors) | Moderate (Standard racking) | High (Trenching & foundations) |
Wall Mounting Hardware and System Options
Mounting an electrical power plant to a vertical wall requires specialized framing that handles dead weight and resists lateral wind forces. Standard roof clamps cannot simply be turned sideways; engineered systems like specialized PV mounting systems for facades use reinforced profiles to keep modules secure under all weather conditions.
Selecting Hardware for Wall Mounted Solar Panels
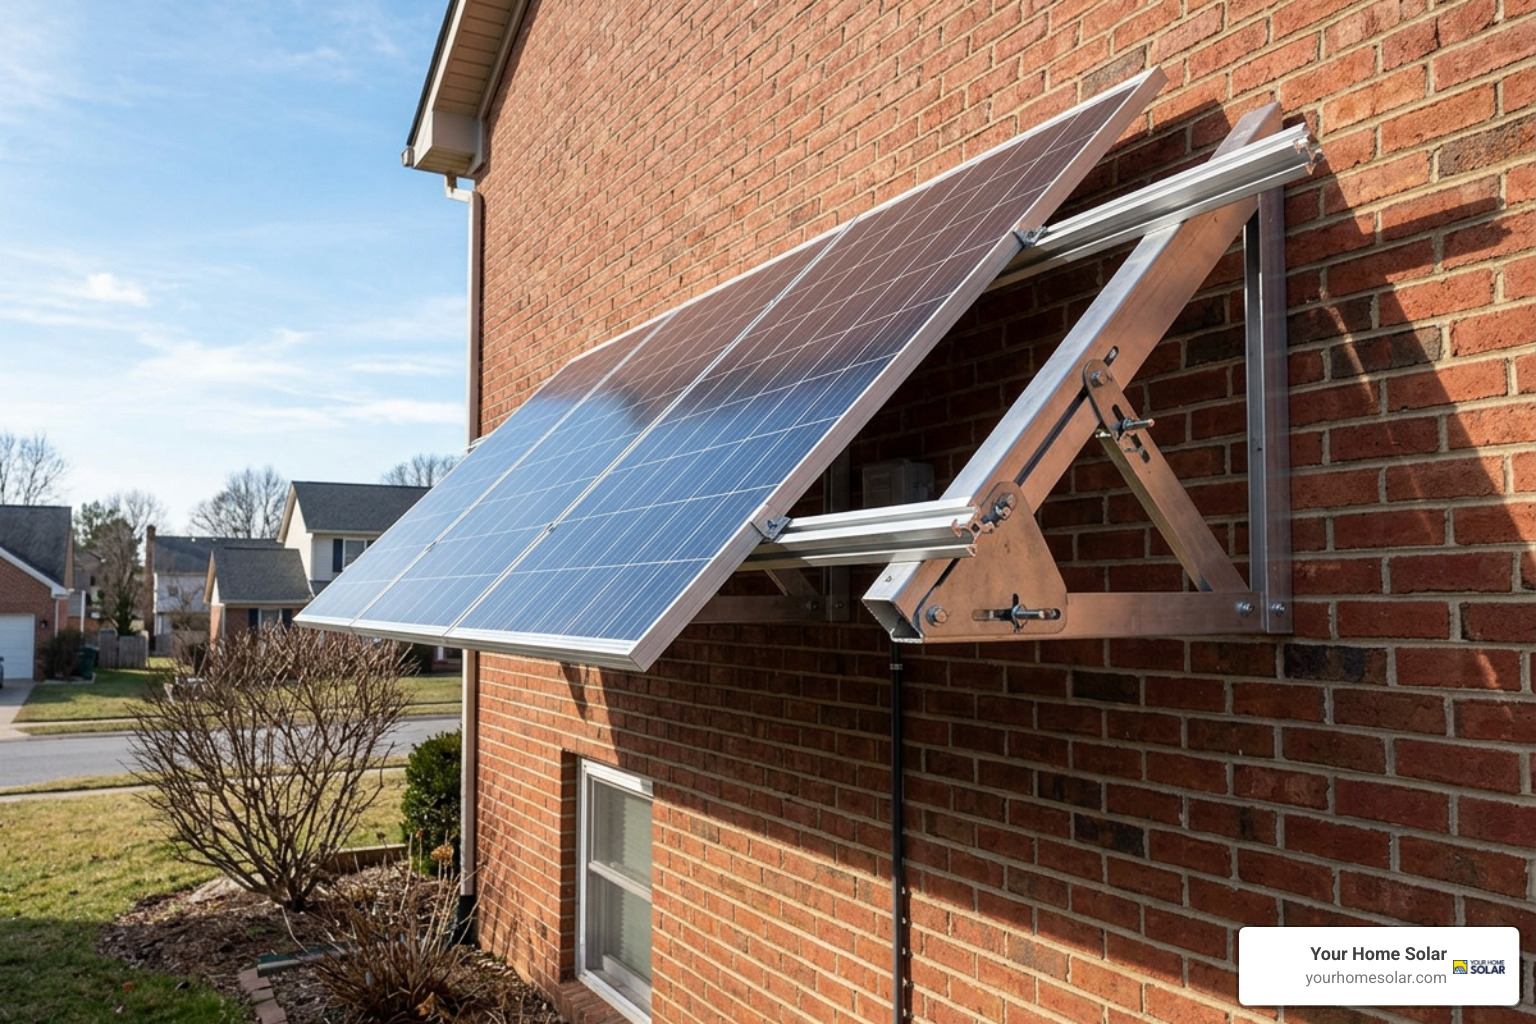
The hardware chosen for vertical installations must balance structural rigidity, thermal management, and corrosion resistance. When selecting components, consider the following primary hardware categories:
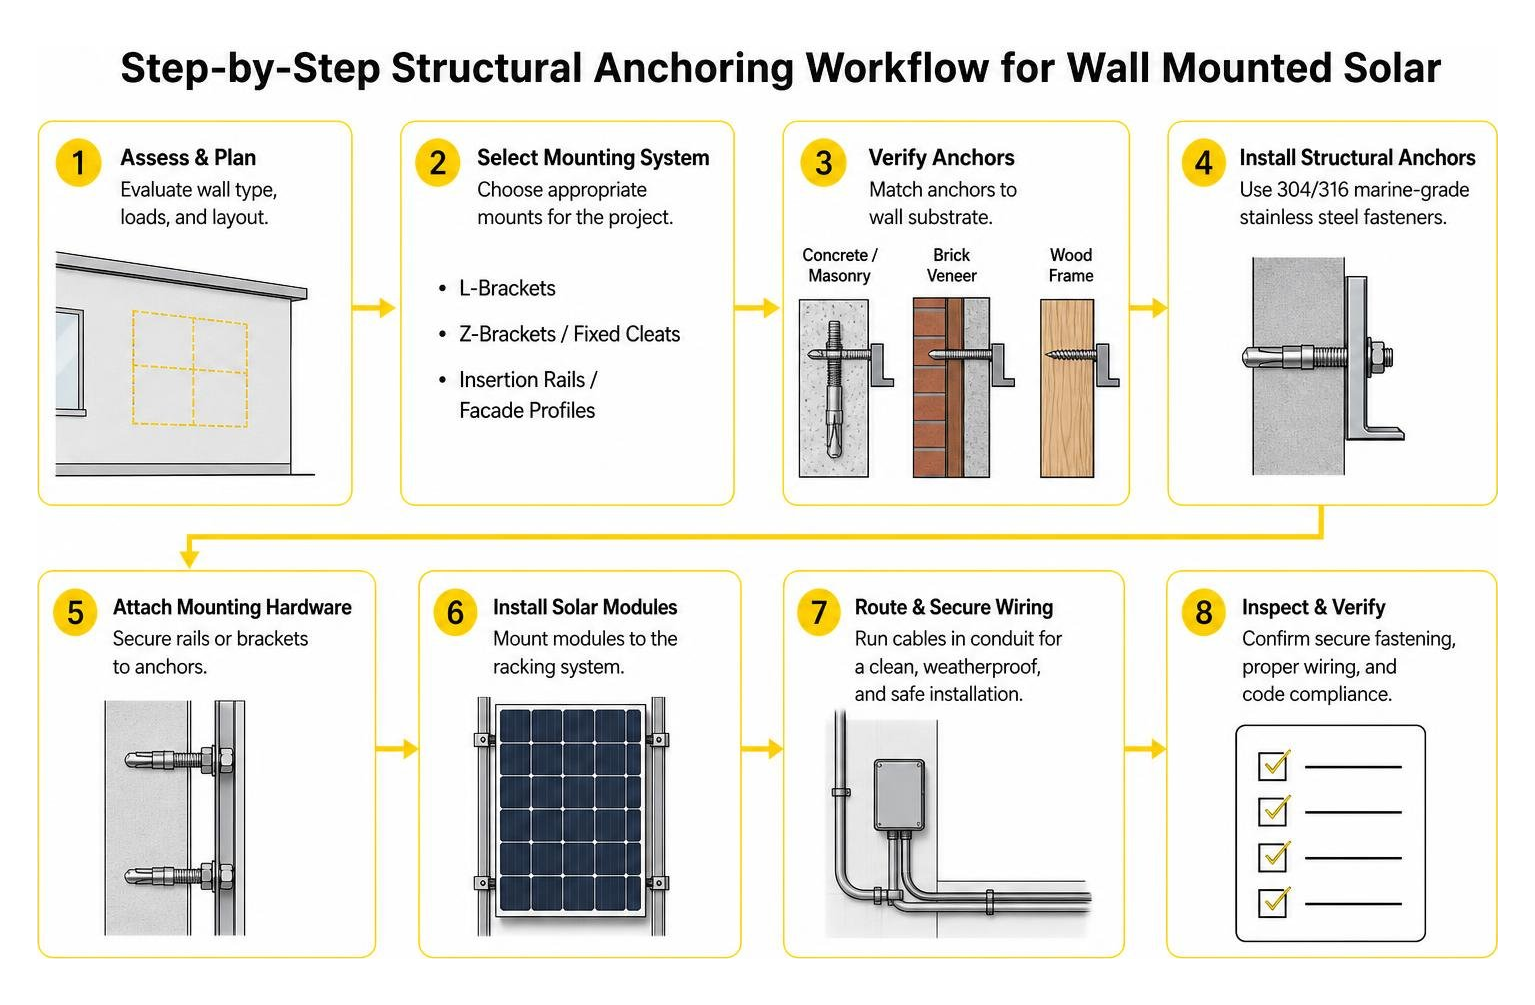
- Heavy-Duty Unistrut Channels & Racking Rails: Slotted metal framing channels (often 1-5/8″ hot-dipped galvanized or aluminum) form the backbone of vertical arrays. Using spring nuts and high-tensile stainless steel bolts, installers can mount horizontal rails directly to structural wall studs or masonry.
- Adjustable Tilt Brackets: For owners wanting seasonal optimization, triangular tilt kits allow panels to swing between 45 and 90 degrees. These systems use telescoping support legs with locking pins to adjust angle settings in spring and autumn.
- Z-Brackets & Fixed Cleats: For small off-grid setups or individual auxiliary panels, heavy-duty aluminum Z-brackets provide a cost-effective, low-profile anchor directly to flat substrates.
- Insertion Rails & Facade Profiles: Advanced architectural solutions—such as The Solarix solar panel mounting system—utilize continuous rear profiles made from recycled aluminum, allowing modules to lock cleanly into place without visible front clamps while preserving an integrated rear ventilation cavity.
All fasteners must consist of 304 or 316 marine-grade stainless steel to prevent galvanic corrosion between aluminum panel frames and steel mounting substructures.
Wall Mounts for Mobile, RV, and Off-Grid Use
Vertical mounting isn’t limited to main residential homes. It has become a practical approach for outbuildings, sheds, detached workshops, and mobile applications across Tennessee.
On recreational vehicles, camper vans, and off-grid tiny homes, roof real estate is often occupied by air conditioning units, vents, and luggage racks. Utilizing heavy-duty side-of-pole or exterior wall brackets turns vertical vehicle siding into functional charging space.
For curved or weight-sensitive structures, ultra-thin flexible monocrystalline panels can be secured using high-bond structural adhesives. These lightweight setups eliminate mechanical bracket penetrations entirely, providing auxiliary battery maintenance for security systems, gate openers, or remote cabins. To see how these configurations fit into a broader power strategy, review our residential solar solutions guide.
Engineering, Installation, and Safety Guidelines
Vertical installations present unique engineering challenges. Unlike a roof array, where the building carries the downward dead weight directly, a wall mount exerts continuous shear and pullout tension on every wall anchor.
Adhering to strict engineering standards and local solar installation permitting standards ensures that arrays remain safe through severe weather events.
Managing Wind Loads, Snow, and Substrate Anchoring
When high winds travel across a building envelope, they create localized low-pressure zones that produce significant suction (uplift) forces. On vertical walls, wind sweeping around building corners can exert strong lateral forces on solar panels.
Engineers calculate anchor sizing based on several substrate requirements:
- Poured Concrete & Solid Masonry: Requires heavy-duty wedge anchors or epoxy chemical anchoring systems rated for substantial dynamic shear and pullout loads.
- Brick Veneer: Standard decorative brick veneer cannot support the dynamic pullout weight of solar racking. Anchors must pass completely through the facade into structural concrete masonry units (CMU) or the interior timber framework.
- Wood Frame Construction: Structural lag screws (minimum 5/16″ diameter) must seat deeply into the center of load-bearing 2×4 or 2×6 studs. Racking should never be secured solely to OSB or plywood sheathing.
Ensuring structural integrity over decades requires components with proven solar panel durability, capable of withstanding front static snow loads of up to 5,400 Pa and rear wind suction loads exceeding 2,400 Pa.
Best Practices for Wiring Wall Mounted Solar Panels
Wiring a vertical solar system requires meticulous organization to ensure weatherproofing, safety, and a clean appearance. Follow this established workflow from our a step-by-step guide to solar PV system installation:
- Rear-Ventilated Cable Routing: Route all interconnecting PV cables behind the panels, clipping them securely along the aluminum racking to prevent sagging and UV exposure.
- Drip Loops & Weatherproof Entry: Form a distinct drip loop in the wiring before it enters any exterior wall pass-through. This prevents rainwater from tracking along the cable sleeve toward the building interior.
- UV-Resistant Metal Conduit: Run external homerun wiring through rigid or EMT conduit painted to match the exterior cladding. This protects conductors from mechanical damage and weather wear.
- Accessible Rapid Shutdown & Junction Boxes: Place weather-rated (IP67 or IP68) junction boxes and rapid shutdown devices where they can be accessed for testing without requiring full panel disassembly.
Avoiding Common Mistakes and Ensuring Long-Term Upkeep
Installing solar modules flush against a vertical wall without adequate planning can lead to performance issues. Below are critical pitfalls to avoid during design and construction:
- Eliminating the Rear Air Gap: Solar cells lose efficiency as their temperature rises (typically declining by 0.3% to 0.4% per degree Celsius above 25°C). Mounting panels directly against flat siding traps hot air. Maintaining a minimum 30 mm to 60 mm standoff creates a natural chimney effect, where rising warm air draws cooler air from below to keep the modules operating efficiently.
- Ignoring Galvanic Corrosion: When raw aluminum rails touch bare carbon steel framing, moisture triggers galvanic reactions that degrade the fasteners. Always use isolating nylon washers, EPDM gaskets, or anti-galvanic barrier tape between dissimilar metals.
- Micro-Cracking from Mechanical Stress: Uneven wall surfaces can torque the aluminum frame if fasteners are tightened unevenly. This flexes the tempered glass and creates internal micro-cracks across the silicon cells. Always shim racking rails so they form a flat, level mounting plane.
Routine system health checks and regular solar energy maintenance will protect structural fasteners, maintain electrical continuity, and ensure consistent seasonal energy production.
Frequently Asked Questions About Vertical Solar
How much energy do vertical solar panels produce compared to roof mounts?
Over a full 12-month calendar year, a vertical (90-degree) solar array typically produces 20% to 30% less total kilowatt-hours than an unshaded, south-facing roof array tilted at 30 degrees. This annual difference occurs because vertical panels capture less sunlight during long summer days when the sun is directly overhead.
However, during midwinter, that dynamic shifts: vertical panels can match or even exceed the daily production of shallow-pitched roof systems by directly facing the low winter sun while shedding snow immediately.
What wall substrates are safe for mounting solar panels?
Solar arrays can be securely mounted to structural concrete, poured foundations, concrete masonry units (CMU), heavy timber framing, and commercial steel studs.
Decorative siding materials—such as vinyl, fiber cement, thin brick veneer, and cedar shakes—cannot support dynamic wind and dead loads on their own. In these installations, structural fasteners must pass through the aesthetic finish and anchor directly into the load-bearing framing members beneath.
Do wall-mounted solar panels require regular cleaning?
Vertical solar panels require significantly less cleaning than rooftop or ground-mounted modules. Because they stand at 60 to 90 degrees, gravity naturally prevents dust, pollen, leaves, bird droppings, and snow from settling on the glass. Normal rainfall rinses away surface debris, making vertical systems a low-maintenance choice for exterior facades.
Conclusion
Wall-mounted solar arrays offer an effective way to generate renewable power, optimize seasonal efficiency, and make use of unshaded vertical space. By taking advantage of low winter sun angles, shedding snow naturally, and avoiding roof penetrations, vertical solar adds valuable flexibility to modern clean energy designs.
Whether you are seeking supplemental winter power, navigating limited roof space, or designing an integrated clean energy system for your home, our team is here to help. Contact Your Home Solar—the top solar installer in Knoxville, TN—to schedule a comprehensive engineering assessment and find the ideal solar solution for your property.