

What You Need to Know Before You Install a Home Battery
Thinking about whether to install a home battery is one of the smartest energy questions you can ask as a homeowner right now. Here’s a quick overview of what the process looks like:
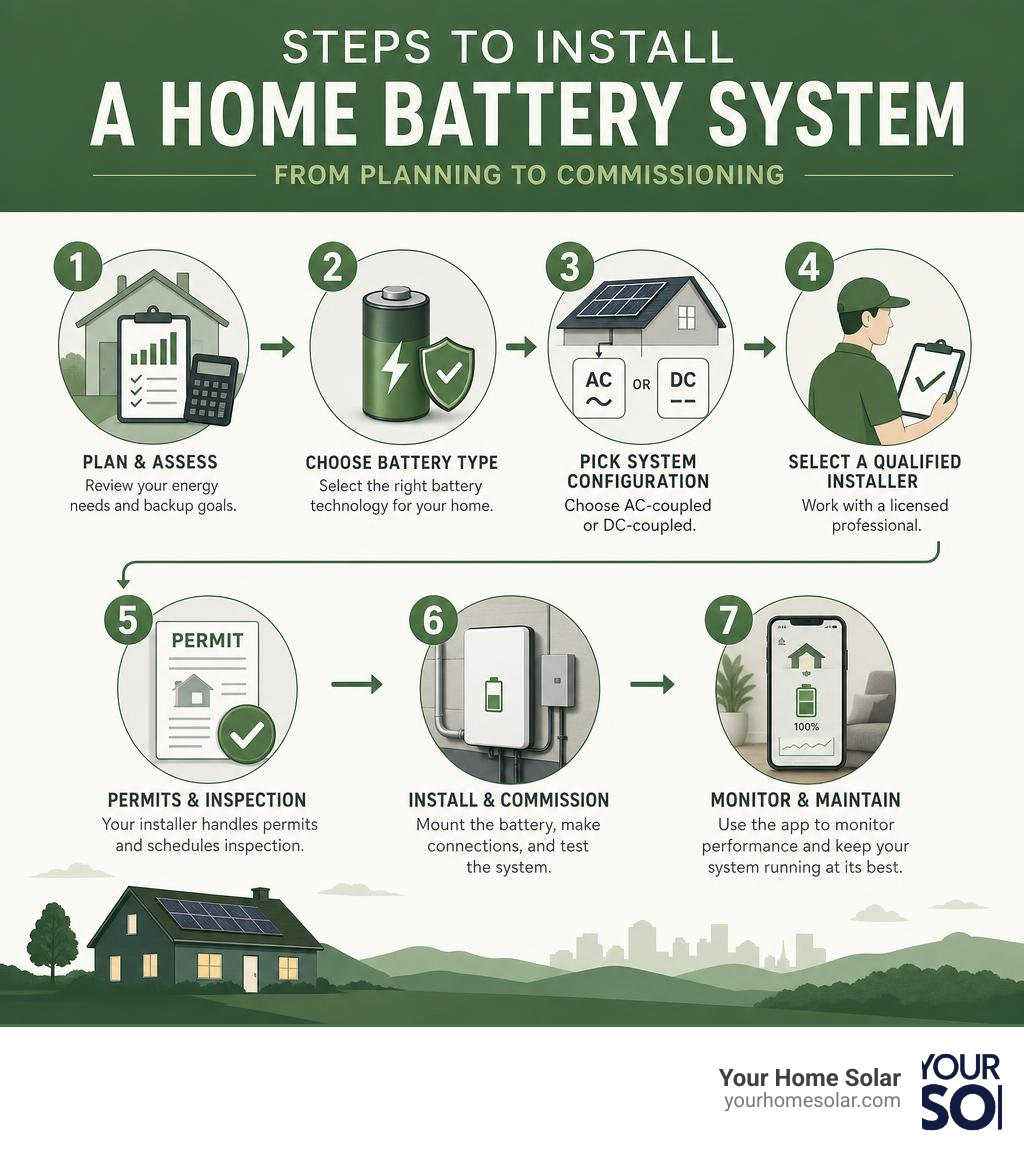
How to install a home battery — at a glance:
- Calculate your energy needs — review your utility bills and identify the appliances you need to keep running during an outage
- Choose a battery type — lithium iron phosphate (LiFePO4) is the most common and reliable option for homes today
- Pick your system configuration — AC-coupled (easier for retrofits) or DC-coupled (better for new installs with solar)
- Select a qualified installer — nearly all installations require permits and must meet National Electrical Code (NEC) requirements
- Pull permits and pass inspection — your installer submits electrical plans and a one-line diagram to your local authority
- Install and commission — mount the battery, make electrical connections, and test the system
- Monitor and maintain — use the manufacturer’s app to track performance over time
The total cost typically runs $9,000 to $19,000, depending on system size and complexity. Federal tax credits can offset a significant portion of that.
Power outages, rising utility rates, and the push for cleaner energy have put home battery storage at the top of many East Tennessee homeowners’ lists. And for good reason — over 50% of people who install a home battery do so primarily for backup power. Whether you’re pairing storage with solar panels or simply want a grid-charged backup, understanding the full installation process before you commit saves time, money, and frustration.
This guide walks you through everything: battery types, system sizing, physical and electrical requirements, permits, costs, and common mistakes to avoid.
I’m Ernie Bussell, Founder and CEO of Your Home Solar, and I’ve spent years overseeing solar and battery installations across East Tennessee — including managing installation crews for a $40 million per year operation — so I know exactly what it takes to install a home battery correctly, safely, and in a way that delivers real long-term value. Let’s get into it.
Install home battery terms you need:
Understanding Home Battery Types and Chemistries
When you decide to install a home battery, your first major choice is selecting the right battery chemistry. The chemistry you choose dictates your system’s performance, safety, depth of discharge (DoD), and lifespan. Modern residential energy storage systems predominantly use lithium-ion technology, but there are distinct differences within this category, as well as older technologies still in limited use.
Lithium Iron Phosphate (LiFePO4 / LFP)
Lithium iron phosphate has rapidly become the gold standard for residential energy storage. LFP batteries are highly stable, significantly reducing the risk of thermal runaway (overheating and catching fire). They also offer an impressive lifespan, typically lasting 10 to 15 years, and support a high depth of discharge—often 90% or more. This means you can use almost all of the stored energy without damaging the battery’s health.
Nickel Manganese Cobalt (NMC)
NMC is another common lithium-ion chemistry. Historically popular due to its high energy density (more power in a smaller, lighter package), NMC batteries are widely used in devices like smartphones and electric vehicles. However, for home stationary storage, they are gradually losing ground to LFP because they have a slightly higher risk of thermal runaway and a shorter cycle life under heavy daily use.
Lead-Acid
Traditional flooded and sealed lead-acid batteries have kept the lights on for decades in early off-grid systems. However, they are rarely used in modern residential installations. Lead-acid batteries have a low depth of discharge (typically capped at 50% to prevent rapid degradation) and a short lifespan of only 3 to 5 years. They also require high maintenance and occupy a massive physical footprint compared to lithium alternatives.
| Feature | Lithium Iron Phosphate (LiFePO4) | Nickel Manganese Cobalt (NMC) | Lead-Acid (Deep Cycle) |
|---|---|---|---|
| Typical Lifespan | 10–15 years (6,000+ cycles) | 10 years (3,000–4,000 cycles) | 3–5 years (500–1,000 cycles) |
| Depth of Discharge (DoD) | 90% – 100% | 80% – 90% | 50% |
| Safety Profile | Extremely high thermal stability | Moderate thermal stability | Low (gassing risks; requires ventilation) |
| Maintenance | None | None | High (for flooded types) |
| Relative Cost | Moderate to High | High | Low (but high long-term replacement cost) |
To dive deeper into these technologies and discover which one fits your specific goals, check out our More info on battery types.
Pre-Installation Planning and System Design
A successful battery installation does not start with a wrench; it starts with a calculator. Sizing your system incorrectly can lead to two frustrating outcomes: you either spend thousands of dollars on capacity you never use, or you find yourself sitting in the dark during a blackout because your battery drained in two hours.
To design the perfect system, you need to weigh your primary goals. Are you looking for whole-home backup, partial-home backup for essential loads, or simply looking to store power to offset peak utility rates?
For a comprehensive comparison of how different setups perform under pressure, read our More info on battery comparison.
Sizing Your System Before You Install Home Battery Storage
To size your battery, you must distinguish between two key electrical metrics: power (measured in kilowatts, or kW) and capacity (measured in kilowatt-hours, or kWh).
- Power (kW) is how much electricity the battery can deliver at any single moment. This determines how many appliances you can run simultaneously.
- Capacity (kWh) is the total amount of energy stored in the battery. This determines how long you can run those appliances.
To calculate your needs, review your utility bills to find your average daily consumption in kWh. The average American household uses about 30 kWh per day (900 kWh per month). If you want whole-home backup to live completely normally during an outage, you would need multiple batteries stacked together.
For most homeowners in East Tennessee, a “critical loads” or “partial-home” backup strategy is much more practical and cost-effective. This involves isolating your most important appliances onto a dedicated subpanel.
Common critical loads include:
- Refrigerator/Freezer (approx. 1.2 kWh to 2 kWh per day)
- Well pump or sump pump (high startup power, but low daily kWh)
- LED lighting and device charging (minimal draw)
- Essential medical equipment
If you are considering a robust system that can handle both daily household loads and reliable backup, learn more about what a More info on 10kW systems can do for your property.
System Configuration: AC vs. DC Coupling
Another critical design decision is choosing how your battery integrates with your electrical system and solar panels. This is done through either AC (Alternating Current) or DC (Direct Current) coupling.
AC-Coupled Systems
In an AC-coupled system, the solar panels and the battery storage system have separate inverters. The solar panels produce DC electricity, which is immediately converted to AC by a solar inverter to power your home. If there is excess power, it is sent to the battery’s dedicated storage inverter, which converts it back to DC to charge the battery.
- Pros: Extremely easy to retrofit onto existing solar panel systems. If you already have solar panels installed at your home in Knoxville or Johnson City, AC-coupling is usually the cheapest and least disruptive way to add storage.
- Cons: Less efficient. Every time electricity is converted between AC and DC, you lose about 1% to 3% of your energy to heat.
DC-Coupled Systems
In a DC-coupled system, both the solar panels and the battery connect to a single, smart “hybrid” inverter. The DC power generated by your panels flows directly into the battery without any conversion losses.
- Pros: Highly efficient. Because the electricity is only inverted once (when it is finally sent to your home’s main panel as AC), you maximize the energy you keep.
- Cons: More complex and expensive to retrofit. If you already have a standard solar inverter, you will have to replace it with a hybrid model, which increases equipment costs.
Key Steps to Install Home Battery Systems Safely
Installing a high-voltage, high-capacity home battery is not a weekend DIY project. It requires professional electrical expertise to prevent severe hazards like electrical shock, short circuits, or thermal runaway.
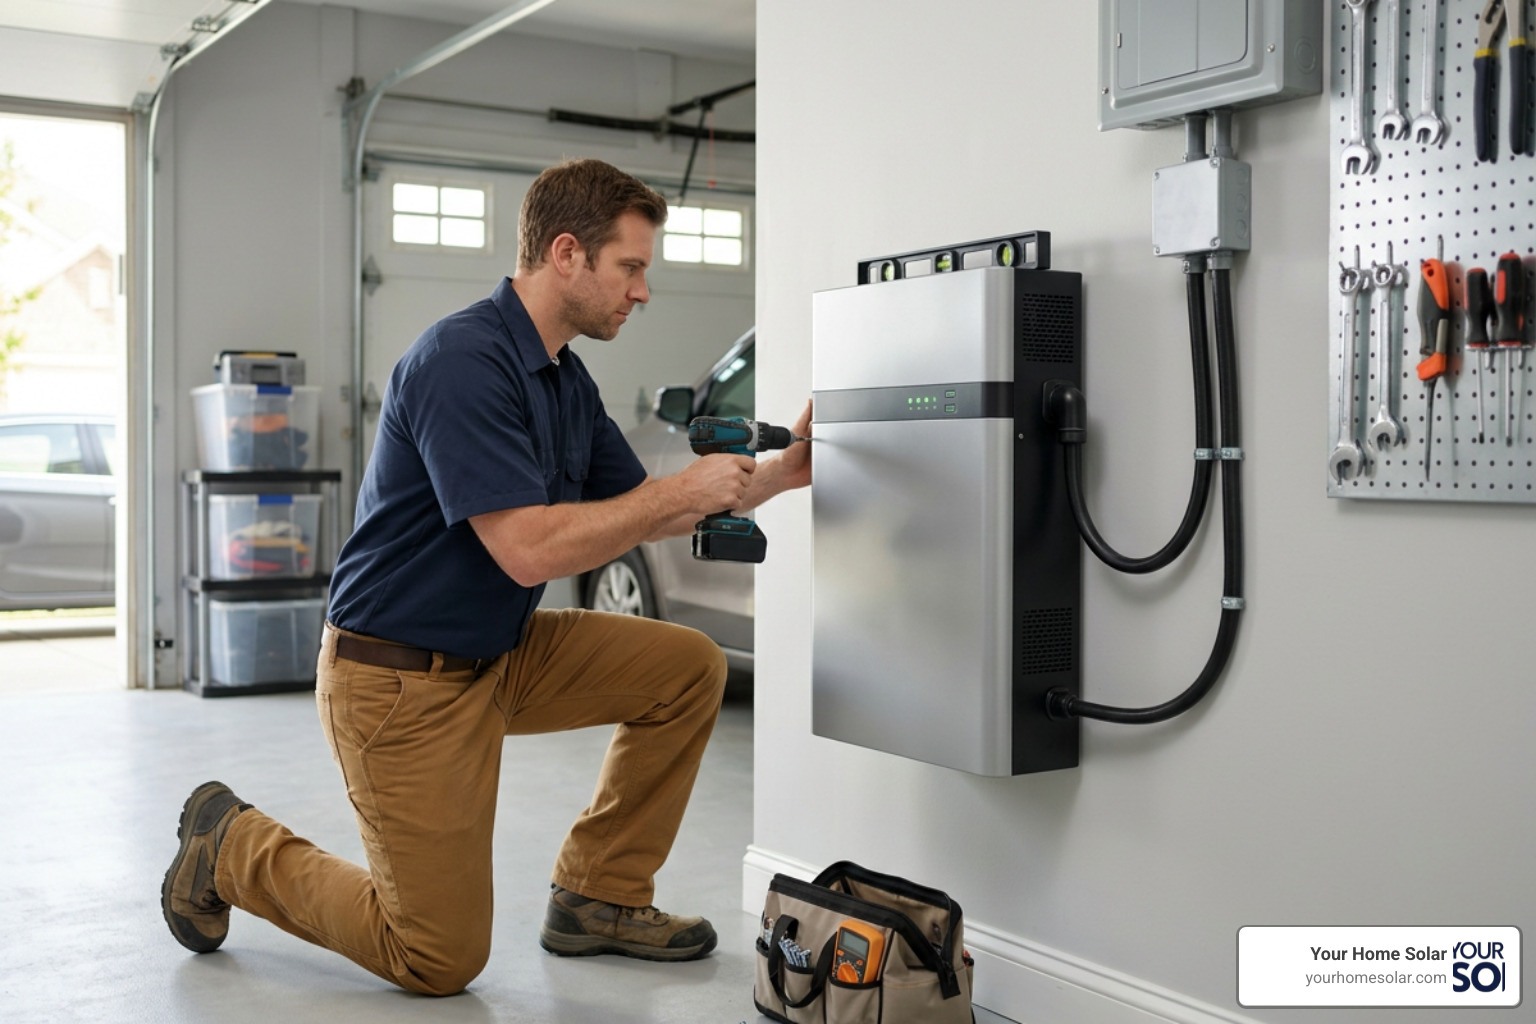
When we install a home battery, we strictly follow manufacturer guidelines, local building codes, and the National Electrical Code (NEC). To see the exact technical specifications required for these systems, you can review the Home Battery 48V Installation Guide.
Physical and Electrical Site Requirements
Before mounting any hardware, the installation site must be carefully vetted. Batteries are sensitive to temperature and environmental conditions.
- Location: The ideal spot is a cool, dry, well-ventilated space like a garage, basement, or utility closet. While many modern batteries are NEMA 3R rated for outdoor installation, keeping them out of direct sunlight in our hot Tennessee summers extends their lifespan.
- Temperature Control: Most lithium batteries operate best between 0°C and 30°C (32°F to 86°F). Extreme cold slows down chemical reactions and reduces capacity, while extreme heat accelerates cell degradation.
- Clearance and Safety Barriers: National fire codes require strict clearance around battery enclosures. For example, you must maintain at least 3 feet (91 cm) of clear space in front of the battery and keep it away from emergency exits. If you mount the battery on a combustible surface (like wood framing), you must install a non-combustible barrier (like cement board) behind it.
- Electrical Specifications: Connecting a battery requires heavy-duty wiring. For low-voltage systems, charging cables must have a large conductor cross-section (often 35mm²) to handle high currents safely.
To understand how professional installers prepare a property for these systems, check out this Site Requirements and Pre-Install Guidance document.
Step-by-Step Guide to Battery Storage Setup
Once the site is prepared, the actual installation follows a precise sequence:
- Mounting the Hardware: Installers secure the heavy wall-mount brackets or position the floor stands. Because battery modules are heavy (often weighing over 100 lbs each), they must be anchored directly into wall studs or masonry.
- Assembling the Battery Stack: For modular systems, individual battery units are stacked or mounted side-by-side and secured to prevent tipping.
- Low-Voltage and Communication Wiring: Installers connect the communication cables (such as CAN-bus RJ45 cables) between the battery modules and the inverter. This allows the system’s computer to monitor cell voltage and temperature.
- High-Voltage DC/AC Connections: Installers run the heavy power cables through conduit, connecting the battery to the inverter and the main electrical panel.
- Integrating Safety Devices: This includes installing dedicated AC/DC disconnect switches within line-of-sight of the battery and setting up rapid shutdown mechanisms to protect emergency responders.
- Commissioning and Testing: After verifying all connections, the system is powered on, firmware updates are applied, and off-grid testing is performed to ensure the automatic transfer switch works seamlessly during a simulated outage.
For a detailed, step-by-step technical breakdown of this process, see the Home Battery (Low Voltage) Installation Guide.
Permits, Codes, and Regulatory Approvals
You cannot simply hang a battery on your wall and plug it in. To ensure safety and maintain your home insurance coverage, the installation must be fully permitted and approved.
- Local Permits: Your local building department in places like Kingsport, Oak Ridge, or Farragut will require a building and electrical permit. This involves submitting detailed electrical schematics, including a one-line diagram that shows exactly how the battery, inverter, solar panels, and grid connect.
- Electrical and Fire Codes: The system must comply with the National Electrical Code (NEC Article 706) and local fire codes, which dictate where batteries can be placed, how they must be ventilated, and what safety labels must be applied to your electrical panels.
- Utility Interconnection: If your battery is grid-tied, you must sign an interconnection agreement with your local utility provider (such as Knoxville Utilities Board or BrightRidge in Johnson City). The utility must verify that your system will not backfeed power into the grid during a blackout, which would pose a fatal hazard to utility line workers.
Navigating these regulations can be daunting, but a certified local installer handles this paperwork on your behalf. To learn more about the regulatory landscape and how modern storage systems fit into home energy management, read our More info on energy storage solutions.
Cost Breakdown and Financial Incentives
Let’s look at the financial reality of adding storage to your home. While the investment is significant, understanding the cost components and available incentives helps you calculate your true return on investment (ROI).
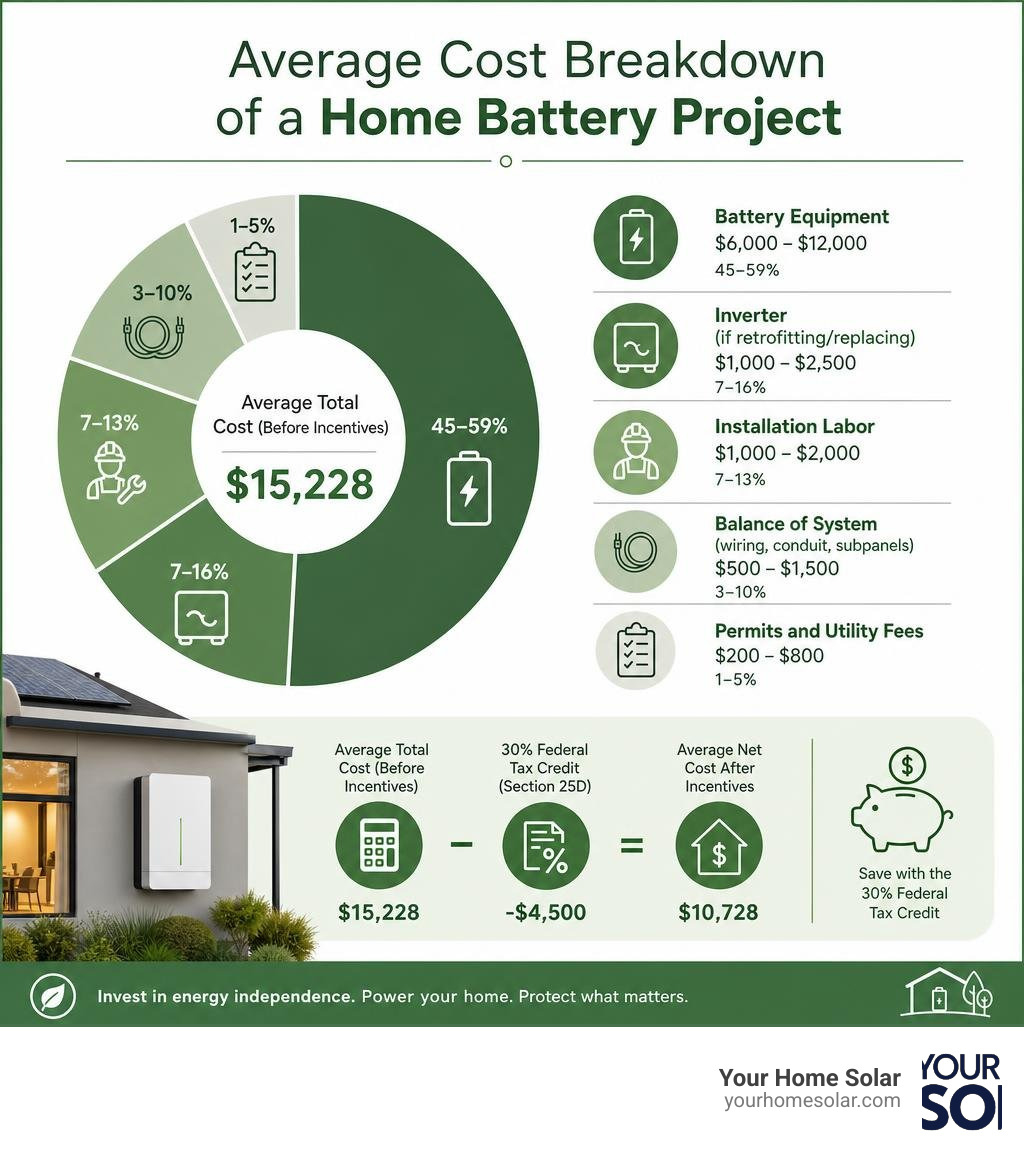
On average, a residential battery storage system costs about $15,228 before incentives. Here is how that budget is typically distributed:
- Battery Equipment: $6,000 – $12,000 (depending on capacity and brand)
- Inverter (if retrofitting/replacing): $1,000 – $2,500
- Installation Labor: $1,000 – $2,000
- Balance of System (wiring, conduit, subpanels): $500 – $1,500
- Permits and Utility Fees: $200 – $800
Incentives and Tax Credits
Fortunately, you do not have to shoulder this cost alone. Under the federal Residential Clean Energy Credit (Section 25D), homeowners can claim a 30% tax credit on the total cost of installing a battery storage system. This credit applies to both solar-plus-storage systems and standalone battery installations, provided the battery has a capacity of at least 3 kWh.
For a $15,000 installation, this federal credit slashes your tax liability by $4,500, bringing your net cost down to $10,500.
To get a highly detailed look at equipment costs, labor rates, and how to maximize your savings, check out our guide on More info on battery costs.
Standalone Battery Storage vs. Solar-Plus-Storage
A common misconception is that you must have solar panels to install a home battery. In reality, standalone battery storage is a highly viable option for many homeowners.
- Standalone Batteries charge directly from the grid. They are programmed to charge during off-peak hours when electricity is cheapest, and discharge to power your home during expensive peak hours (known as time-of-use arbitrage). They also provide immediate backup during an outage. However, because they cannot generate their own power, they can only keep your home running for a limited time during a prolonged blackout.
- Solar-Plus-Storage Systems offer true energy independence. During an outage, your solar panels continue to generate electricity during the day to power your home and recharge the battery, while the battery keeps your lights on at night. This cycle can theoretically keep your home powered indefinitely.
If you want to compare how a battery stack stacks up against traditional backup options, read our More info on battery generators.
How to Install Home Battery Backups Without Solar
If solar is not a good option for your home—perhaps due to heavy shading from East Tennessee’s beautiful trees or strict HOA rules—installing a standalone battery is still incredibly beneficial.
A standalone battery operates using smart software:
- Time-Based Control: The system automatically monitors utility rates, charging when demand is low and discharging when rates spike.
- Generator Integration: Many modern battery systems (like the FranklinWH) can integrate directly with an existing standby generator. The battery acts as the primary buffer, providing clean, instant power, while the generator only kicks on to recharge the battery when it runs low, saving fuel and reducing noise.
- Vehicle-to-Load (V2L): If you own an electric vehicle, some standalone battery systems can integrate with your EV’s onboard charger, allowing you to use your car’s massive battery to support your home during an extended outage.
For a complete blueprint on keeping your household running when the grid goes down, see our More info on staying powered.
Frequently Asked Questions about Home Battery Installation
Do I need a permit to install a home battery?
Yes. Nearly all local municipalities in East Tennessee require building and electrical permits before you can install a home battery. The process involves submitting a detailed electrical plan and a one-line diagram to ensure compliance with the National Electrical Code (NEC) and local fire safety codes. Once the installation is complete, a local inspector must sign off on the work before the system can be commissioned.
How long does a home battery last during an outage?
It depends entirely on your battery’s capacity and what you choose to power. A standard 10 kWh battery can easily power essential loads—like your refrigerator, LED lights, Wi-Fi router, and phone chargers—for 24 to 48 hours. However, if you try to run high-draw appliances like a central air conditioner, clothes dryer, or electric water heater, a single battery can drain in as little as 2 to 3 hours.
Can I add a battery to my existing solar panel system?
Yes, you can absolutely retrofit a battery onto an existing solar array. The easiest and most common way to do this is through an AC-coupled configuration, which adds a secondary storage inverter without needing to modify your existing solar inverter. If your existing solar inverter is older and nearing the end of its lifespan, you may want to consider replacing it with a hybrid inverter in a DC-coupled configuration for maximum efficiency.
Conclusion
Deciding to install a home battery is an investment in safety, financial predictability, and peace of mind. Whether you are looking to protect your family from winter storm blackouts in Oak Ridge, offset rising utility costs in Knoxville, or achieve complete off-grid independence in the mountains of East Tennessee, having a professionally designed and installed battery system makes all the difference.
At Your Home Solar, we pride ourselves on delivering trusted expertise and tailored, reliable installations. We don’t believe in one-size-fits-all systems; we work closely with you to design a solution that matches your unique energy goals and budget. Ready to take control of your power? Get started with Your Home Solar today and request your personalized consultation.