Start Your DIY Solar Setup for Home With a Safe Plan
A DIY solar setup for home starts with planning, not buying panels. First, review 12 months of electricity use, check your roof’s age and shade, choose a grid-tied, off-grid, or hybrid design, and confirm local permit and utility rules. Then size compatible panels, inverter, wiring, protection, and optional battery storage around your real energy needs.
DIY can reduce an 8 kW project’s pre-incentive cost to roughly $6,500-$10,700, compared with about $13,500-$24,700 for professional installation. But the savings only hold up when the system is safe, correctly sized, weatherproof, code-compliant, and approved for connection where required.
For many East Tennessee homeowners, the best middle path is DIY mechanical work, such as planning, racking, and panel mounting, followed by a licensed electrician for the service-panel connection, inspection, and utility interconnection. That approach can preserve meaningful labor savings without treating roof safety, high-voltage DC wiring, or backup power as a weekend experiment.
I’m Ernie Bussell, founder and CEO of Your Home Solar, with solar operations experience and a background shaped by Navy quality assurance, education, and hands-on process leadership. In this guide to a DIY solar setup for home, I will help you understand what to do yourself, what to plan carefully, and when professional help is the smarter choice.
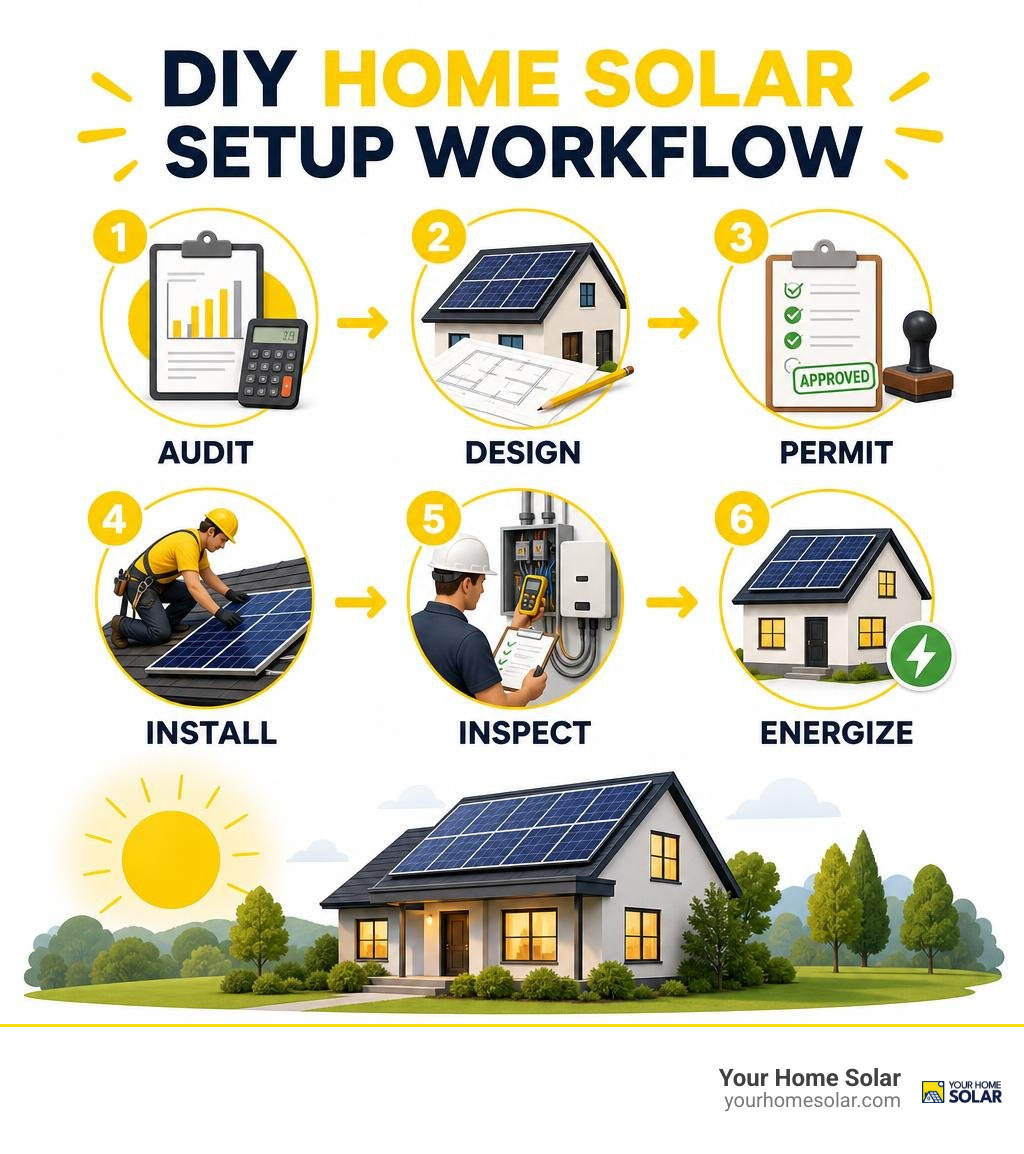
Diy solar setup for home vocab explained:
Planning and Sizing a DIY Solar Setup for Home
Rushing into hardware purchases before running system calculations is the fastest way to blow your budget. A reliable solar array balances electrical production against physical roof constraints and energy consumption habits.

To build a high-performing system, evaluate:
- Historical Consumption: Pull 12 months of utility statements to find total kilowatt-hours (kWh) consumed.
- Solar Insolation: Determine average peak sun hours (PSH). Across East Tennessee—from Knoxville to Johnson City—annual daily averages hover between 4.2 and 4.8 peak sun hours.
- Derating Factor: Factor in system losses (typically 14% to 20%) caused by inverter conversion, wire resistance, panel temperature coefficients, and atmospheric dust.
- Roof Pitch and Azimuth: South-facing planes at a 30° to 35° tilt yield optimal year-round output, though east- and west-facing arrays capture valuable morning and late-afternoon sun.
- Shading Profiles: A single vent pipe or tree casting shadows over a string of panels can disproportionately drop power production.
Cost Breakdown: Is a DIY Solar Setup for Home Worth It in 2026?
Labor and contractor overhead traditionally make up roughly 27% of a turnkey residential installation. Taking on the design and mechanical installation yourself slashes costs from professional benchmarks ($2.50 to $3.30 per watt) down to direct equipment pricing ($0.80 to $1.50 per watt).
Because the federal 30% Residential Clean Energy Credit (ITC) expired on December 31, 2025, maximizing upfront equipment value is essential. Exploring local market pricing, such as regional data from Knoxville, TN Solar Panel Cost: 2026 Prices and Savings, highlights the financial difference between hiring a turnkey crew and tackling hardware sourcing on your own.
| Cost Component | Turnkey Professional Install (8 kW) | Full DIY Installation (8 kW) | Hybrid DIY (Mechanical DIY + Electrician Tie-In) |
|---|---|---|---|
| PV Modules (400W x 20) | $4,500 – $6,000 | $3,200 – $4,200 | $3,200 – $4,200 |
| Inverter / Microinverters | $2,500 – $4,000 | $1,600 – $2,800 | $1,600 – $2,800 |
| Racking & Flashing | $1,800 – $2,500 | $1,000 – $1,500 | $1,000 – $1,500 |
| BOS (Conduit, Wire, Fuses) | $1,200 – $2,200 | $700 – $1,200 | $700 – $1,200 |
| Permits & Utility Interconnection | Included in overhead | $400 – $1,000 | $400 – $1,000 |
| Labor & Overhead | $7,000 – $10,000 | $0 (Personal Time) | $1,200 – $2,500 (Electrician AC tie-in) |
| Total Estimated Cost | $17,000 – $24,700 | $6,900 – $10,700 | $8,100 – $13,200 |
Step-by-Step Load Audit and System Sizing
Accurate sizing prevents two common headaches: overpaying for unusable capacity or suffering power shortages in the winter months.
- Calculate Daily Energy Demand: Divide your annual kWh usage by 365. For example, a home using 10,950 kWh annually consumes 30 kWh per day.
- Apply the Sizing Formula: Divide daily kWh by your local peak sun hours, then adjust for derating losses: $$\text{System Size (kW)} = \frac{\text{Daily kWh}}{\text{Peak Sun Hours} \times 0.80}$$ $$\text{System Size} = \frac{30\text{ kWh}}{4.5\text{ PSH} \times 0.80} = 8.33\text{ kW}$$
- Determine Module Count: An 8.33 kW array divided by modern 400W monocrystalline modules requires roughly 21 panels, demanding approximately 460 square feet of unobstructed roof space.
- Account for Seasonal Variation: Winter sun hours drop significantly. If you plan to operate off-grid, size your array based on December/January insolation rather than summer peaks.
For regional sizing methodologies and derate factors, consult our guide to properly sizing a solar system.
Choosing System Architecture: Grid-Tied, Off-Grid, or Hybrid
Selecting the right system structure dictates everything from hardware compatibility to permitting hurdles.
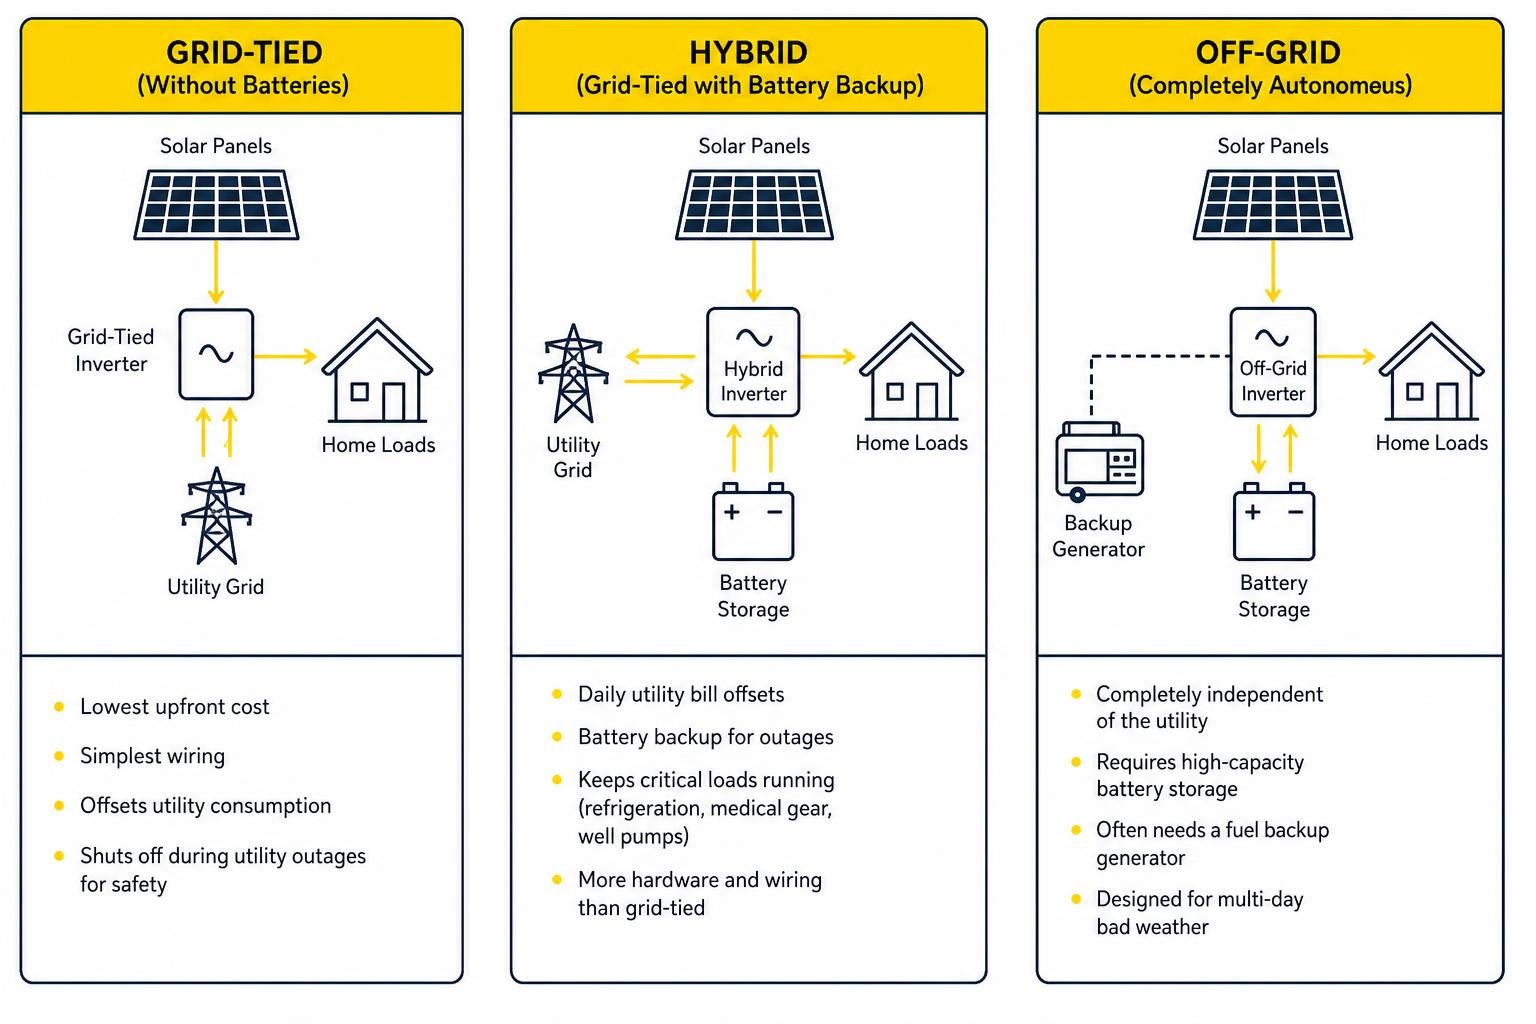
- Grid-Tied (Without Batteries): Lowest upfront cost and simplest wiring. Solar directly offsets utility consumption. When the local utility goes down, standard grid-tied systems shut off automatically for line-worker safety.
- Off-Grid: Completely autonomous. Requires high-capacity battery storage and often a fuel backup generator to manage multi-day bad weather.
- Hybrid (Grid-Tied with Battery Backup): Provides daily utility bill offsets while keeping critical loads (refrigeration, medical gear, well pumps) energized during grid interruptions. Review our walkthrough on going hybrid with battery storage for dedicated design recommendations.
Core Equipment and Hardware Selection
Choosing quality equipment upfront saves hours of troubleshooting down the road. Every component must integrate cleanly with the next to ensure safety, code compliance, and efficiency.
Essential Components of a DIY Solar Setup for Home
A complete residential solar system relies on several core components working in unison:
- Photovoltaic Modules: Monocrystalline half-cut cell panels (400W–550W) offer the best balance of footprint and efficiency (20%+).
- Inverter Architecture: Microinverters attach beneath individual modules and simplify wiring by outputting safe AC voltage directly on the roof. String inverters convert high-voltage DC centrally and pair with DC optimizers for shaded roofs.
- Mounting & Racking Rails: Extruded aluminum rails engineered for regional wind and snow loads.
- Balance of System (BOS): UV-resistant PV wire (10 AWG), EMT conduit, disconnect switches, combiner boxes, and waterproof pass-through boxes.
If you prefer an all-in-one package with matched equipment, explore our guide to diy solar kits for home installation.
Battery Bank, Inverter, and Charge Controller Matching
When integrating energy storage, equipment compatibility is vital:
- Lithium Iron Phosphate (LiFePO4): Modern LiFePO4 chemistry provides 3,000 to 5,000 charge cycles at an 80%–90% usable depth of discharge (DoD), vastly outperforming outdated sealed lead-acid options. DIY battery configurations run $150 to $300 per kWh of equipment, compared to $1,000+ per kWh for installed proprietary wall batteries.
- System Voltage (48V vs. 12V/24V): For systems larger than 2 kW, run a 48-volt DC architecture. Higher voltage keeps electrical current low, drastically reducing cable gauge requirements and resistive heat loss.
- MPPT Charge Controllers: Sized using open-circuit voltage ($V_{oc}$) calculations that account for record-low ambient temperatures (where panel voltage rises). Always add a 25% safety margin above panel short-circuit current ($I_{sc}$).
- Inverter Surge Ratings: Check motor-starting surge demands. A well pump running at 1,500 continuous watts can surge to 4,500 watts on startup; your inverter must handle these instantaneous surges without faulting.
- Class T Fusing: Lithium battery banks can dump over 10,000 amps during an unmitigated short. Protect the battery bank with an extremely fast-acting Class T fuse installed within 18 inches of the positive battery terminal.
Step-by-Step Installation Roadmap: From Mounting to Commissioning
Following a structured installation sequence keeps your build organized and prevents costly safety mistakes. For detailed mechanical overviews, see the DIY Solar Panel Installation: Step-by-Step Guide 2026.
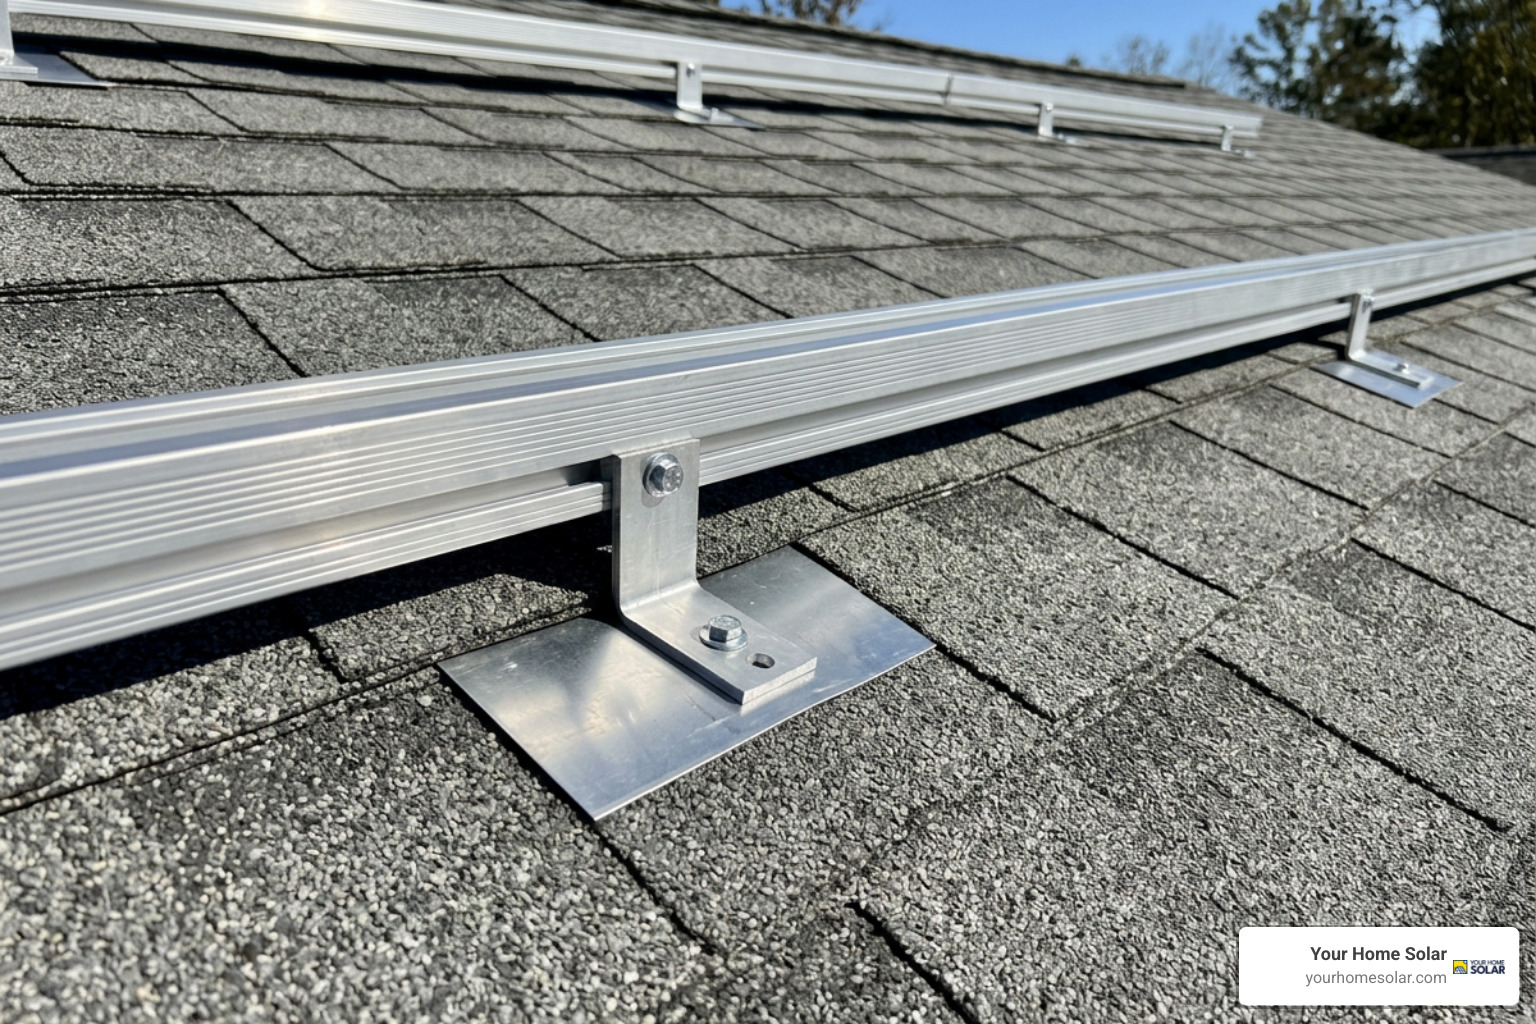
Roof Layout, Racking, and Weatherproof Flashing
- Locate Rafters: Use an electronic deep-scan stud finder or tap with a dead-blow hammer from the roof surface, confirming rafter spacing (commonly 16″ or 24″ on center).
- Mark Penetration Lines: Snap chalk lines to align mounting brackets with rafters while keeping an even setback from roof ridges and eaves (typically 36 inches for fire pathways).
- Install Flashing: Lift shingles carefully, slide metal flashing beneath the upper course, and drive structural lag screws into rafter centers embedded with structural roofing sealant.
- Attach Rails: Fasten aluminum mounting rails onto the L-feet brackets, verifying planar alignment across all spans with a string line.
Panel Mounting, Cable Management, and DC Wiring
- Secure Cable Runs: Fasten all PV wiring using 90-degree UV-rated stainless steel module clips. Cables must never rest on abrasive shingle surfaces.
- Form Drip Loops: Create downward wire loops prior to conduit entries to keep rainwater from tracking into junction boxes.
- Torque Panel Clamps: Place mid-clamps and end-clamps between modules, tightening them to the manufacturer’s exact torque specification (usually 10–14 ft-lbs) using a calibrated torque wrench.
- Check String Voltages: Before making inverter connections, verify string polarity and open-circuit voltage with a digital multimeter.
For a thorough breakdown of physical wiring techniques, read through our step-by-step solar PV system installation guide.
Inverter Placement and AC Grid Tie-In
- Environmental Mounting: Install inverters in a shaded, well-ventilated space (such as a garage or north-facing exterior wall) away from combustible materials.
- Backfeed Breaker Calculations (The 120% Rule): Under NEC 705.12, the sum of your main service breaker and the solar backfeed breaker cannot exceed 120% of the service panel’s busbar rating: $$\text{Busbar Rating (A)} \times 1.20 – \text{Main Breaker (A)} = \text{Max Solar Breaker (A)}$$ For example, a 200A busbar with a 200A main breaker allows a maximum 40A solar backfeed breaker ($200 \times 1.20 = 240 – 200 = 40\text{A}$).
- Commissioning: Follow the proper startup sequence: energize battery storage first (if present), switch on AC isolators, close the DC disconnect, and confirm system telemetry shows normal operating parameters.
Critical Safety Rules, NEC Codes, and Permitting Requirements
Rooftop photovoltaic systems combine structural wind loads with high-voltage direct current. Proper compliance with National Electrical Code (NEC) standards is essential for a safe, durable installation.
Equipment Grounding, Fusing, and Rapid Shutdown Compliance
- Equipment Grounding (NEC 690.43): Every metallic rail, panel frame, inverter enclosure, and combiner box must be bonded using continuous copper conductors (minimum 6 AWG) and approved grounding lugs.
- Rapid Shutdown (NEC 690.12): Rooftop systems require module-level rapid shutdown that reduces array conductors within the array boundary to 80 volts or less within 30 seconds of switch initiation. Microinverters provide this built-in; string inverters require module-level shutdown devices (MLPE).
- Overcurrent Protection (NEC 690.8): All DC circuit conductors and protection devices must be sized to carry at least 125% of the calculated maximum circuit current to prevent nuisance tripping and wire overheating.
Navigating Building Permits, Utility Interconnection, and Plug-In Laws
- Permitting Package: Local Authorities Having Jurisdiction (AHJ) require an electrical permit and building permit. Your submission must include a detailed single-line electrical diagram, roof attachment map, and manufacturer specification sheets.
- Utility Interconnection: Grid-tied systems require formal approval from your local utility before turning the system on. Operating without Permission to Operate (PTO) can result in utility disconnection and stiff fines.
- Emerging Plug-In Regulations: The regulatory landscape is evolving. In 2025, Utah established standard plug-in solar policies permitting micro-systems up to 1,200W to connect to standard circuits without traditional permitting hurdles, prompting similar legislative reviews in other states. Always confirm current local county codes before installing unconventional micro-arrays.
Frequently Asked Questions About Home DIY Solar
Can I legally install solar panels on my home without an electrician?
In most jurisdictions, homeowners can pull an owner-builder permit to perform mechanical racking and DC-side wiring on their own property. However, local utility interconnection rules frequently mandate that the final AC tie-in to the main service panel, net-metering disconnect, and breaker upgrades be completed and signed off by a licensed electrician.
How much battery capacity do I need for full home backup?
To run a typical home’s critical loads during an outage, plan for 1 to 2 days of battery autonomy. Sizing is based on daily critical watt-hours divided by usable depth of discharge:
$$\text{Battery Bank (kWh)} = \frac{\text{Daily Critical Load (kWh)} \times \text{Days of Autonomy}}{\text{Usable DoD (0.90)}}$$
A home consuming 10 kWh daily on essential circuits requires roughly 22 kWh of total battery storage for two days of backup. For outages lasting longer than 48 hours, integrating a backup fuel generator is far more cost-effective than adding multiple battery banks.
What are the most dangerous mistakes to avoid in DIY solar projects?
- Undersized DC Cabling: Generates excessive heat and creates fire risks. Keep total circuit voltage drop below 3%.
- Neglecting Roof Flashing: Skipping approved metal flashing on lag bolts leads to interior ceiling rot and expensive structural repairs.
- Incorrect Series String Sizing: Failing to calculate cold-weather open-circuit voltage spikes can blow past your inverter’s maximum input voltage on freezing mornings.
- Working Hot on DC Strings: Direct-current arcs do not self-extinguish like AC power. Never disconnect energized MC4 connectors under load.
Learn how to spot other common installation and industry pitfalls in our guide to avoiding common solar mistakes.
Conclusion
Tackling a diy solar setup for home can lower your upfront project costs by 40% to 60%, delivering long-term power generation and real savings. Success comes down to meticulous load sizing, strictly following electrical safety codes, building reliable weatherproofing into every roof penetration, and recognizing the point where professional trade assistance is the safest choice.
If you are an East Tennessee homeowner evaluating your roof, balance the benefits of handling mechanical assembly against the safety, speed, and warranty protections of working with an experienced team. Contact our local specialists at Your Home Solar to explore tailored professional residential solar installation solutions and secure dependable power for years to come.