

What to Do When Your Solar Generator Stops Working
If you’re dealing with a broken solar generator, here’s a quick overview of the most common problems and first steps:
- Battery won’t charge — Often caused by BMS undervoltage lockout after long storage. Try a bench power supply to recover cells.
- No power output — Check the inverter for error codes and inspect fuses and MOSFETs on the control board.
- Solar input not working — Clean panels, check for loose connectors, and verify the charge controller is functioning.
- Unit powers on but drains fast — Battery cells are likely degraded and may need balancing or replacement.
- Intermittent shutdowns — Usually overheating or a failing solder joint on the BMS or inverter board.
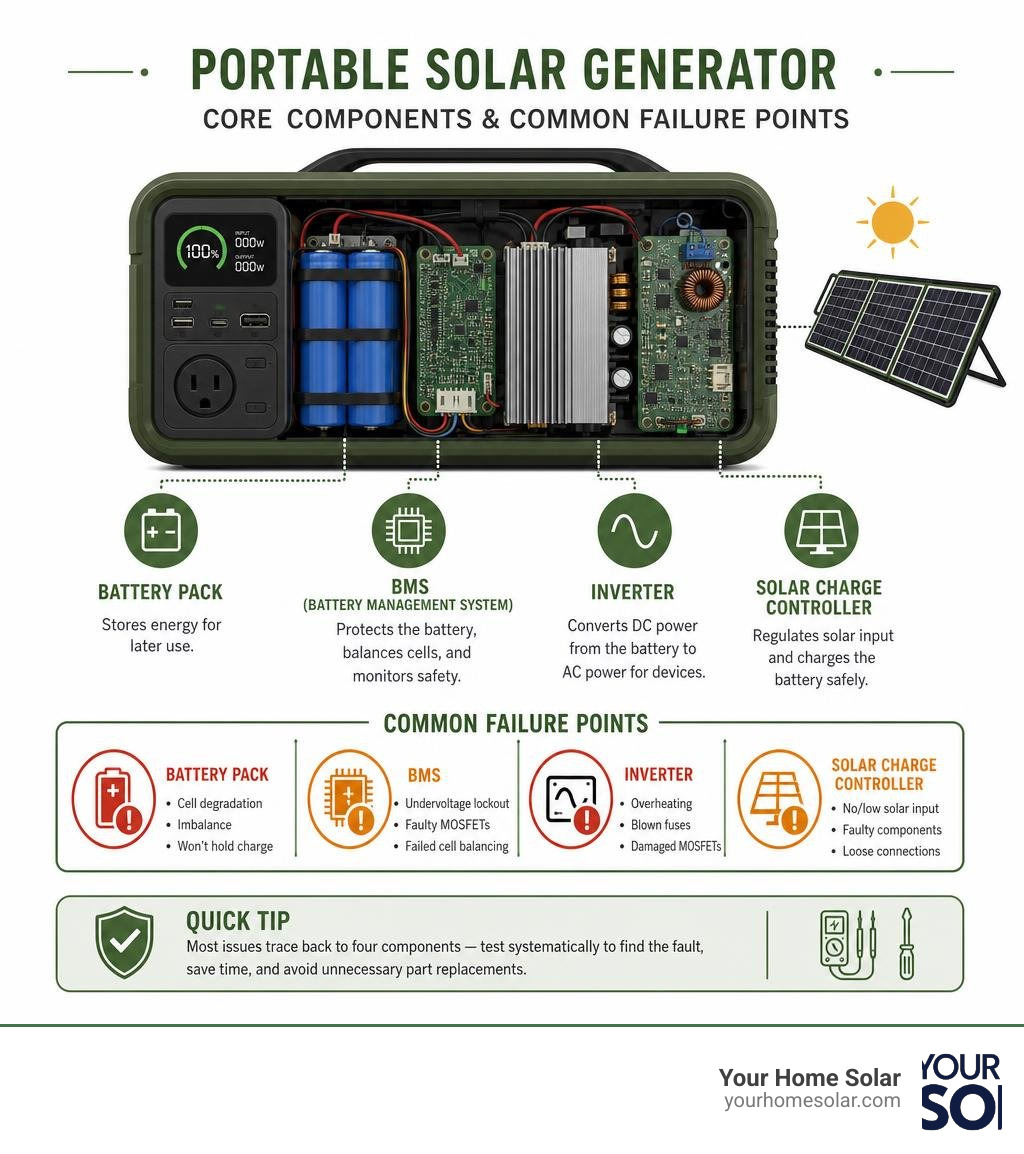
Quick answer: Most solar generator repair issues trace back to one of four components — the battery pack, the BMS, the inverter, or the solar charge controller. Systematic voltage testing with a multimeter will tell you which one has failed.
When a solar generator goes dead — especially one you’re counting on during a power outage — it’s a stressful situation. Maybe it sat in storage for a year and won’t wake up. Maybe it charges fine but cuts out under load. Or maybe it simply shows no signs of life at all.
The good news? Most failures are fixable. According to industry data, roughly 30% of solar generator failures come down to battery degradation or BMS issues — problems that can often be resolved without buying a whole new unit. Repairs in the U.S. typically run between $200 and $800, which is far less than replacing a quality portable power station outright.
This guide walks you through the full process — from safe teardown to component-level diagnosis to knowing when repair no longer makes financial sense.
I’m Ernie Bussell, Founder and CEO of Your Home Solar, and my background spans military systems work, operations management for a $40 million solar operation, and hands-on experience with home energy systems — all of which directly inform how I approach solar generator repair at the component level. Let’s get into it.
Relevant articles related to solar generator repair:
Common Failure Points and When to Seek Solar Generator Repair
The global solar generator market is growing rapidly, projected to expand from $1.2 billion in 2023 to $3.8 billion by 2030 at a compound annual growth rate (CAGR) of 17.8%. As these portable power stations become staple backup devices for homeowners from Knoxville to Sevierville, understanding how they fail—and how to fix them—is more critical than ever.
When your backup power system fails, it’s often at the worst possible moment. Knowing how to maintain and repair your equipment ensures you aren’t left in the dark. If you’re wondering how these portable units stack up against larger setups, you can read about Why Emergency Solar Power is the Brightest Idea for Your Next Outage.
Battery Degradation and BMS Lockout
The most common reason portable power stations fail is battery-related. Approximately 30% of all solar generator failures are caused by battery degradation or Battery Management System (BMS) issues. This is especially common when a unit sits unused in a garage or closet for over a year without a maintenance charge.
Modern solar generators utilize Lithium Iron Phosphate (LiFePO4) or Lithium Nickel Manganese Cobalt Oxide (NMC) cells. LiFePO4 cells are highly valued for their safety and long lifespan (often lasting 5 to 10 years), but they have a critical vulnerability: self-discharge. Over 40% of solar generator users report that their integrated BMS boards fail to charge after extended inactivity.
When the generator is stored empty or drains slowly over months of neglect, the individual cell voltages can drop below a critical threshold (typically around 2.0V to 2.5V per cell). When this happens, the BMS triggers an undervoltage lockout. To protect the cells from dangerous thermal runaway or plating, the BMS completely shuts off the charging and discharging paths. At this point, plugging the unit into a standard AC wall outlet or solar panel won’t do anything because the BMS refuses to let current pass.
To see how DIYers actively navigate these tricky lockouts, check out the DIY Solar Power Forum discussion on charging issues.
Inverter and Charge Controller Malfunctions
If the battery cells are healthy but the generator still refuses to power your appliances, the fault likely lies in the inverter or the integrated solar charge controller. The inverter is responsible for converting the DC power stored in the battery into the clean AC power used by your household electronics.
Common physical and electrical failures in the inverter or charge controller circuits include:
- MOSFET Damage: Metal-Oxide-Semiconductor Field-Effect Transistors (MOSFETs) act as electronic switches. Overloading the generator, running it in high-temperature environments, or facing sudden voltage spikes can blow these transistors.
- Solder Joint Failures: Cheap manufacturing or thermal expansion and contraction can cause solder joints to crack, breaking the electrical path.
- DC Voltage Too High Alarms: Connecting too many solar panels in series can exceed the maximum input voltage threshold of the charge controller, triggering protection modes or destroying input capacitors.
For those interested in the deep technical architecture of these systems, the Axpert Inverter Service Manual provides an excellent component-level look at how high-power inverters manage current, protect circuits, and flag faults.
Safety Protocols and Essential Tools for Teardown
Before you grab a screwdriver and start cracking open your portable power station, we must emphasize safety. Working with lithium-ion battery packs and high-voltage capacitors is fundamentally different from fixing a broken toaster. A single mistake can cause a short circuit, an electrical shock, or a hazardous battery fire.

Proper preparation and safety measures are crucial to protecting your gear and your home. For a foundational overview of keeping your broader home solar infrastructure in top shape, check out our guide on Solar Energy Maintenance 101.
Required Diagnostic Equipment
To perform a successful solar generator repair, you need the right diagnostic toolkit:
- Digital Multimeter (DMM): Your most important tool. You will use it to measure DC and AC voltages, check circuit continuity, test resistance, and evaluate diodes/MOSFETs.
- Bench Power Supply: Essential for reviving locked-out cells. A variable DC bench power supply allows you to manually inject a highly controlled, low-current charge directly to individual cells or battery groups to wake up a sleeping BMS.
- Infrared (IR) Thermal Camera: An incredibly useful diagnostic tool. By powering up a faulty board and scanning it with an IR camera, you can instantly spot overheating components (like a shorted capacitor or a failing MOSFET) before they cause further damage. (Tip: If you don’t have an IR camera, you can apply a small amount of isopropyl alcohol to the board; the area where the alcohol evaporates almost instantly indicates a hot spot).
- Soldering Iron and Solder Sucker: For replacing blown fuses, swapped MOSFETs, or repairing cracked solder joints.
High-Voltage Safety Precautions
When opening a solar generator, you are exposed to raw battery voltage and high-voltage AC circuits. Always follow these safety rules:
- Disconnect All Inputs and Outputs: Ensure the generator is completely powered off, unplugged from the wall, and disconnected from any solar panels.
- Wear Personal Protective Equipment (PPE): Wear safety glasses to protect against accidental sparks and use insulated gloves when handling exposed wiring.
- Discharge the Capacitors: Inverters contain large electrolytic capacitors that store high-voltage DC energy even after the battery is disconnected. Before touching any internal circuitry, measure the voltage across the main capacitor terminals with your multimeter. If voltage is present, discharge them safely using a high-power resistor (never short them with a screwdriver, as this can cause a damaging arc flash).
- Work on a Non-Conductive Surface: Always perform repairs on a clean wooden or anti-static rubber workbench. Remove all jewelry, watches, and metal items from your hands and wrists.
Step-by-Step Diagnostics: Isolating the Faulty Component
A successful repair depends entirely on a logical, step-by-step diagnostic process. Do not guess which part is broken. Instead, start from the power source (the battery pack) and trace the electricity forward through the system.
| Symptom | Likely Cause | Diagnostic Test |
|---|---|---|
| Unit is completely dead; screen won’t turn on | BMS undervoltage lockout or blown main fuse | Measure voltage at the battery terminals before the BMS. Check continuity of main fuses. |
| AC outlets don’t work; DC outlets work fine | Blown inverter MOSFETs or failed driver circuit | Inspect inverter board for burned components. Test MOSFET gate-to-source resistance. |
| Solar charging screen shows 0W input | Blown input diode, damaged charge controller, or bad port | Test continuity from solar input port to charge controller board. Check MPPT board diodes. |
| Generator shuts down instantly under load | High internal resistance in battery or weak cell | Monitor individual cell voltages under a mild load; look for rapid voltage drops. |
Testing the Battery Pack and BMS
To determine if your battery or your BMS is the culprit, you must measure the individual cell voltages.
First, carefully disassemble the outer casing to expose the battery pack. Locate the balance lead harness plugged into the BMS. This harness consists of thin wires that monitor the voltage of each individual cell series group.
Set your multimeter to DC voltage. Keep the black probe on the main battery negative terminal and use the red probe to measure the voltage at each pin along the balance connector.
- If all cells read between 3.0V and 3.4V (for LiFePO4): The cells are healthy and balanced. If the unit still won’t charge or output power, the BMS board itself or a fuse is likely faulty.
- If one or more cells read below 2.0V: The BMS has locked out the pack due to an undervoltage condition. The cells must be manually recovered before the BMS will function again.
- If there is a massive voltage delta (e.g., three cells read 3.2V and one reads 1.1V): You have an unbalanced pack or a bad cell that is dragging down the entire system.
Next, check the BMS MOSFETs. These are usually a row of small, square black chips on the BMS board (often models like the AO4413 or AO4415). Measure the voltage between the Gate and Source pins of each MOSFET. If the BMS is trying to turn on but no power is passing through, a failed bias voltage or a shorted gate-to-source path is the likely issue.
Diagnosing Inverter and Control Board Issues
If your battery pack checks out but you have a “no-display” fault or the AC inverter refuses to kick on, it’s time to inspect the main control board.
Open the case and look for visual signs of damage: swollen or leaking electrolytic capacitors, burned traces, or cracked resistors. If everything looks visually perfect, grab your multimeter and follow this testing sequence:
- Check the Fuses: Solar generators use both standard blade fuses and tiny surface-mount micro-fuses. Test them for continuity. If a fuse is blown, there is a reason—do not simply replace it without checking for shorts downstream.
- Test the Power Devices: Set your multimeter to the diode testing function. Measure the forward voltage across the inverter’s IGBTs or MOSFETs. A healthy silicon diode junction should read between 0.4V and 0.7V. A reading of 0.0V indicates a dead short, meaning the component must be replaced.
- Verify the Driver Circuit Resistance: Refer to the manufacturer’s technical specifications. For instance, according to the Infini V IV 5.6KW Service Manual, driver resistors typically have a reference value of 22 ohms, while gate-to-emitter resistors on the IGBTs should read around 22.2K ohms. Significant deviations from these reference values point to a failed driver circuit.
How to Perform Component-Level Fixes
Once you have isolated the faulty component, you can proceed with the actual repair. Depending on the failure, this could range from a simple solder reflow to a delicate battery cell recovery.

Step-by-Step Guide to BMS Solar Generator Repair
If you’ve determined that the BMS is faulty or stuck in a permanent software freeze, you can attempt to reset or repair it:
- Perform a Hard Reset: Disconnect the main battery positive and negative cables from the BMS, along with the balance lead connector. Let the board sit completely unpowered for 10 minutes to allow all microcontrollers to fully discharge. Reconnect the balance leads first, followed by the main power cables.
- Jumpering the BMS: If the BMS is locked out but you have verified that all cell voltages are perfectly safe (above 3.0V), you can try to “wake up” the board. Temporarily connect a jumper wire from the battery negative terminal (B-) to the output negative terminal (P-) for a split second while a charger is plugged in. This bypasses the switching MOSFETs and can trigger the control chip to reset its fault state.
- Replacing Blown MOSFETs: If a MOSFET is shorted, desolder it using a hot air rework station or a soldering iron with a solder-wicking braid. Clean the pads with isopropyl alcohol, apply fresh flux, and solder a matching replacement chip in place. Note: If one MOSFET in a parallel bank has failed, always replace the entire group to ensure even current sharing.
For detailed, step-by-step disassembly guides for specific consumer power station brands, we highly recommend checking out the community-sourced teardowns on the iFixit guide on portable power station troubleshooting.
Reviving Deeply Discharged Battery Cells
If your diagnostic tests revealed that your battery cells are sitting below the BMS cutoff threshold (undervoltage lockout), you must manually revive them. Do not attempt to charge zero-volt cells that have been sitting empty for years, as they may have developed internal copper shunts that can cause a fire. However, if the cells are resting between 1.0V and 2.2V, they can often be safely recovered using this process:
- Disconnect the BMS: Unplug the balance lead harness and the main power cables from the BMS board. You must isolate the cells completely so the BMS does not interfere with the manual charging process.
- Set Up Your Bench Power Supply: Set your variable DC power supply to match the nominal voltage of the cell group you are charging (typically 3.2V for a single LiFePO4 cell group).
- Limit the Current: This is the most crucial step. Set the current limit on your power supply to a very low rate—no more than 0.05C to 0.1C (for example, if you have a 100Ah battery pack, limit the charging current to 5 amps; if it’s a smaller 10Ah pack, limit it to 0.5 amps). Slow, low-current charging prevents the cells from overheating and safely dissolves minor crystalline formations.
- Charge Individually: Connect the positive and negative alligator clips of your power supply directly to the positive and negative terminals of the low cell group. Monitor the cell temperature constantly. If the cell feels warm to the touch, stop immediately.
- Reconnect and Balance: Once all individual cell groups have been raised to a safe voltage (above 3.0V per cell), reconnect the balance leads and the BMS. Plug in the standard generator charger and allow the BMS to run a full balance cycle overnight.
Testing and Validating the Repaired Unit
Never assume a repair is complete until you have thoroughly tested the unit under controlled conditions:
- Visual Inspection: Double-check all solder joints, ensure no loose wires are touching the chassis, and verify that all screws are securely tightened.
- No-Load Test: Turn on the generator and check if the display screen lights up. Verify that the idle power consumption matches the manufacturer’s idle specifications.
- Load Testing: Connect a known, moderate load (such as a 500W space heater or a few light bulbs) to the AC outlets. Monitor the battery voltage on the display. It should remain stable. If the voltage drops rapidly or the unit shuts down immediately, a weak battery cell or high-resistance connection is still present.
- Thermal Validation: Run the generator under a heavy load for 20 minutes while scanning the internal boards with your IR camera. Ensure no trace, wire, or MOSFET exceeds safe operating temperatures (typically under 80°C / 176°F).
Repair vs. Replacement: Making the Right Financial Decision
While we love a good DIY project, there comes a point where repairing an old solar generator simply doesn’t make sense. You must weigh the cost of parts and labor against the lifespan and capacity of a new system.
Evaluating the Cost of a Solar Generator Repair
When deciding whether to repair or replace, consider these three factors:
- Battery Replacement Costs: The battery pack accounts for roughly 60% of the total manufacturing cost of a portable power station. If your battery cells are completely degraded and need to be entirely replaced, the cost of a new lithium pack—combined with your repair time—will often approach the price of a brand-new generator.
- Parts Availability: Many consumer-grade portable power stations are built as sealed, proprietary units. Finding replacement control boards, matching LCD screens, or proprietary BMS chips can be incredibly difficult.
- Flat-Rate Repair Services: If you prefer not to do the work yourself, professional repair shops can fix your unit. For example, you can review the Jackery official support and repair guidelines to see if your device is eligible for factory repair or warranty service.
If your generator is over 5 years old, uses older, less-efficient lithium chemistry (like standard Li-ion NMC instead of LiFePO4), and requires a major battery or inverter replacement, your money is almost always better spent upgrading to a modern, high-efficiency system. For a breakdown of the long-term economics of home backup systems, explore our analysis of The Real Price of Never Losing Power Again.
When to Upgrade to a Whole-Home Battery Backup
If you find yourself constantly repairing small, portable solar generators to keep your essential home appliances running during East Tennessee’s frequent storms, it might be time to think bigger.
Portable solar generators are fantastic for camping, tailgating, and running a few small electronics during a brief outage. However, they have clear physical limitations when it comes to powering a modern home. They cannot run your central HVAC system, your well pump, or your electric water heater.
For true, seamless energy independence, a whole-home standby battery backup system is the gold standard. These systems integrate directly into your home’s main electrical panel, charging automatically from your rooftop solar panels or the grid, and kicking on instantly the millisecond the utility power goes out.
To learn how a permanently installed home battery backup compares to portable units, read our guide on Power to the People with a Battery Generator Backup. You may also want to check out Comparing Solar with Traditional Gas Generators for East Tennessee Homes and explore our list of the Don’t Be Powerless: Top Home Battery Backup Solutions.
Frequently Asked Questions
Can I repair a solar generator myself?
Yes, minor issues like replacing blown fuses, repairing broken solder joints, or resetting a locked-out BMS are well within the reach of a handy DIYer with a multimeter and a soldering iron. However, if the repair involves replacing individual lithium cells or working on high-voltage inverter circuits, you should only proceed if you have formal training in electronics and battery safety.
Why is my solar generator not charging?
The most common cause is a BMS undervoltage lockout, which happens when the battery sits completely discharged for a long period. Other common culprits include a blown input fuse, a damaged DC charging port, or a failing solar charge controller. Start by measuring the voltage of your solar panels or wall charger, then trace that voltage through the generator’s input port to the battery.
How long do solar generator batteries last?
The lifespan depends heavily on the battery chemistry. Older lithium-ion (NMC) batteries typically last for 500 to 1,000 charge cycles (about 3 to 5 years of regular use). Modern Lithium Iron Phosphate (LiFePO4) batteries are much more durable, easily lasting 3,000 to 5,000 cycles (10 years or more) before their capacity drops to 80% of its original rating. Proper storage—keeping the unit in a cool place and charged to around 50% to 80% when not in use—can double your battery’s actual lifespan.
Conclusion
A broken solar generator doesn’t have to mean a trip to the landfill. Armed with a multimeter, a patient diagnostic mindset, and the safety protocols outlined in this guide, you can successfully tackle many common solar generator repair projects yourself.
But if you are tired of managing small, portable power stations and want a robust, worry-free energy solution for your home, we are here to help. At Your Home Solar, we specialize in designing and installing custom, whole-home solar and battery backup systems across East Tennessee—from Knoxville and Oak Ridge to Maryville and Johnson City. We pride ourselves on our trusted local expertise, top-tier workmanship, and a commitment to 100% customer satisfaction.
Ready to take your home backup power to the next level? Schedule professional solar panel maintenance in Knoxville or contact our team today to discuss a tailored home energy solution that keeps your lights on, no matter what.