
Understanding the Solar Installation Process: What East Tennessee Homeowners Need to Know
The solar installation process typically follows five key stages that transform your home into a clean-energy powerhouse. Here’s what you can expect:
- Site Assessment and Design – Engineers evaluate your roof, energy needs, and property characteristics (1-2 weeks)
- Permitting and Approvals – Your installer handles building permits and utility paperwork (2-8 weeks depending on location)
- Equipment Procurement – Solar panels, inverters, and mounting hardware are ordered and delivered (1-4 weeks)
- Physical Installation – Crews mount racking, install panels, and connect electrical components (1-3 days)
- Inspection and Energization – Local authorities inspect the system, and your utility grants Permission to Operate (2-4 weeks)
The entire process from contract signing to flipping the switch takes two to three months on average, though permitting timelines vary significantly by jurisdiction.
Why understanding this process matters: If you’re among the growing number of East Tennessee homeowners frustrated by rising utility bills and frequent power outages, solar offers a path to energy independence. But the installation journey involves multiple stakeholders—engineers, permitting offices, utility companies, and installation crews—each with specific requirements and timelines. Knowing what happens at each stage helps you plan accordingly, avoid delays, and make informed decisions about equipment, financing, and installers.
The good news? While the bureaucratic steps take time, the actual installation happens remarkably fast. Most residential systems go from bare roof to fully operational in just one to three days of physical work. The rest is paperwork, safety inspections, and coordination—critical steps that ensure your system performs safely and reliably for decades.
Professional installation matters more than you might think. Solar arrays must withstand wind loads, prevent roof leaks, meet electrical codes, and integrate seamlessly with your home’s power system. Improper wire sizing can create fire hazards. Poorly secured panels can detach during storms. Skipped permits can void your homeowner’s insurance. This isn’t a weekend DIY project—it’s a long-term investment that demands expertise.
I’m Ernie Bussell, founder and CEO of Your Home Solar, and I’ve guided hundreds of East Tennessee families through the solar installation process over the past three years, drawing on my background in operations management, quality assurance, and customer education. In this guide, I’ll walk you through exactly what happens at each stage, what you need to prepare, and how to avoid common pitfalls.

Preparing for Your Solar Installation Process
Before the first panel ever touches your roof, a significant amount of groundwork must be laid. Preparation is the secret sauce to a smooth solar installation process. We always tell our neighbors in Knoxville and Johnson City that a solar system is only as good as the roof it sits on.
Assessing Your Home’s Readiness
The first step is a comprehensive energy audit and roof assessment. You’ll want to look at your roof’s age; since solar panels have a lifespan of 25 to 30 years, if your roof is older than 10-15 years, it might be wise to replace it before or during the installation. In fact, the U.S. Department of Energy Homeowner’s Guide notes that installing solar concurrently with roof replacement can often save you money on labor and staging.
Key factors we analyze include:
- Shading Analysis: Are those beautiful Tennessee oaks blocking your sun? We use specialized tools to ensure your panels aren’t living in the shadows.
- Orientation and Tilt: For maximum efficiency in the Northern Hemisphere, a south-facing roof is the gold standard. A tilt between 15 and 40 degrees is ideal for catching those rays.
- Energy Usage: We’ll need at least 12 months of utility bills to accurately size your system. This helps us account for seasonal spikes—like those humid Tennessee summers when the AC is cranking.
For more details on getting your property ready, check out our guide on Preparing Your Home for Solar Installation.
Compliance and Paperwork
Don’t forget about your Homeowners Association (HOA). While many Tennessee communities are solar-friendly, some have specific aesthetic requirements. We handle the heavy lifting here, but it’s always good to give your HOA board a heads-up.

The 5 Key Stages of a Professional Installation
Once the contract is signed, the “invisible” work begins. We move from the sales phase into the technical execution of the solar installation process.
Engineering and Permitting in the Solar Installation Process
This is where the math happens. Our engineers create a site-specific plan called a CAD (Computer-Aided Design) drawing. This plan ensures structural integrity—making sure your roof rafters can handle the weight—and compliance with local electrical codes.
We then submit these designs to the local Authority Having Jurisdiction (AHJ) for building and electrical permits. In places like Kingsport or Sevierville, this can take anywhere from a few days to several weeks. We use tools like the SolarTRACE tool to estimate these timelines accurately. To learn more about how we manage these details, visit Our Process page.
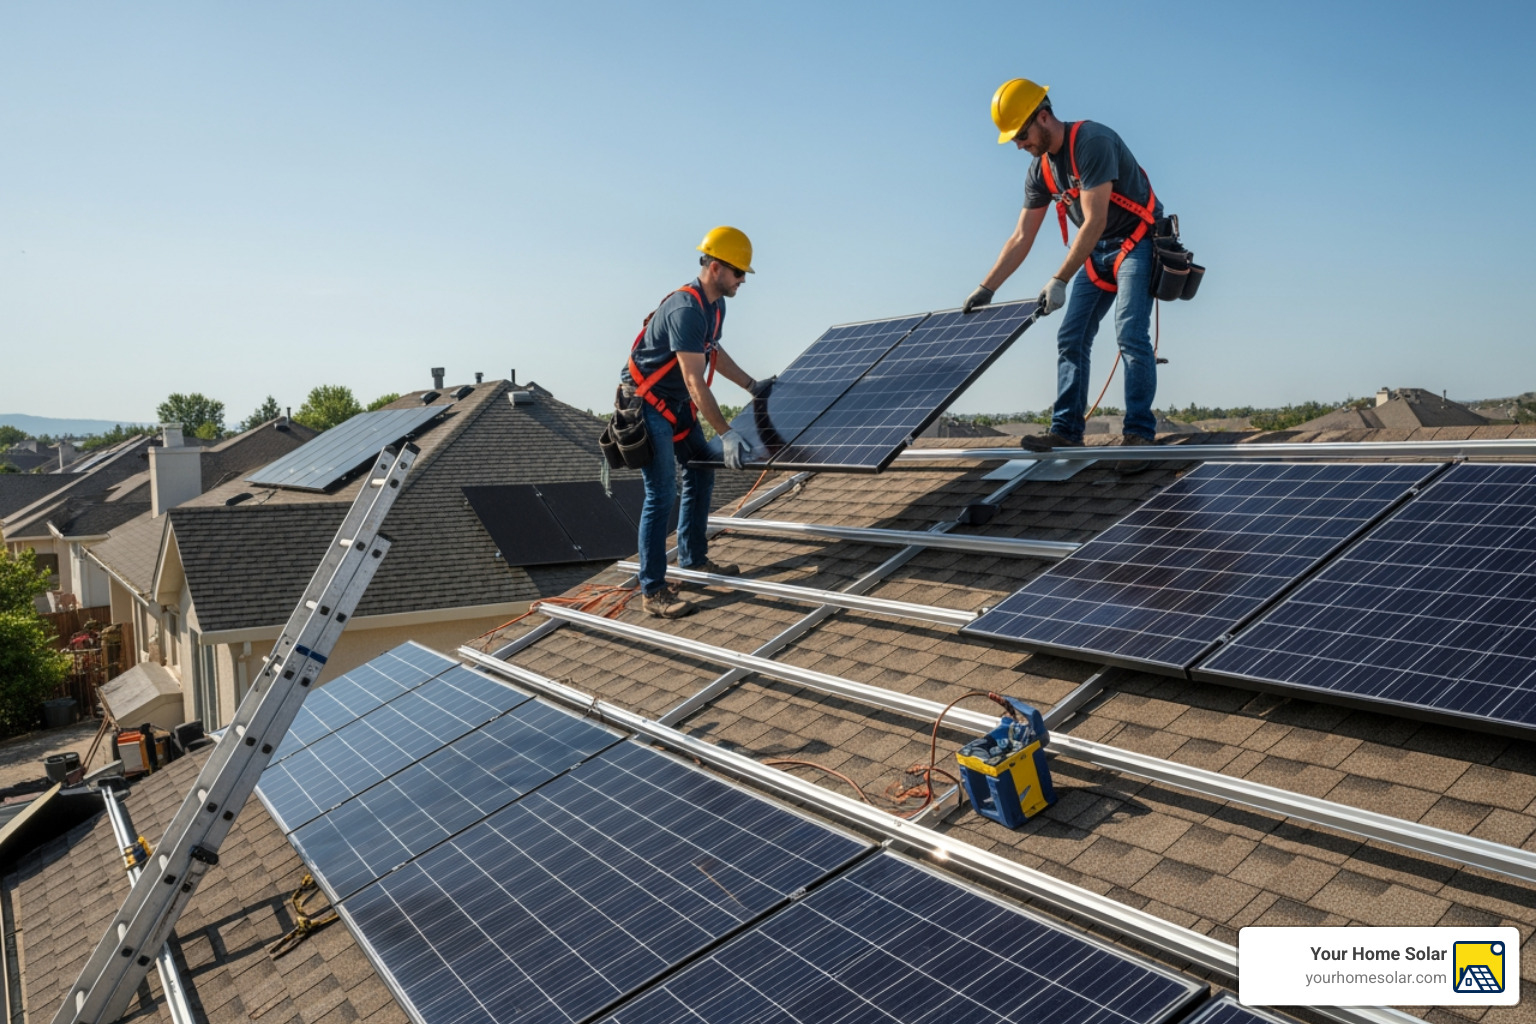
Step-by-Step: The Physical Solar Installation Process
When “Install Day” finally arrives, it’s usually a whirlwind of activity. Here is the typical sequence:
- Roof Preparation and Racking: We mark the rafters and install high-quality flashing and mounts. This is the most critical part for preventing leaks. We use heavy-duty sealant to ensure your roof remains watertight.
- Electrical Wiring: We run the conduit (the pipes that hold the wires) from the roof down to your electrical panel.
- Microinverter/Inverter Installation: Most modern systems use microinverters mounted directly behind each panel. These convert the Direct Current (DC) power from the sun into the Alternating Current (AC) power your home uses.
- Panel Mounting: The panels are hoisted up—sometimes using a ladder lift—and secured to the racking rails.
- Grounding: The entire system is grounded to protect against electrical surges and lightning strikes.
For a deeper dive into these technical steps, see Solar Energy Made Simple. You can also find a localized perspective in our article on What to Expect During a Solar Installation for Your East Tennessee Home.
Equipment and Financing Considerations
Choosing the right gear and the right way to pay for it is just as important as the installation itself.
Equipment Selection
Not all panels are created equal. We look at efficiency (the best on the market hit about 22.8%), durability, and aesthetics. But it’s not just panels—you might want to integrate a backup generator or an EV charger. As East Tennessee’s energy experts, we can bundle these into a single solar installation process.
Financing Your System
There are several ways to go solar, and each has its pros and cons.
| Option | Ownership | Tax Credit Eligibility | Upfront Cost |
|---|---|---|---|
| Cash Purchase | You | Yes (30% ITC) | High |
| Solar Loan | You | Yes (30% ITC) | Low/Zero |
| Lease | Third Party | No | Zero |
| PPA | Third Party | No | Zero |
The Federal Investment Tax Credit (ITC) is a massive benefit for owners, currently offering a 30% credit on the total system cost. For those looking to bundle solar into a home purchase or renovation, the Fannie Mae HomeStyle Energy Mortgage is an excellent tool.
We highly recommend choosing a company with NABCEP certification. This is the “gold standard” in the industry, ensuring the team working on your roof has met rigorous national standards. You can read more about these choices in our Residential Solar Solutions Guide.
Post-Installation: Inspection and Energization
The panels are on the roof, but you can’t flip the switch just yet! The final phase of the solar installation process is all about safety and official approvals.
The Final Problems
Once the physical work is done, we schedule a final inspection with the local building department. They check that everything matches the permitted drawings and meets the National Electrical Code.
After the city or county signs off, we notify your utility provider (like KUB or TVA). They will often install a new “net meter” that can spin both ways—measuring the power you take from the grid and the excess power you send back. Finally, the utility issues “Permission to Operate” (PTO). This is the moment you’ve been waiting for!
Monitoring and Maintenance
Once energized, you can track your system’s performance through a Wi-Fi-connected app. You’ll see exactly how many kilowatt-hours your roof is churning out. While solar is low-maintenance, we recommend a quick visual check after major Tennessee storms. With a typical 25-year warranty, your system is built for the long haul. For more pro tips, check out From Sunlight to Savings: Expert Tips for Solar Installation.
Frequently Asked Questions about Solar Installation
How long does the physical installation take?
The actual “boots on the roof” part of the solar installation process usually takes 1 to 3 days. A standard 7kW to 10kW residential system can often be finished in two days. Factors like roof steepness, weather (we can’t install in heavy rain or high winds!), and system complexity—like adding battery storage—can add a day or two.
Can I install solar panels myself?
Technically, yes, but we strongly advise against it. DIY solar carries significant risks. You’re dealing with high-voltage electricity and structural roof work. One wrong bolt can lead to a leak that costs more than the solar savings; one wrong wire can cause a fire. Furthermore, most manufacturers will void your warranty if the system isn’t installed by a certified professional, and many utilities won’t allow a DIY system to connect to the grid. To see why professional help is the way to go, visit our Residential Solar page.
What happens if a solar company goes out of business?
This is a common concern. In the industry, if an installation company undergoes restructuring, service contracts and assets are typically managed by specialized management firms to ensure continuity. Your warranties are usually backed by the equipment manufacturers (like Enphase or Q-Cells), not just the installer. By choosing a local, stable partner like Your Home Solar, you minimize this risk and ensure you have someone to call for years to come.
Conclusion
The solar installation process might seem like a long journey, but with the right partner, it’s a seamless transition to a more sustainable lifestyle. From the initial shading analysis in your backyard to the final “Permission to Operate” from your utility, every step is designed to ensure your home is safe, efficient, and ready for the future.
At Your Home Solar, we pride ourselves on our deep roots in East Tennessee. Whether you are in Knoxville, Oak Ridge, or anywhere in the Tennessee Valley, we are here to provide custom, reliable, and rewarding installations. We don’t just put panels on roofs; we build long-term relationships based on 100% customer satisfaction.
Ready to start your journey? Power Your Home with Top Solar Installation Services today, or take a closer look at Our Process to see how we make solar simple for you.